System Settings Editor Time Tab
- Thomas Sherman (Deactivated)
- Emily Lee (Unlicensed)
- Shivam (Deactivated)
- Former user (Deleted)
The time tab is used for setting up email alerts, defining the look and feel of the dashboard, defining what information must be included with time cards, and actions that are possible with time cards.
Additional Resources
This form is reached from the Administration Tab | Setup Subsection | System Settings Heading | Time tab and clicking edit

Permissions and Settings
To make changes on this tab you need the global permission System Settings set to Update.
A missing hour is the difference between your normal working hours and your submitted or approved time. For example, if you have one holiday in a week then your normal working hours would be 32. If you have 26 submitted or approved time cards for that week, you are missing 6 hours. Draft, rejected, or time simply not entered all contribute to this total.
Reporting Time Increment
This is the granularity with which people can enter their time. If you only want people to enter time in half hour increments, then set it to 30 minutes. Your available options are 60, 30, 15, 12, 6, 3, and 1 minutes. The last option, 1 minutes is only available if another setting on this page, Display hours as, is set to Hours and Minutes. The reason being, that Projector wants to show time in whole units. If your hours are displayed as decimal (3.25 hours), and you can enter 1 minute increments, then Projector would need to show 1/60 of a minute or .016667 increments. These numbers don't make much sense displayed like this. Rather, displaying as 0:01 is much cleaner.

If you change this setting, anyone with a current time entry session will continue to use the old value until they log in/out of the system. Any existing time cards using the old value may still be submitted. There is no auto-rejection of time cards for violating the time increment rule.
This setting is for reporting time. If you are scheduling time out into the future, that granularity is controlled from the System Settings Editor Scheduling Tab.
Email Alerts
Configure your installation to email people who have time needing their attention.
Missing, Draft, or Rejected Time Alerts
This section configures when email notifications go out for missing, draft, and rejected time cards. Missing time notifications go out for eight weeks and then stop. Reason being, there are legitimate reasons why time may be missing and we don't want to pester people forever. Rejected and Draft warnings do persist forever. Reason being, if the time is there it is likely legitimate and needs to be recorded so that you have accurate metrics.
Three different email notifications are available. Emails can be sent:
- Weekly - for specific days of the week. Often Monday is chosen so that users get their time for the previous work week entered.
- Monthly - often sent the first day of a new month so that users get their time in for month end close.
- Accounting Period -
Missing Time - the difference between your working hours and your submitted or approved time. For example, your working hours are 40 per week. If you have less than 40 approved + submitted hours then you are missing hours. If the week had a holiday in it, then you would only be expected to work 32 hours. Any hours in Draft or Rejected status do not count towards your working hours. They must be submitted or fixed and submitted before they count.

Tick the checkbox for 'Only alert for missing time greater than or equal to 'X' hours' so that resources do not receive missing time alerts (emails to resources and web notifications) unless the missing time exceeds the threshold.
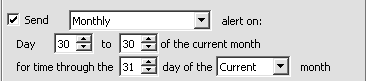
Email Alert Configurations
As the number of days vary from month to month, an adjustment was made so that if you choose ‘day 31’ the system will send notifications on the last day of the month, regardless if the month has less than 31 days.
In summary:
- Enter day 1-28 = emails being sent on the specific day of the month selected
- Enter day 29 = emails sent 2 days prior to the last day of the month selected
- Enter day 30 = emails sent 1 day prior to the last day of the month selected
- Enter day 31 = emails sent on the last day of the month selected
The following examples show the configuration of various settings and its result.
- Often organizations send notifications on the last day of the current month and the first day of a new month so that users get their time in for month end close.
To achieve this outcome set the following controls to:

- Enter day 1-28 = emails being sent on the specifiic day of the month selected

- Enter day 29 = emails sent 2 days prior to the last day of the month selected

- Enter day 30 = emails sent 1 day prior to the last day of the month selected
In the lower section choose between Week and Day for your Calculate missing time by option. Missing time is based on the number of hours someone is supposed to report per week or per day. The week option looks at the week as a whole. So if I leave work early on Friday, but put in extra time on Tuesday I won't get a warning email. The day option requires that every single day a certain number of hours are reported. To determine the number of hours a resource is supposed to work, see their resource profile.
Rejected and draft emails are sent until the time is either deleted or submitted. Missing time is sent for the previous eight weeks only. The distinction was made because draft and rejected time is active data that should be properly triaged. Therefore we never give up on it. Whereas missing time may be purposefully missing. In which case we eventually give up.
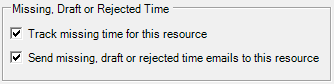
Just because you tick the checkboxes above does NOT mean that emails are guaranteed to go out. In addition to enabling emails here, you must enable them on individual resources. Edit their resource profile and make sure you tick the Track Missing Time for this resource and Send missing, draft, or rejected time emails to this resource checkboxes.
Missing Time Example Email
Dear Tom Sherman,
You have missing, draft or rejected time in the following weeks:
- 17-Sep-2012 (https://secure.projectorpsa.com/TimeEntry/timeentry.aspx?periodStartDate=17-Sep-2012)
40 hours currently in draft stateProjector account: PPSA (Projector PSA, Inc.)
This email was automatically generated. Please do not reply directly to this message.
Time to Approve
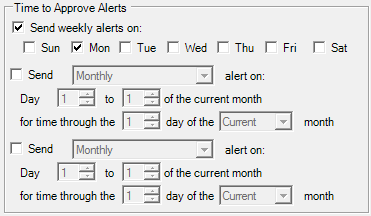
Once time is submitted, it moves out of the hands of your resources and into the hands of your time approvers. Tick the Send time to approve alerts on checkbox and tick each day of the week you would like an email sent out. In the screenshot below I chose Monday because I expect time to be in by end of day Friday. Emails are sent when time cards meet the following three criteria.
- There are unapproved time cards
- The accounting period is open for time
- Work date is < 52 weeks from current date
See our Time and Expense Approval how-to to learn how to configure who your time approvers are.
Time to Approve Example Email
Dear Jane Doe,
You have time waiting for your approval:
Summary by week:
- 21-May-2012 (10 hours)
Summary by project:
P001001: Rocket Propelled Roller Skates(10 hours)Summary by resource:
- Wile E. Coyote (1 hours)
Projector Web
These settings govern what your employees see when they visit their dashboards and time entry screens.
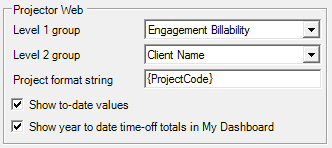
Groupings
Groupings allow you to group your projects by different criteria in time entry. The settings you choose here affect the display of projects for everyone who uses time entry. Users cannot override these settings at the individual level. In the screenshot below you can see how I have chosen a primary grouping of Billable/Non-Billable (dark gray bars) and a subgrouping of Client Name (light gray bars). Notice how the hours roll up to give you subtotals. You can't see it in the screenshot, but if you expanded the light gray bars you would see individual projects and tasks listed, along with the hours for each.

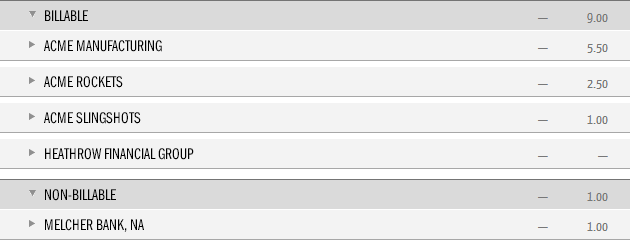
You can group/subgroup by the following choices. If you want to keep the interface simple, then use no groupings. If you have a lot of simultaneous projects, then the groupings and the ability to expand/collapse them will help you filter the noise.
- Engagement Billability (default)
- Client Name
- Engagement Type
- Engagement Name
- (no grouping)
Project Format String
When viewing projects in time entry, this setting determines additional information you would like to see next to the project name. In the example screenshot below, you can see that I show the Project Number after the name.


You can enter a mix of shortcodes and regular characters to display in a format of your choosing. For example : {Project Code} would display Acme : P001001-001.
| Data to Show | Shortcode |
|---|---|
| Project Code | {ProjectCode} |
| Project Name | {ProjectName} (we already show project name so this would be redundant) |
| Project Description | {ProjectDescription} |
| Engagement Code | {EngagementDescriptor.EngagementCode} |
| Engagement Name | {EngagementDescriptor.EngagementName} |
| Client Name | {EngagementDescriptor.ClientDescriptor.ClientName} |
| Engagement Manager First Name | {EngagementDescriptor.EngagementManager.FirstName} |
| Engagement Manager Last Name | {EngagementDescriptor.EngagementManager.LastName} |
| Engagement Manager Middle Name | {EngagementDescriptor.EngagementManager.MiddleName} |
| Engagement Manager Display Name | {EngagementDescriptor.EngagementManager.UserDisplayName} |
| Engagement Manager Email Address | {EngagementDescriptor.EngagementManager.EmailAddress} |
| Engagement Manager Reference System ID | {EngagementDescriptor.EngagementManager.UserReferenceSystemId} |
| Engagement Type Name | {EngagementDescriptor.EngagementTypeDescriptor.EngagementTypeName} |
| Engagement Type Short Name | {EngagementDescriptor.EngagementTypeDescriptor.EngagementTypeShortName} |
| Engagement Type Billable Flag | {EngagementDescriptor.EngagementTypeDescriptor.BillableFlag:GroupingBillability} |
| Project Location Name | {LocationIdentity.LocationName} |
| Project Manager First Name | {ProjectManager.FirstName} |
| Project Manager Last Name | {ProjectManager.LastName} |
| Project Manager Middle Name | {ProjectManager.MiddleName} |
| Project Manager Display Name | {ProjectManager.UserDisplayName} |
| Project Manager Email Address | {ProjectManager.EmailAddress} |
| Project Manager Reference System ID | {ProjectManager.UserReferenceSystemId} |
| Project Stage Name | {ProjectStageIdentity.ProjectStageName} |
Show to-date Values
Tick the Show-to-date checkbox to show each type of time-off you have taken as well as how many days you have used so far.

Show to-date values shows the total number of hours you have contributed to a project over the current year.

Show year to date time-off totals in My Dashboard creates a new area on your My Dashboard which shows this years and last years time-off.
In addition, on time entry pages it controls display of how many hours you have entered against a project.
Additional Options
These additional settings cover additional aspects of time entry. Please see the table below for an explanation of each.
Setting | Description |
|---|---|
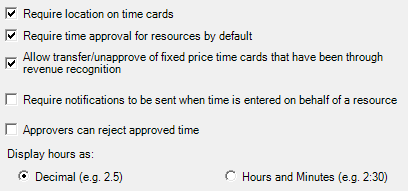
Require location on time cards | Tick this checkbox to require users to enter the location where time was worked |
Require time approval for resources by default | Tick this checkbox to force the Timecards require approval checkbox to be ticked for all new resources. |
Allow transfer/unapprove of fixed price time cards that have been through revenue recognition *Note: This field is being deprecated. | Projector recommends leaving this checkbox unticked. When ticked, it allows users to transfer time away from a project that has been through revenue recognition. The reason we block this by default is that transferring a revenue recognized time card causes that revenue to go to zero. For example, if my time card has $100 of recognized revenue and I transfer it, it will have $0 afterwards. This causes the actual revenue on time cards to be out of alignment with revenue recognition. For example, you ran revenue recognition for $1000, but there is only $900 on time cards now. This is bad. There are only a few situations where you should use this setting.
Aside from the three cases above, Projector recommends reversing revenue recognition, transferring the time cards, and then redoing revenue recognition. |
Require notifications to be sent when time is entered on behalf of a resource | Tick this checkbox so that anyone who enters time for someone else has to send out an email with a note explaining why. In addition to the person who had time entered for them, anyone with the notification Time has been entered on behalf of another resource will also receive an email. See Time has been submitted on behalf of a user for screenshots and more information. |
Approvers can reject approved time | When ticked, people who approve time will also have the option to reject time cards. See the Time Approval Form for more details. |
Display hours as: |
|