Create a Cost Baseline
A cost baseline is the basis for a budget. A baseline can be very simple - this project cannot have costs of more than $5000. Or very complex - this project has a senior sales rep and a junior sales rep. Each is budgeted a specific amount of money per diem. This help document guides you through the baseline creation process.
Additional Resources
The Topic of the Day: Budgets webinar is a great resource to learn about best practices around creating, tracking and monitoring budgets in Projector. (go to 19:20)
This form is reached from multiple locations:
- The Project Budget Tab, cost subtab, of the Project Editor
- The Project Cost Planning Tab by choosing Create Cost Budget Baseline from the multi-select dropdown
Permissions and Settings
To create or edit a cost baseline you must have at least one of the following permissions:
- Be the engagement manager
- Have the cost center permission Maintain Projects and Engagements
- You are a Project Manager and the current stage allows you to Edit Baselines
The Wizard
The wizard consists of four tabs described below. You can navigate between the tabs by using the Back and Next buttons. When creating a new baseline, it often makes sense to start with the leftmost tab and work your way right.
You can have multiple baselines, so choose a name that will allow you to differentiate between them. For example, you might have a baseline that shows a budget broken down by Resource or by Task. Your name should reflect this.
To open the wizard go to a project's budget tab. Then choose the cost subtab. Finally click the Create New Baseline button in the lower left.
Once the parameters of a baseline have been specified, they cannot be edited. You can only make the baseline inactive or delete it. Both of these actions are performed using the Baseline Browser. If you need to update your plan then you should create a new baseline and base it on the Current Active Baseline setting on the info tab.
Info Tab
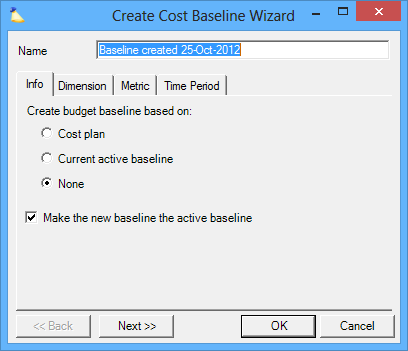
The most important thing to take away from the info tab is that you are specifying whether your budget numbers should be prepopulated. For example, I want to create a new budget and prepopulate it based on the cost plan. Or, I don't want Projector to populate my budgeted amounts for me. I will do it myself.
Checkbox | Description |
|---|---|
Create budget baseline based on | The budgeted money can be prepopulated based on one of the data points described below:
|
Make the new baseline the active baseline | Check this box to make this baseline the active baseline after it is created. Useful when you are replacing the current plan with a new one. Untick this checkbox if you are adding additional budgets for informational or planning purposes only. |
Dimension Tab
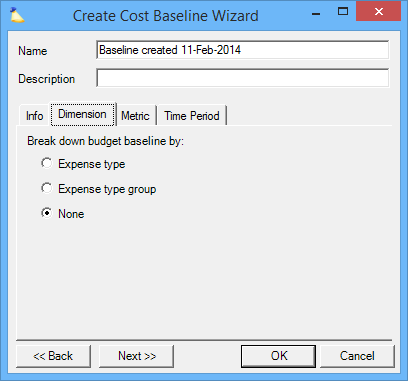
A dimension breaks down a metric into more granular detail, in this case expense types. For example, you could create separate budgets for Travel, Meals, and Entertainment. If the options on this tab are grayed out, then you have chosen to copy the Current Active Baseline on the Info tab. As Projector cannot reliably translate between say departments and resources, you are locked into the current dimension type.
Dimension | Description |
|---|---|
Expense Type | Populated based on each expense type in your installation |
| Expense Type Group | Populated based on each expense type group in your installation |
None | Don't break down the budget any further |
Metric Tab
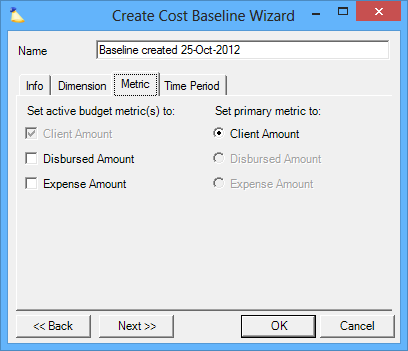
Tick the checkbox next to each metric you want to track. See the grid below for an explanation of each. Choose a radio button for the primary metric. The primary metric is shown in reports and dashboards. If an active metric option is grayed out, it is because the primary metric radio button is ticked for it. Choose a different radio button as appropriate.
Active Metrics
Tick the checkbox next to each metric that you want to track for budgeting. Typically for a fixed price project you would be interested in Resource Direct Cost or Hours. Whereas for a T&M project you would be interested in Billing Adjusted or Contract Revenue.
Active Metrics | Description |
|---|---|
Client Amount | Amount that the client is responsible for paying |
Disbursed Amount | Amount that is put towards expenses, regardless of who pays for them |
Expense Amount | Amount that the company is responsible for paying |
Primary Metrics
Choose a radio button for the primary metric. The primary metric is used for display in the Project Dashboard and in Reporting. It should represent the metric that you most often want to see or be used for checking project performance.
Time Period Tab
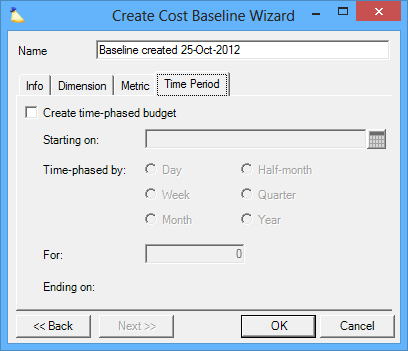
This optional setting allows you to time phase your budgets. For example, you might want to budget $1000 for each month of a project. Leave this checkbox unticked if you don't care about time phasing.
Control | Description |
|---|---|
Starting On | Enter a start date for the budget |
Time Phased By | Choose the period by which the baseline will be phased:
|
For | Enter the quantity of units for which the budget will extend. For example, if you chose Week from the Time-phased by section, enter the number of weeks. |
Ending On | Based on the information entered above, Projector will automatically calculate the end date |


