Project Roles Tab
A role serves several functions within Projector, but at its core it represents demand for labor. This demand is supplied by a resource. For example, you may have a project that requires a Team Lead, Writer, and Social Media Manager. So you create a role for each one. These roles are then staffed by Sally, Joe, and Henry.
A useful analogy to understand Projector roles is to think of an actor/actress. Just like you have actors in a play, you have actors on a project. Each actor has a role. Some people may even have multiple roles in the same play. It is the director's job to identify all the roles and assign the appropriate actor/actress. In keeping with this analogy, a project is like a script. A script defines all the parts and what will be said. In the same way a project defines everything that must be done and who will do it.
Roles also have functional purposes. Some of their commons uses are:
- Limit who is allowed to work on a project
- Schedule out all the work that must be done on a project
- Setting billing rates
See the Roles MP page for a higher level introduction to roles.
This tab is reached by opening a project and selecting the Roles tab.
Permissions and Settings
The following people can create new roles and delete existing roles
- Engagement and Project Managers with the stage permission Project Managers can Create Roles
- Users with all three of the following:
- stage permission Users with Permissions can Request Resources
- the cost center permission Request or Schedule Engagements for the engagement's cost center
- the cost center permission Request or Schedule Resources for at least one cost center
- Users with all three of the following:
- stage permission Users with Permissions can Schedule Resources
- the cost center permission Request or Schedule Engagements for the engagement's cost center
- the cost center permission Request or Schedule Resources for at least one cost center
- Roles may be implicitly created if the project is open for time entry from all resources
- Roles may be implicitly created if time is transferred to the project and a destination role does not already exist
The following people can edit role names, start dates, and end dates
- Anyone with the cost center permission Maintain Projects and Engagements
- Engagement/Project Managers
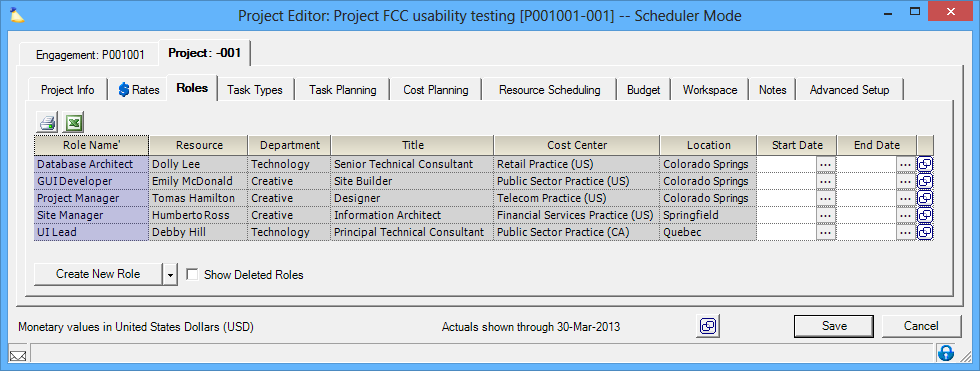
Roles Grid
The tab contains a grid where each row is a role on the project. A role can only belong to one resource. However, the resource can have multiple roles. So Tom can act as both an Engineer and a Tester on the same project. You may also have (unassigned) roles. These are roles where you have specified the type of person you would like to do the work, but do not yet know who it will be. Unassigned roles allow you to plan out your work and fulfill the needs at a later date.
The grid below explains each column in the grid.

| Column | Description |
|---|---|
| Role Name | The name for the role, such as 'programmer' or 'designer'. How you name your roles is up to your organization, but keep in mind the following. Projector's default A200 and A300 invoice templates display the resource's role name for the client. For this reason you may want to use customer-facing role names. For example, you call your documentation people 'writers' internally, but your client expects them to be called 'copywriters.' Other organizations may want to match the resource's title with their role name. Some projects are open for anybody to submit time. If someone submits time to the project who does not yet have a role, one is created on the fly by Projector. These dynamically created roles default to the resource's display name. |
| Resource | This will be either a resource's name or 'unnamed.' An unnamed role has not yet had someone assigned to it. It is a placeholder until such a time that an allocation can be made. |
| Department | The resource's department. In the case of an unnamed role it will be the requested department. The department displayed depends on a few items. The reason it may vary, is because a resource's department may change mid-project. So we do our best to guess the most appropriate department. If we guess wrong, you can override the through the role editor.
|
| Title | The resource's title. In the case of an unnamed role it will be the requested title. This column always reflects the resource's actual title. Projector has the ability to override the title used for billing by editing the role. This override does not affect the display of this column. The title displayed depends on a few items. The reason it may vary, is because a resource's title may change mid-project. So we do our best to guess the most appropriate title. If we guess wrong, you can override the through the role editor.
|
| Cost Center | The resource's cost center. In the case of an unnamed role it will be the requested cost center. The cost center displayed is the resource's department as of their role start date. If they have no start date, then it will be as of the project's start date. Reason being, we assume that at the start of the role/project was the intended department/title for the duration of the project. If an update is required, you can make a new role with a later date or you can edit the role and put in an override. |
| Location | The resource's location. In the case of an unnamed role it will be the requested cost center. |
| Start/End Date | This feature is useful if your organization uses contractors and you would like to limit his/her ability to enter time on projects. Start and End dates restrict:
Dates must be compatible with:
Use care if setting start and end dates on roles within your project if using detailed task management. Warnings will prevent project changes from being saved if an assigned role to a task has start or end dates outside the task start and end dates. For example, if a task starts January 1 and an assigned role has a start date of January 15 a warning will be generated |
| Click the squares icon or double click in any row to open the Role Editor. The role editor provides access to a number of advanced features like billing rate overrides, visual scheduling, role history, and more. |
Actions
The roles tab allows the following actions.
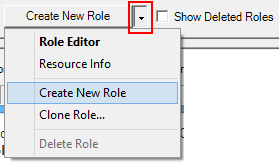
Create Role
To create a new role, click the Create New Role button. If it is not visible, click on the small arrow ( !i ) to reveal the multiselect option list. This opens the Create Role form where you select either an unnamed or named role.
Delete Role
Right click on a role and choose Delete Role. See How do I delete this role if the option is grayed out.
Edit Role
Double click on any grid row to open the Role Editor
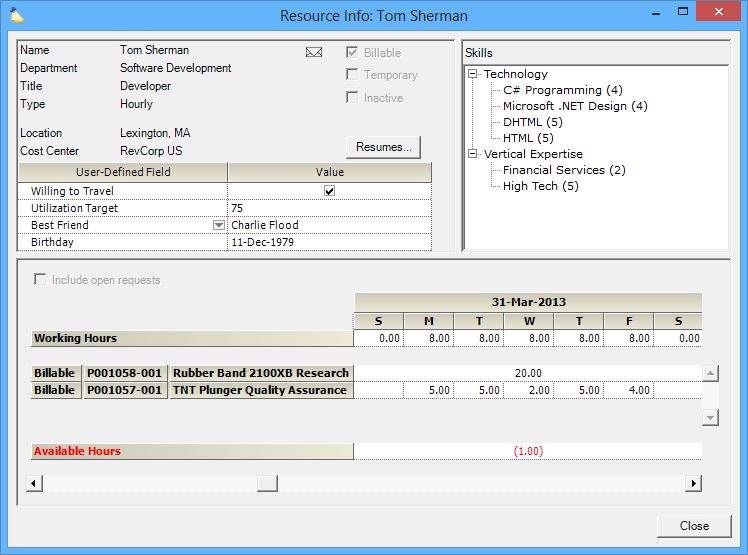
View Resource Info
You can view an overview of a resource by right clicking on a grid row and choosing Resource Info. Projector shows information about current availability, other projects the resource is working on, skills, and more. See the Resource Info Form for an in depth explanation of this form.