Task Plan Tab
- Former user (Deleted)
- Shivam (Deactivated)
- Thomas Sherman (Deactivated)
- Former user (Deleted)
The task planning tab is used to create bottom-up hierarchical project plans. The plan describes individual tasks, with the ability to assign resources, timelines, and deadlines to them. Tasks can also have complex dependencies with leads, lags, and due dates. For a higher level introduction to detailed task management, see the task planning help page.
Additional Resources
- In the Topic of the Day: Managing Projects in Projector Webinar, we provide a general overview of the task management and detailed budgeting features within Projector. (go to 8:45)
This tab is reach from the Task Planning tab of the Project Editor.
Permissions and Settings
The following people can make changes on this tab:
- Engagement or Project managers with the stage permission Edit Tasks
- Anyone with the cost center permission Maintain Projects and Engagements
To access detailed task management you must have the Project Management module enabled.
To turn on detailed task management, tick Enable Detailed Task Management on the Project Info Tab.
The following people can enable or disable DTM:
- Engagement or Project managers with the stage permission Edit Project Info
- Anyone with the cost center permission Maintain Projects and Engagements
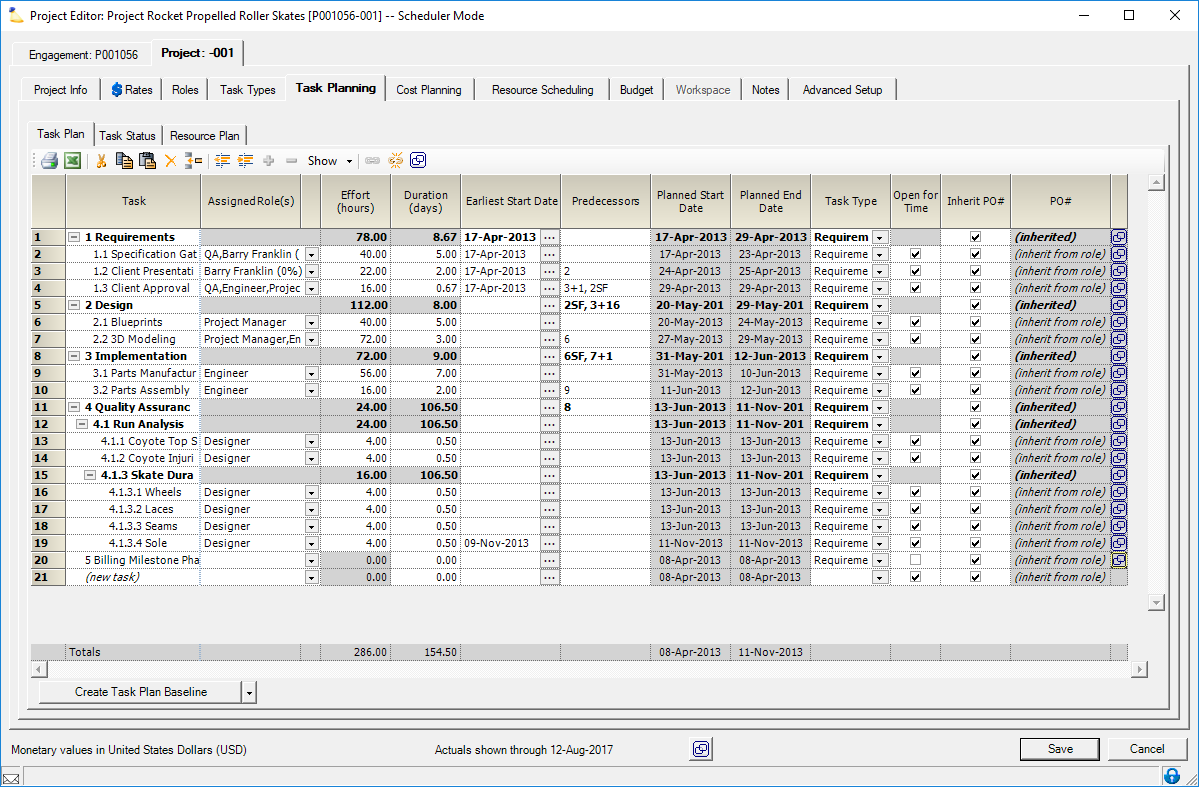
Grid Columns
The following table describes each of the columns in the grid. This is a high level explanation. For more detailed information about the relationships between these columns see the sections below.
Bolded rows indicate a parent task. A parent task represents a roll up of information for all of its child tasks. These rows are read only and cannot be assigned resources or have duration/hours specified.
If you see that a row is grayed out and non-editable then it is a milestone tasks. See the task types section below for an explanation of why.
Column | Description |
|---|---|
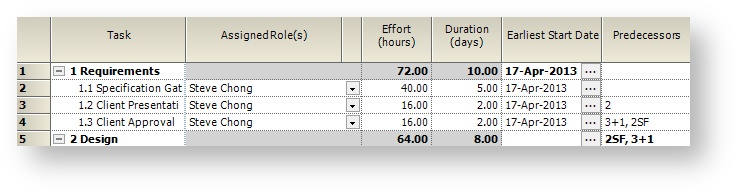
| Row Number | The row number is used to identify unique tasks. These row numbers are entered in the Predecessors column to create intertask dependencies. |
Task | Click in the field to change the name of the task. This name is what your employees will see when choosing tasks to enter their time against. Each name is preceded by a Work Breakdown Structure (WBS) code. |
Assigned Role(s) | Who should be working on this task? Only people assigned to the task can enter time against it. Tick multiple checkboxes to allow multiple roles. The available roles are determined on the Project Roles Tab. |
Effort (hours) | The number of hours expected to complete the task. Make your best estimate, you can modify the estimate later and create a new baseline so you don't lose the details of what changed. This should be the total hours for everyone working on the task. If the task requires ten hours from John and five hours from Jane, then enter fifteen hours. |
Duration (days) | The number of days that will be spent on this task. Working days and hours are defined by the project's location. So if a project is in the USA location it probably has a 5-day, 40-hour week. Hours and days are related. If you have eight hour days, then a sixteen hour task takes two days. The number of hours in a day is set on the Project Info Tab. By default the value is inherited from the project location. |
Earliest Start Date | This is used in conjunction with Predecessors to determine the Planned Start Date. Optionally leave blank. |
Predecessors | Enter a list of comma separated row numbers for each task that is a dependency to this task. Optionally postpend the acronyms FS, SF, SS or FF to define the relationship type. Optionally postpend + or - and a number to define lead/lag times. |
Planned Start Date | The date when work on the task is planned to start. Three things can determine the planned start date. The latest date of the three is used.
|
Planned End Date | Calculated by adding the Duration to the Planned Start Date. If an assigned role has start/end dates outside the task dates then you cannot save the project. |
Task Type | Specify the task type for this task. Setting a parent task type sets the same name on all its children. |
Open for Time | Control whether resources are able to submit time using this Task. Milestone tasks require this box to be unticked. |
| Inherit PO# | When ticked, a PO# is inherited from the role (which in turn may be inherited from the project, engagement, or client) |
| PO# | You can specify your own PO # on this task if the inherit checkbox is unticked |
| Open the Task Details Form where you can enter notes, manage roles, define task interdependencies, and view task completion status. |
Toolbar
The toolbar provides a convenient way to perform several operations. Many actions can be executed on multiple rows at once by multi-selecting them. You can use Ctrl+click to select individual rows or Ctrl+shift+click to select a range.

| Button | Description |
|---|---|
| Open in Excel. Useful for.... ? | |
| Cut | |
| Copy | |
| Paste | |
| Delete selected rows | |
| Insert a new task above the current selected row | |
| Outdent the current selected rows | |
| Indent the current selected rows | |
| Expand the current row | |
| Collapse the current row | |
| Show | Choose which tasks you want to see. Choose milestones to show only milestone tasks. Choose a level to hide lower levels (hiding children). Choose all to show everything again. |
| Link all selected tasks together. A dependency chain will form. So if you have task rows 3, 5, and 7 selected, then 3 becomes a predecessor of 5 and 5 of 7. | |
| The predecessors column is cleared for all selected tasks | |
| Open the Task Details Form |
Tasks
Projector supports several kinds of tasks described in the table below.
| Task | Description |
|---|---|
| Milestone Task | Milestone tasks cannot be used with time entry. They are instead marked complete by a project manager through the project editor. Milestone tasks are either done or not done. For example, you can't set one to half done. Milestone Tasks can be linked to Billing Milestones. When the task is completed, the billing milestone is automatically achieved and can be invoiced. See the milestone tasks section for more information. |
| Billing Milestone Task | This is just a milestone task that has been associated with a billing milestone on the contract tab. When the milestone is marked complete by a project manager, the milestone becomes available for invoicing. |
| Parent Task | Parent tasks are shown in bold. A parent task cannot have allocation, effort, or duration entered. Instead, it contains a rollup of all its child tasks. |
| Child Task | Any task with a parent. Child tasks aren't special. |
| Leaf Task | A task that work can be done on. They appear unbolded and editable in the user interface. Your employees will choose from leaf tasks when entering their time. |
Task Types
Each DTM task is also assigned a task type. This creates a three level categorization system for time.
- Standard Task Type > Task Type > Task
This is done so that when you are generating reports that contain information for both DTM and Non-DTM projects, they can be combined at the task type level.
Triangle Relationship of Assigned Roles, Effort, and Duration
There is a mathematical relationship between Assigned Roles, Effort, and Duration. When you change one, Projector must recalculate one of the other two. For example, you have a task assigned to John. You decide to add Jane to the task too. Why?
- Because the task will take more hours than you thought? Then the effort must be extended.
- Because you want to get the task done faster? Then the duration should be shortened.
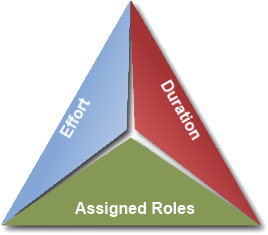
Which of the two values are recalculated can be done automatically or based on your input. To determine which one - choose Set Task Planning Preferences from the multi-select dropdown box. For each action, choose what should happen.
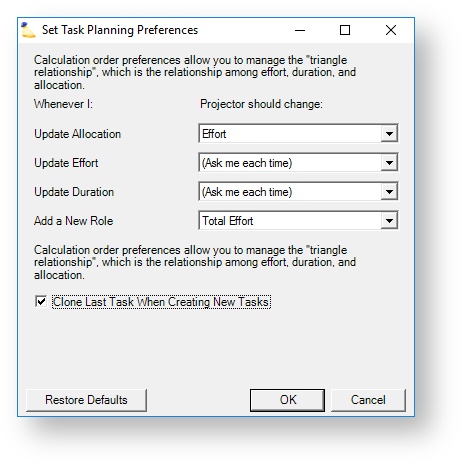
When set to Ask me each time, Projector shows a ![]() icon next to the two options that can be updated. Click the calculator for the value you want to CHANGE. The other value is held constant. Click the
icon next to the two options that can be updated. Click the calculator for the value you want to CHANGE. The other value is held constant. Click the ![]() icon to undo your change and put everything back the way it was.
icon to undo your change and put everything back the way it was.

Clone Last Task When Creating New Tasks - when ticked, a new task inherits the same assigned roles, effort, duration, start date, and task type as the previous task. Predecessors are not copied.
Create a Task Plan
First plan out the level of detail you wish to track by making a list of tasks. Projector can support a large amount of granularity in a task plan, but remember that your time entry users must also choose from all their assigned tasks when entering time. You don't want resources spending as much time entering their time as they are actually working! Once you have a list of all the tasks you should group them in a logical way. Finally start adding each group and each task to your plan.
Add Task
Start typing in the last row of the grid to add a task to the end. Or, select an existing row and click the  icon to insert a row above it.
Enter Name
Your employees will see this name when choosing tasks to enter time against.
Role/Effort/Duration
Specify the roles, effort and duration for this task (triangle relationship). If you haven't specified any roles yet, then do so on the Project Roles Tab. By default Projector smooths allocation percent over your assigned roles. So if there are three people working on a task, all may be set to work on the task half-time. However, you can manually override the percentage and have one person work full time, one half time, and one quarter time. To specify allocations on individual roles click the  icon to open the Task Details Form. On the Role Assignment tab tweak individual role allocation percents.
Start Date
Optionally specify the earliest date this task can start.
Predecessors
Enter the Row Number for other tasks that must be completed before this one can start. You can enter a comma separated list to define multiple predecessors. Projector will automatically detect and prevent any circular references. To save time, multi-select several rows and click the  icon to have Projector auto-fill the predecessor fields. In addition, Projector supports custom link types and lead/lag times.
Link Type
By default, specifying a predecessor indicates that a task cannot be started until a previous task has completed. But Projector supports three additional types of these relationships. Each is described in the table below. You can change the relationship by postpending the predecessor number with the acronym in the table. Optionally click the icon to open the Task Details Form. From there, find the visual editor on the Task Scheduling subtab. Projector supports the following types.
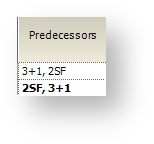
In this example image the first and second row have the link type overridden to SF.
| Link Type | Acronym | Description |
|---|---|---|
| Finish to Start | FS | Task 2 can start only when Task 1 is completed. The default type. Predecessor numbers without an acronym postpended are of this type. |
| Start to Finish | SF | Task 2 cannot finish before Task 1 starts. |
| Start to Start | SS | Task 2 cannot begin until Task 1 begins. |
| Finish to Finish | FF | Task 2 cannot finish until Task 1 finishes. |
Lead and Lag Time
Each predecessor can also have a lead and lag time. This is specified by postpending the predecessor number with a plus or minus sign and the number of lag hours. A + indicates lag. A - indicates lead time.
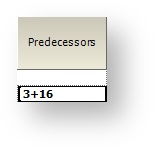
In this example image, a lag of 16 days is specified after task 3 has completed.
Task Type
Specify the task type for this task. This becomes a grouping category for this time. If you don't have any task types then define them on your Project Task Types Tab.
Open for Time
Tick the checkbox to control whether the task is available for time entry. Milestone tasks require that you untick this checkbox.
Milestone Tasks
A milestone task is a special type of task. It is either complete or incomplete. These tasks have a couple limitations.
- Cannot enter time against them
- Cannot have child tasks
With these limitations, how are they useful? A milestone task is most useful for recognizing when a task is binary in nature. It is either done, or not done. A common use case in Projector is to tie a billing milestone with a task milestone. When the task is marked complete, the billing milestone is automatically set to achieved and will be ready for invoicing. This is useful when your project managers do not have permission to edit milestones/contract terms, but you want them to be able to trigger billing events.
Add Task Milestone
On the task planning tab add a new highest level task. It cannot have any children.
- Add a new task
- Clear any roles and effort
- Untick the Open for Time checkbox
- Optionally click the
 icon and set an earliest start date on the Task Details Form

Once a Milestone Task is associated with a billing milestone, the assigned roles column will gray out.

Add Billing Milestone
To have the milestone task trigger a billing event:
- Go to the Engagement Contract Tab
- Create a new milestone
- Choose the milestone's project from the Project Code column
- Choose the milestone task from the Task column. If the task is grayed out in the selection list, then it is not set up properly. See the previous section Add Task Milestone for help.

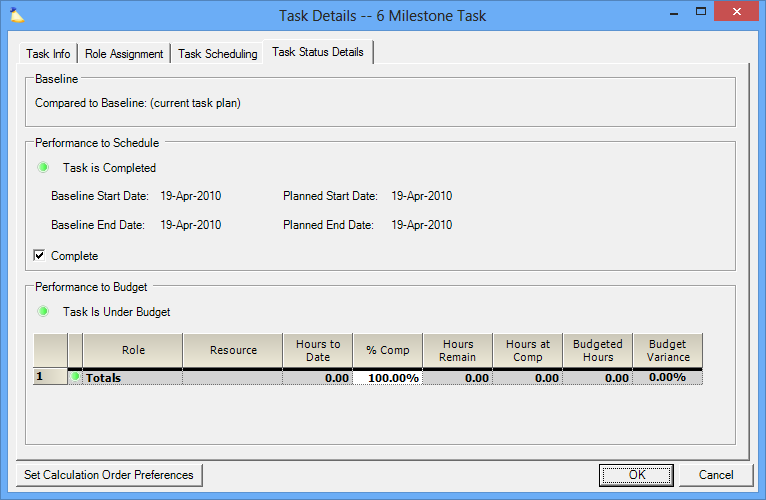
Complete Milestone
Milestones are marked completed by the project manager once they are achieved. To achieve the Milestone Task:
- Click on the icon for the Milestone Task
- Choose the Task Status Details tab
- Tick the checkbox Complete