Zendesk Connector
Projector provides the ability to connect to Zendesk. This page explains how to configure your Zendesk connector. You may need to work with an implementation consultant to fully customize your integration.
If you wish to learn how to use the connectors, please see our How-To article, Workflow Management System User Guide.
To reach this editor navigate to Administration Tab | Setup subsection | External Connectors.
Permissions and Settings
To update settings on this form you must have the global permission System Settings set to Update.
After configuring an external connector, you must associate it with a time card. This is done from the User Defined Fields Editor | subtab Time.
Once the External Connector and UDF are configured, you can start using it in Enter Time and Time Card Import. Also see our Workflow Management System User Guide which explains how this works for your end users.
Configure Zendesk
This section explains how to configure the Zendesk connector.
- Click New to create a new connector
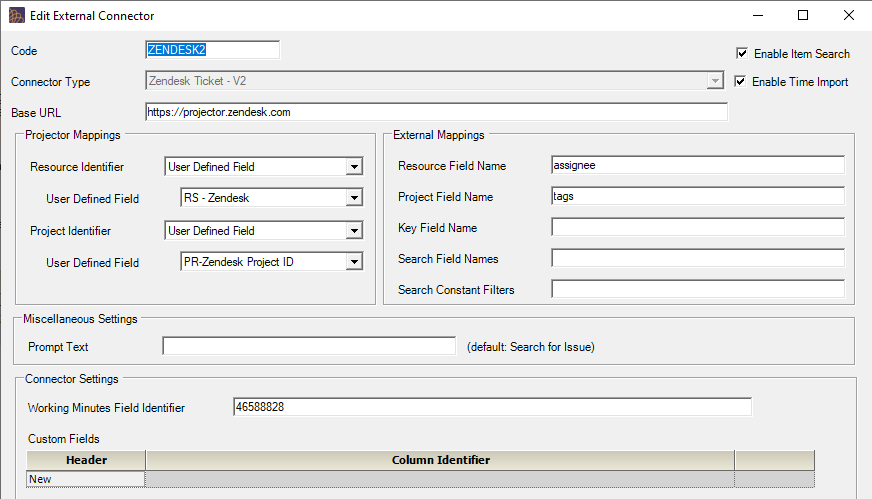
Fill out the form using the settings described in this table.
Field Description Code Use this to uniquely describe your connector. Connector Type Set this to Zendesk2. Zendesk's API is currently on v2. This number may change as they release updates to their software. Base URL The root of your Zendesk instance URL. If you have URL forwarding enabled (zendesk.com forwards to your own domain) - then enter your domain's URL.
Examples:
Enable Item Search Tick this checkbox so that resources entering a time card in Projector can search for and link Zendesk tickets to the time card. Enable Time Import Tick this checkbox so that resources can use Time Card Import to search your Zendesk database and create time cards from Zendesk tickets. Resource Identifier The Resource Identifier represents the resource-related field in Projector that will be used to match a Projector resource to the corresponding Zendesk User.
You can choose from Email address, Display Name, Employee ID, or a user-defined field. If you choose either Employee ID or a user-defined field, that field must contain the Zendesk User ID. To obtain a list of User IDs for Zendesk users, use the following API call in a web browser:
Resource Field Name
This is an optional field used only for the Item Search functionality. It allows you to filter the tickets a resource can search on based on some criteria. It is used in conjunction with the Resource Identifier (the Projector Mapping field discussed above in this table). For example, in this field you might type:
assignee
This tells to Projector to search for Zendesk tickets where assignee = {Resource Identifier}
If you want the resource to see all tickets, not only tickets assigned to them, you wouldn't want to use the "assignee" field.
Project Identifier The Project Identifier represents the project-related field in Projector that will be used to match a Zendesk ticket to the appropriate Projector project. The options here are Project Code or User-Defined Field. Project Field Name
This is an optional field used only for the Item Search functionality. It represents the ticket field in Zendesk that maps tickets to a particular Projector project. Entering a value in this field will allow you to filter the tickets a resource can search on based on the project associated with the time card the resource is editing. This field is used in conjunction with the Project Identifier (the Projector Mapping field discussed above in this table). For example, in this field you might type:
project
This tells to Projector to search for Zendesk tickets where project = {Project Identifier}
Note: “project” is not a native Zendesk ticket field. To learn more about zendesk ticket fields, see: https://support.zendesk.com/hc/en-us/articles/203661506.
Key Field Name Leave blank. This field is not required for Zendesk.
Search Field Names Leave blank. This field is not required for Zendesk.
Search Constant Filters Use this field to append additional querystring parameters to the Item Search. For example, if you only want your connector to find Zendesk tickets created this year:
created>2016-01-01
You can also combine search terms. For example, only find Zendesk tickets that are open and were created this year.
status:open and created>2016/01/01
A full list of search APIs are available here.
Working Minutes Field Identifier If you are using the basic time tracking app in Zendesk, logged time is stored in a custom ticket field called “Time Spent Last Update.” Zendesk requires that custom fields be referenced by ID, so please enter the field ID here. To obtain the custom field ID, use the following API call in a web browser:
Custom Fields As needed, you can add custom fields to the list of fields available during time import. By default, the Zendesk ticket fields that are available during time import are:
Ticket Key
Work Date
Work Hours
Ticket Subject
Ticket External IdentifierIf additional ticket fields are needed, then add them as custom fields. To add a custom field, enter a name for the field in the “Header” column and the field ID as the Column Identifier. To obtain the field ID, use the following API call in a web browser:
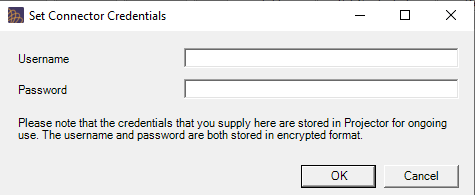
Click Set Credentials. Enter the username/password combination for a Zendesk user.
Now go to the User Defined Fields Editor and associate your new connector with time card UDFs.


