Invoice Editor MP - Cost Card Review Tab
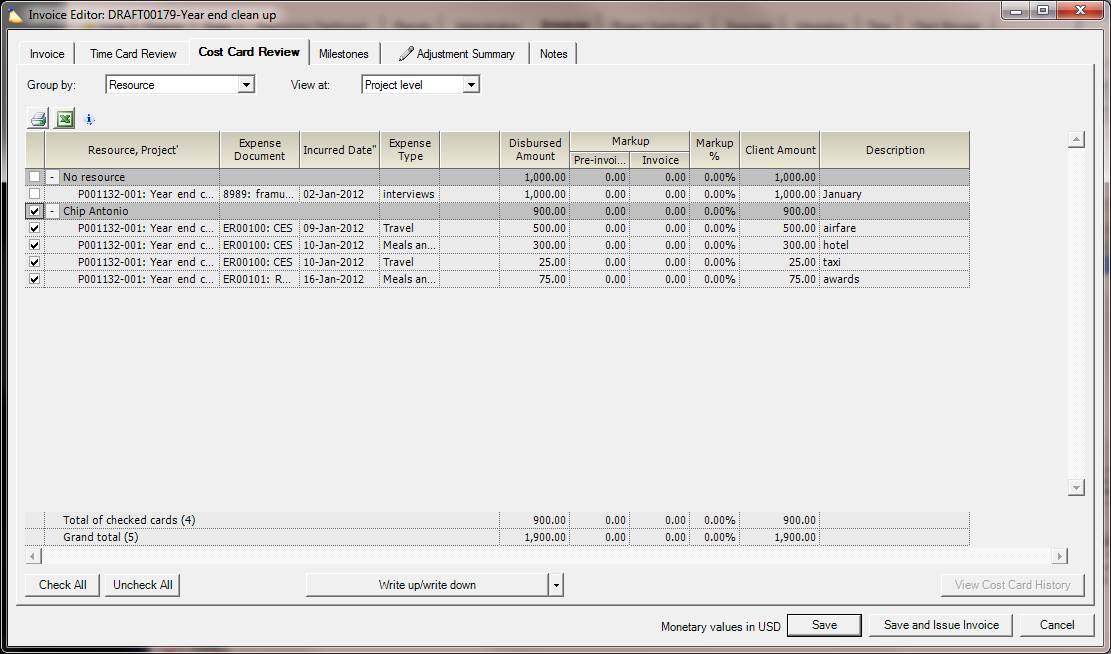
The Cost Card Review tab lists all the cost cards currently included on the invoice. It displays the net effect of all adjustments, access to the history of cost cards, and provides powerful tools to adjust, transfer, add, and exclude cost cards.
The Topic of the Day: Invoicing webinar is a great resource to learn all about creating invoices on Projector Management Portal.
This form is reached by opening an Invoice from the invoice tab, and selecting the Cost Card Review tab.
From here you can easily see how much the employee was reimbursed for the expense and how much the client would get billed for the expense if the invoice was issued as is. Values reflect all pending or approved adjustments, but not rejected adjustments.
You can make cost card adjustments by checking the checkboxes next to each card and selecting an adjustment type from the menu at the bottom of the screen. See the sections below on each of the cost card adjustment types for more information.
Permissions and Settings
To perform adjustments such as write up/down, transfer, split, etc the accounting period must be open for adjustments.
The following people can perform cost card adjustments.
- Users with the cost center permission Create and Approve Invoices
- PMs for all projects on the invoice
Adjustments are queued and only executed once the invoice is issued. There is an exception to this rule, splits and project transfers occur as soon as the invoice is saved.
Display Options
Configure this form to display information in a manner that best suits your needs by using the following tools:
- Group by -- Cards are grouped together by Project or Resource via collapsible buttons
- View at -- Expand or collapse the groups by making a selection from this list
Cost Card Grid
Card information is displayed in the columns of the grid.
Column | Description |
|---|---|
Checkbox Column | The first column contains checkboxes. Check cards that you would like to modify. Modification details are discussed later on in this document. |
Project, Resource | The project to which the cost was reported, and the resource that reported the cost. Collapse or expand or expand groups by pressing the plus ( + ) sign or minus ( - ) sign. |
Expense Document | The name of the expense document (expense report, soft cost or vendor invoice) the cost card is on |
Incurred Date | The date the cost was incurred. This date is specified by the resource when filling out expense reports or by an administrator when creating vendor invoices or soft costs. |
Expense Type | The expense type associated with this card |
Status Icons |
|
Disbursed Amount | The amount that the resource was reimbursed, minus VAT, converted into the Engagement Currency. |
Markup | The amount by which the cost card has been written up or down. Some expense types have .
|
Markup % | The total markup divided by the disbursed amount |
Client Amount | This is the amount that the client will get billed for this cost card. It is calculated by adding the total markup to the disbursed amount. |
Description | The text entered in the Description field by whoever created the cost card. The description can be edited by using adjustments discussed below. |


Totals for the time and financial columns are displayed in the following rows at the bottom:
Total of checked cards | Totals up all the checked cost cards. The number of checked cards is shown in parentheses. |
Grand total | Totals up all cost cards on the invoice. The number of cards on the invoice is shown in parentheses. |
Add Cost Cards
From the multi-select drop down click Include cost cards on invoice. The following dialog is shown where you can search for cost cards to add. Only cost cards that are submitted will be displayed. If a cost card is not yet approved for invoicing then it shows up in results, but cannot be added to the invoice. Review the list of returned cards and check the box beside each card that you wish to include. Checking the box in the first row checks off all cards. Finally click OK to add the cards to the invoice. 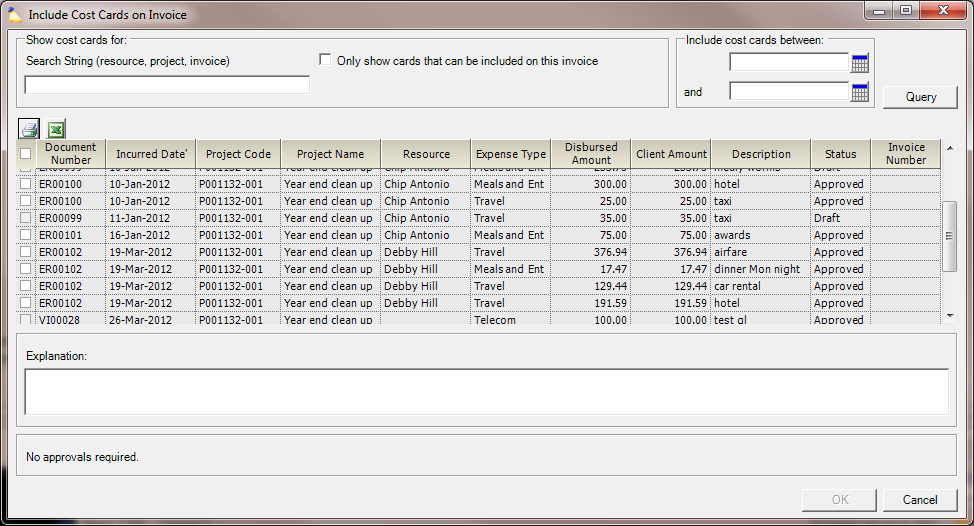
Parameter | Description |
|---|---|
Search string | Projector searches in the following fields
|
Only show cards that can be included on this invoice | Checking this box will find cards ready for invoicing that meet the invoice parameters. Otherwise, submitted, but not approved cards are shown. |
Date Range | Search within a specified date range. Leave either the start or end date blank to search from the beginning or end of time. |
Explanation | Enter a reason for the inclusion of the cards. When viewing card history this note will be viewable. |
Remove Cost Cards
Check the checkbox next to cards that you wish to remove from the invoice. Then from the multi-select dropdown choose Exclude cost cards from invoice. A confirmation dialog is shown detailing the affect on value due to exclusion. The cards values may change due to an exclusion because of previous adjustments. Remember that invoice adjustments are not "real" until it is issued. So any write ups, transfers, etc will be undone.
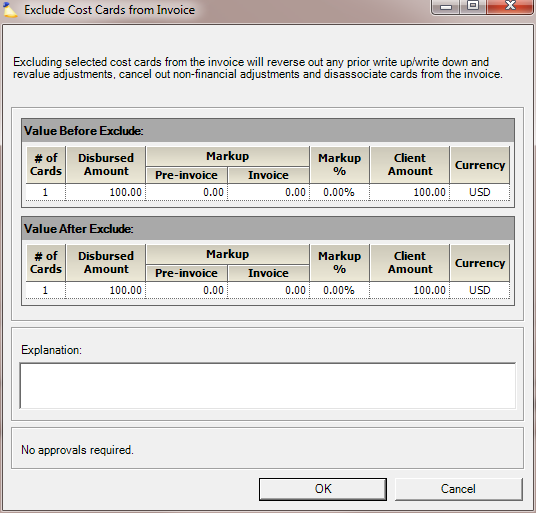
Excludes differ slightly from other adjustments in that it is possible to execute exclusions without requiring approval from both the project manager and finance approver in certain cases. If you have the Create and Approve Invoices cost center permission then you can exclude cards as long as their are no prior adjustments. This allows users who create invoices to be able to fine-tune the cards or cost cards that are on an invoice prior to inserting it into the review and approval workflow.
If there are previous adjustments, or you do not have the cost center permission, then Project Management and Finance approvals will be necessary before the cards are officially excluded.
Credit Cost Cards
Crediting a cost card involves taking a previously invoiced card and creating a credit for it on the current invoice. On the current invoice, the client is charged the net amount of all charges and credits. Like regular cost cards, credits can be adjusted up or down as needed. So for example you could issue a credit for half of a charged card.
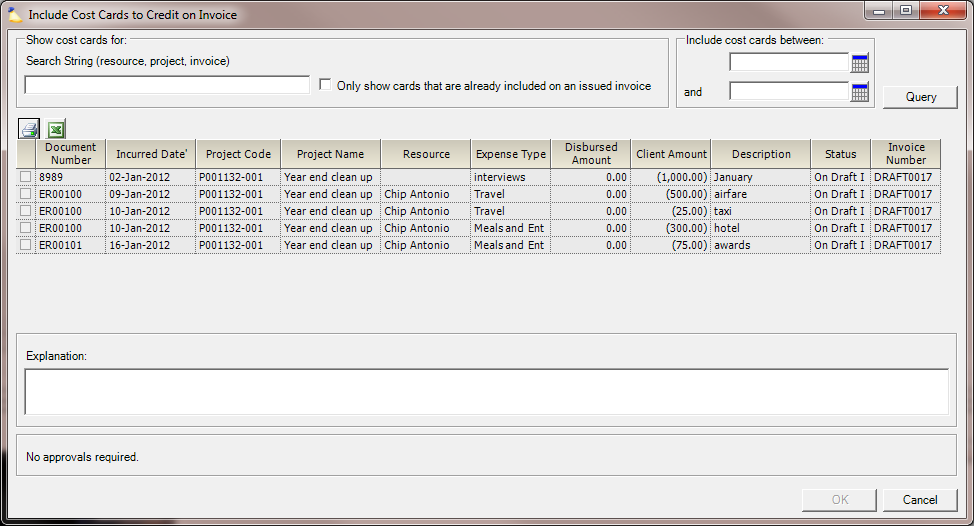
Parameter | Description |
|---|---|
Search string | Projector searches in the following fields
|
Only show cards that can be included on this invoice | Checking this box will find cards ready for invoicing that meet the invoice parameters. Otherwise, submitted, but not approved cards are shown. |
Date Range | Search within a specified date range. Leave either the start or end date blank to search from the beginning or end of time. |
Explanation | Enter a reason for the inclusion of the cards. If the change requires approval by the project or finance manager they will see this message. When viewing card history this note will be viewable. |
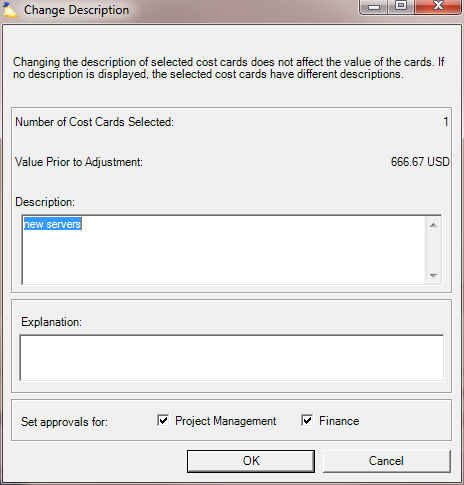
Modify Card Descriptions
The change cost card description adjustment is used to simply modify the descriptive text associated with one or more cards. This adjustment has no financial impact on the cards to which it is applied. You may want to change the description on a card if the current one is inappropriate, not descriptive enough or many other reasons. If the description field is blank when you enter this dialog then either all selected cards have no description or they have different descriptions. After the adjustment all selected cards will have the same, new description.
Adjusting Cost Cards
One of the most powerful features of Projector's invoicing is the ability to modify cost cards on the invoice.
Adjustments are not "real" until the invoice is issued, so you know that as you experiment with which adjustments are best, you are not distorting the reports or dashboards for other users. For more see our FAQ - How come my invoice adjustments don't show up in my reports?
The Adjustment Screen
All cost card adjustment screens share a common layout. There is an upper section that shows the current value of the selected cards. Then there is a middle section where you specify the changes you want made. Finally there is the lower section which details the effects of those changes. The following table describes the various fields you will encounter when adjusting cards. At the bottom of the screen you can optionally set finance and project manager approval if you have sufficient permissions.
Value Before – This section summarizes the details of all selected cards as they currently exist on the invoice. See the cost grid section for an explanation of each column.
Adjustment – This section will vary depending on the type of adjustment. See the adjustment types below for more detail.
Value After – This section summarizes the details of all selected cards after the adjustment. See the cost grid section for an explanation of each column.
Explanation – Explain why the change was made. This could be important if you execute an audit down the road and wish to recall why certain changes were made.
Set Approvals For – Optionally set finance and project manager approval if you have sufficient permissions
- Write Up/Down Cost Cards
- Transfer To Project
- Change Expense Type
- Change Description
- Add Cost Cards on Invoice
- Include Cost Cards to Credit
- Remove Cost Cards
- Split Cost Cards
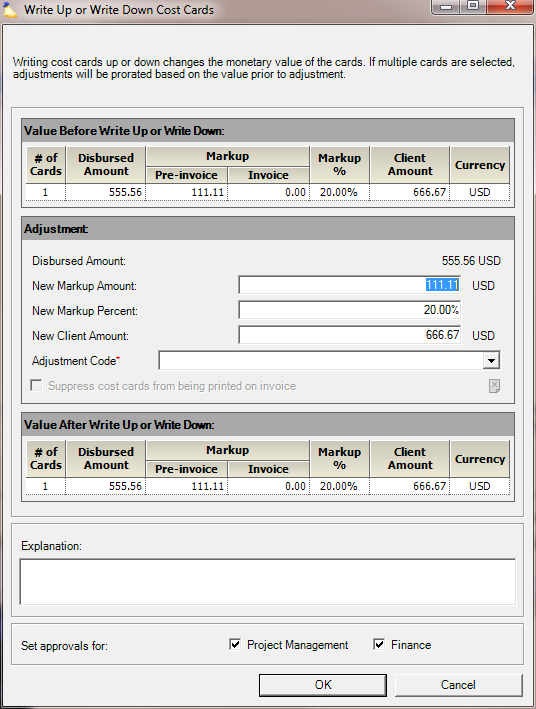
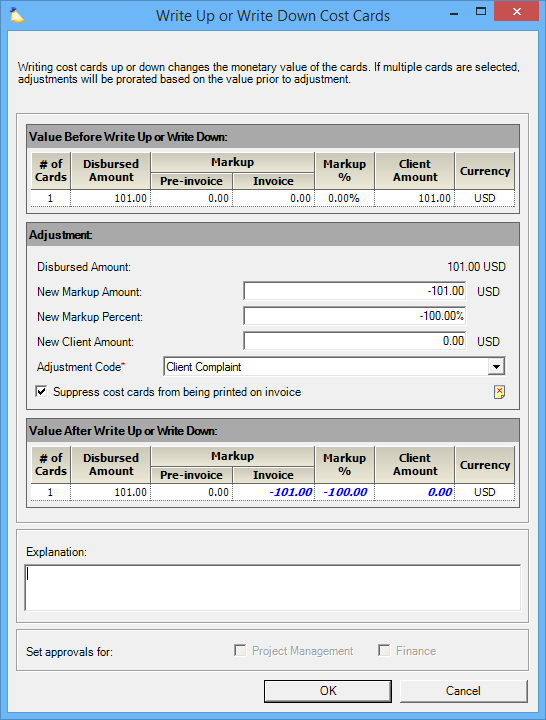
Write Up/Down Cost Cards
Write up or down cards to change the amount that the client will be charged. Changing one field automatically recalculates the others. The adjustment amount will be prorated across all cards being adjusted.
Adjustment | Description |
|---|---|
Disbursed Amount | The disbursed amount of the cards prior to the adjusment. This field is read-only and cannot be changed. |
New Markup Amount | The new monetary value that you would like to markup the cards, using the disbursed amount as a base. |
New Markup Percent | The new percentage by which you would like to markup the cards, using the disbursed amount as a base. |
New Client Amount | The value of the cards after this write up/down. |
Adjustment Code | Choose an adjustment code for this write up/down. Adjustment codes are used within Projector to explain why an invoice has been adjusted. |
Suppress cost cards from being printed on invoice | If the adjustment causes the cards to be worth zero, then you can check this box to suppress the cards from being printed on the invoice. If the system setting Automatically suppress display of zero-amount cost cards on invoice is ticked, then this checkbox is grayed out and will automatically be ticked as necessary. Suppressing a cost card is useful when you do not want the client to know about an expense from an invoice. For example, if a resource had a bar tab that was not authorized by the client, you may write the client amount down to zero and suppress it from the invoice. |
Transfer to Project Form
The transfer cost cards to project adjustment is used to move one or more cards from one project to another. This adjustment type is typically used when a resource has logged time to the wrong project. You also see it used to transfer a cost to a non-billable project if you have agreed to absorb the cost rather than seek reimbursement.
When cards are transferred,
- any changes made on the invoice to the cards are removed
- cards are transferred
If a card is transferred to a project that is not part of the current invoice, it is executed as soon as the invoice is saved with the transfer adjustment in a fully approved state. The cards will then reflect the new project and will be eligible for inclusion on other invoices so that the billing process will not be held up. Once executed, the transfer cannot be undone.
If you attempt to transfer expenses where the card work date is outside of the project start and/or end date, you will be warned that the dates will be adjusted to accommodate the transfer. See Warning - Transferring these cards to this project will cause the open or close date to be adjusted.
![]()
- New Project – The project to which the cards are to be transferred. Press the ... button to choose a project for the transfer.
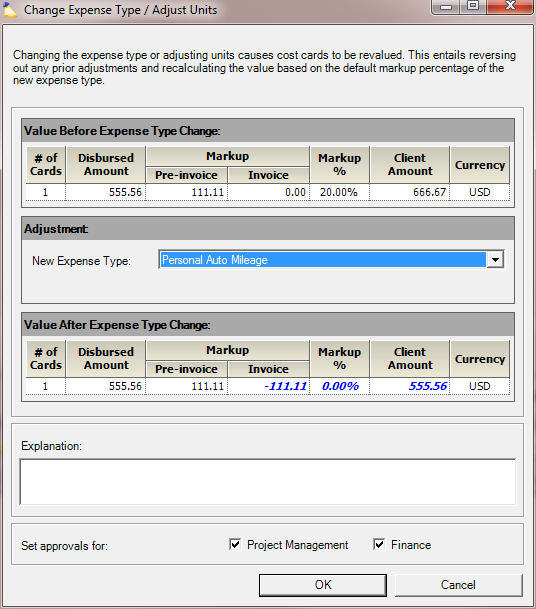
Change Expense Type / Adjust Unit
The change expense type adjustment is used to modify the expense type associated with one or more cost cards. Because the default markup percentage and treat costs as fees setting associated with expense types have a bearing on the value of a cost card, any prior write up and write down adjustments applied to the cost cards will be reversed and the cost cards will be revalued when the adjustment is applied.
Adjustment:
- New Expense Type – Open the drop-down menu to choose a new expense type for the selected cards
Split Cost Cards
A split divides one card into two separate cards. You specify a split percentage and the financial values (disbursed amount, incurred amount, client amount) are spread proportionally between the two. Once a cost card is split, it cannot be be unsplit. From the split on, the cards are functionally separate. As just splitting a card isn't particularly interesting, it is often used in conjunction with another adjustment. For example, you might have a hotel bill that combines your room with your breakfast. The client doesn't want to pay for breakfast, so you split that portion out and perform a write-down adjustment to zero breakfast out. Or, perhaps part of a cost belongs on another project. So you split the cost and transfer some of it to another project.
Unlike other adjustment types, split card adjustments always apply to a single card. If you need to split multiple cards, you need to specify the split percentage on each one. To facilitate this workflow, you can select multiple cards for splitting and then Projector lets you scroll back and forth among all the cards being split.
Split card adjustments do not require approval, and are executed as soon as you save the invoice.
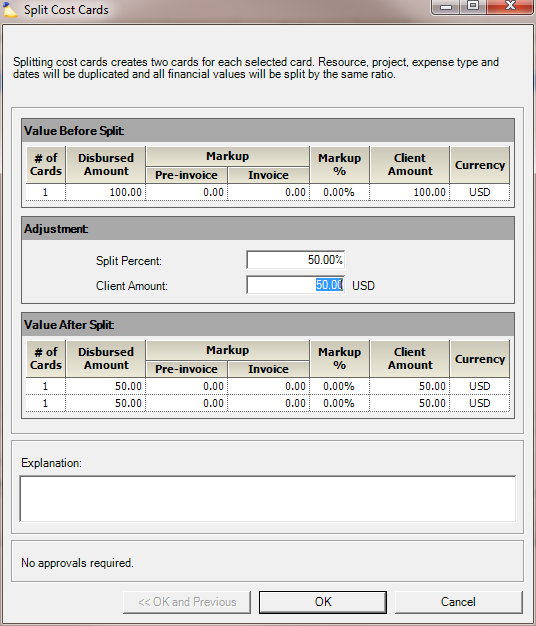
Adjustment – Determine the division of values between the existing card and the new card that will be created. Note that Projector only requires you to enter data in one of these fields, as all other values will be automatically computed.
- Split Percent – The percentage of the cost to be assigned to the existing card after the split
- Client Amount – The client amount that will remain on the existing card after the spilt
Suppress Zero Amount Cost Cards
Sometimes you'll have expenses that pull onto an invoice, but are not to be charged to the client. Therefore you write them down to zero. Some organizations prefer to hide this detail from the client. For example, if your consultant ate lunch at the Four Seasons, maybe you don't want to show that. So instead you write the expense down to zero and choose not to show it on the invoice. Zero amount cards can be suppressed automatically through a system setting, or suppressed on a case-by-case basis.
To suppress a cost card on a case by case basis, choose the write up/down adjustment and tick the checkbox Suppress cost cards from being printed on invoice. This option is grayed out if the client amount is any value besides $0. It is also grayed out if the system setting Automatically suppress display of zero-amount cost cards on invoice is enabled.
Expenses that are suppressed will have a ![]() icon displayed.
icon displayed.

Viewing Cost Card History
Projector enables you to view the history of a card in greater detail. Double click a row to open the Cost Card History.
Sorting Data in Columns
Click on a column heading to sort the data by that column in alphabetical, chronological or numerical (as appropriate) order.
To sort on one column just click on that column's header.
To sort on two columns, click on the column header for the secondary sort first. Then click on the column for the primary sort. So to sort by name, then date: Click date column. Click name column.