How do I email my invoices?
Projector can email your invoices to your clients. These emails look and act as though they were sent by your actual organization. This help document will help you understand what is required to set this up, how to use the feature, and questions that arise surrounding this feature.
Initial Configuration
In order to use this feature you have to ask the support team for help. This is because our IT team needs to configure our mail servers to send emails as you. The support team will ask you whether you want to use a single email address or a domain wide set of email addresses. A single email address is exactly as it sounds. For example, AR@mycompany.com. A domain wide set of emails is everyone at your company. For example, AR@mycompany.com, finance@mycompany.com, or jane@mycompany.com.
Single Email
Registering a single email address is easy. You will receive an email from our email provider with a link in it. Click this link to authorize us to send mail on your behalf.
We strongly recommend using the single email approach and making it something generic like AccountsReceivable@mycompany.com. The reason is that when your clients respond to your emails, you want it to go to an address that will always be there. If you assign it to Sally@mycompany.com and she leaves, now your client gets bouncebacks. Once you have your generic address defined, have your email system forward it to appropriate members of your finance team.
If you need to change the single email address, then you will need to contact the Projector support team and let them know which email needs to be inactivated and which needs to be activated. There may be additional fees associated with this process.
Domain Email
Projector does not recommend authorizing domain wide emails unless you are a large organization that needs to route multiple email addresses to different finance teams. As with the single email option, choose a set of generic email addresses like supportAR@mycompany.com, consultingAR@mycompany.com, etc.
Registering a domain has greater flexibility because we can send emails on behalf of anyone in your organization. As is mentioned in the single email section, be careful of assigning a specific person's email address. If that person were to ever leave your company, then your client will receive a bounceback when responding to their invoice email. To use a domain based approach your IT department will need to do the following.
Choose from one of the following authorization methods
- Email (recommended) – Receive and reply to an email from either postmaster@mycompany.com or administrator@mycompany.com.
- Add the following unique authentication DNS record IN TXT "as=1256051565"
Add a webpage to the root of your website called 1256051565.html. It should contain the following code
<html>
   <head></head>
   <body>
        <p>1256051565</p>
   </body>
</html>
Once your domain is authorized, you may undo any changes you had to make. Then notify the support team of any additional subdomains you wish to add.
When a domain is authorized it does not include subdomains. Subdomains can be added afterwards by contacting Projector support.
Configure SPF Record
Add the following to your SPF record.
include:authsmtp.com
SPF records are a means of making sure that someone sending email on behalf of you is authorized.
We now highly recommend configuring your SPF record. Many organizations now refuse to accept emails if there is not a proper SPF record. This means your clients may not receive your emailed invoices.
About SPF Records - https://www.authsmtp.com/faqs/faq-65.html
You must enter your SPF record correctly. You can check your SPF record through this website by entering your domain name in the first box. For example, mysite.com.
http://www.kitterman.com/spf/validate.html
The most common error we see is creating SPF entries on separate lines. All entries must be on a single line.
Projector Configuration
Once your email addresses are configured, you must make some changes on the Projector side too.
Create "From Users"
The "From User" is who the email is from and who replies go to. This user should have the same email address as defined in the previous step. We strongly recommend that you create and use a generic named user for this step rather than assigning it to a real person. Reason being, if a real person ever leaves the company, all replies to emails sent during their tenure will now be going to a dead email address. You can also encounter cutover issues as invoices created under the old From User cannot and need to be voided and reassigned to the new From User.
In addition to using a generic email address, you should use a client user for invoice emailing. This client user can have no permissions and will likely incur no monthly charges. When creating a client user, you'll need to specify the client associated with that account. You should have a "self client" named after your company. Choose that client. If you don't have one already, make one.
Create "Client Users"
Client Users are people that will receive the emails. To create a new client user:
- Open the User Editor
- Click Create New User
- Fill in the client's first name, last name, display name, and email address. This email address is where your emails will arrive.
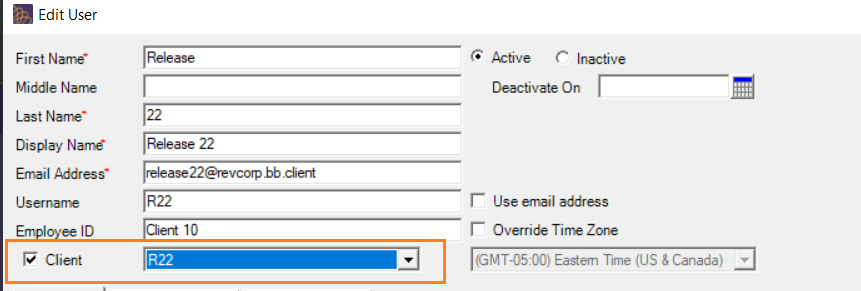
- Tick the Client checkbox. Then find the client.
- Check that the permissions selected are appropriate for this client (typically no permissions are allowed)
- Save
- In the popup box only tick the Send Email notification to user checkbox if the user will be logging into project workspaces. Project workspaces allow your users to view current and past invoices through our website.
Repeat this process for every client and user that will receive invoice emails.
Edit Your Clients
When you create new invoices, they inherit a number of attributes from the client editor, including who the email is from, who it goes to, and whether the invoice is included as an attachment or not. Start by visiting the Client Browser and editing each client that will receive emails.
- On the Billing tab tick the checkbox E-mail and
- Choose a radio button for how you wish to include the invoice
- In the From dropdown list choose who the email is from
- In the Send list choose who the email will go to
- Select the appropriate template
See the Invoice Editor MP - Distribution Tab help page for more information about each of these fields.
Sending an Email
Once you have everything configured to run you can start using Projector to email your invoices.
For each invoice you want to email out, make sure that the distribution tab has the Email and checkbox ticked and that the form is properly filled out with a From and To address.
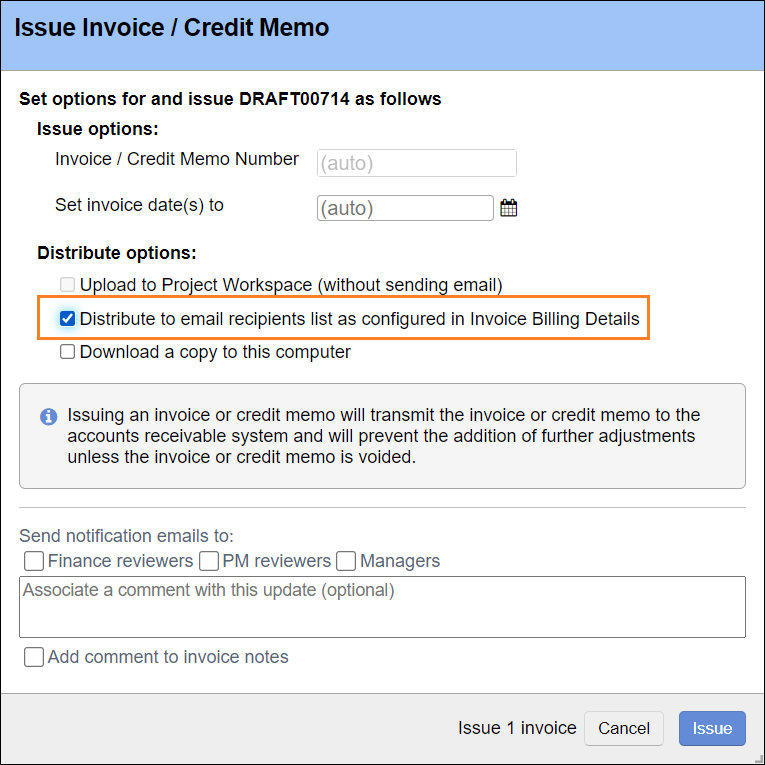
Once an invoice is issued you will be presented with the Issue Invoice Form. Tick the radio box for sending emails and click OK.


