Salesforce.com Evaluation Configuration
The basic configuration is meant for evaluation purposes. Salesforce integration testing should only be done using a Sandbox or Trial installation.
Prerequisites
Salesforce.com Professional Edition or higher
The integration uses your original installation owner's permissions for pushing data into Projector. If your installation owner has changed, then you can contact the support team to have the user updated.
Projector Configuration
Check each setting in this table to ensure Projector is configured correctly.
Step | Description |
|---|---|
Enable the SalesForce module | If it is disabled please contact Projector support to have it enabled. For Revolutionary Solutions Corporation users this will be enabled by default. |
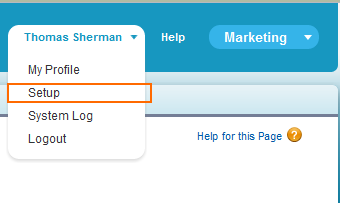
Create a Projector resource for each Opportunity Owner in Salesforce | Opportunity Owner identities are controlled by your Salesforce personal information setting. Each of these should match the Display Name of a Projector resource. In this example image you would need a resource with a display name of Thomas Sherman |
Make sure that you have a USD currency setup | You can view existing currencies and add new currencies from the Currencies and FX Rates Editor. Revcorp trial users can skip this step. |
Make sure that you have a non-zero USD rate card setup | You can view existing rate cards and add new rate cards from the Rate Card Editor. Revcorp trial users can skip this step. |
Create a Department called Staff and a Title called Staffmember in that department | See the Department and Titles Editor. |
Configure SalesForce.com Opportunities
You must configure SalesForce.com to include custom fields for Opportunities. These instructions and screenshots may vary slightly from SalesForce.com as they modify their user interface.
1. Enter Setup
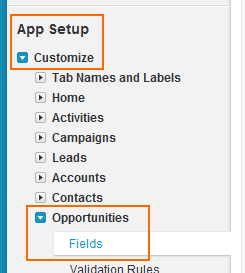
2. Navigate to App Setup | Customize | Opportunities | Fields
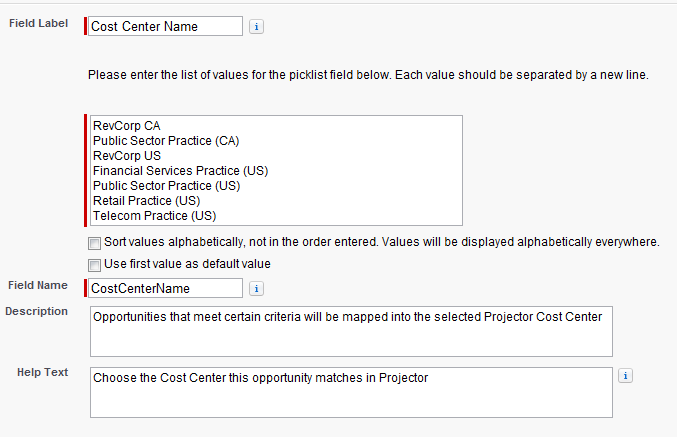
3. You will need to create the following four custom fields for Opportunities.
Field Type | Field Label | Values | Field Name |
|---|---|---|---|
Pick List | Cost Center Name | The name of each cost center in your installation | CostCenterName |
Pick List | Project Location | The name of each location in your installation | ProjectLocation |
Date | Project Start Date | ProjectOpenDate | |
Date | Project End Date | ProjectCloseDate |
3a. Choose New from the Custom Fields panel
3b. Enter the information for each field in the table described above. Do not include the __c seen in the screenshot. This is added automatically by Salesforce.
Trial Users
For Revolutionary Solutions Corporation users you can cut and paste the following default values for Cost Centers and Locations. If you have edited or added to these then you should visit the Locations Editor and Cost Center Editor and enter those values instead.
Cost Centers
RevCorp CA
Public Sector Practice (CA)
RevCorp US
Financial Services Practice (US)
Public Sector Practice (US)
Retail Practice (US)
Telecom Practice (US)
Locations
Colorado Springs
Quebec
Springfield
4. Add Projector engagement types as Salesforce opportunity types. The full name of the engagement type should match the Salesforce type.
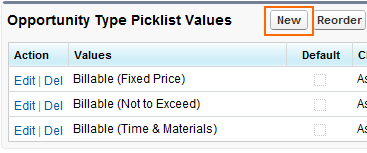
4a. Click on Type
4b. Click on New to add a new value. When complete you should have values similar to those in the screenshot below.
Trial Users
For Revolutionary Solutions Corporation users you can cut and paste the following default values for Engagement Types. If you have edited or added to these then you should visit the engagement type editor and enter those values instead.
Engagement Types
Billable (Fixed Price)
Billable (Not to Exceed)
Billable (Time & Materials)
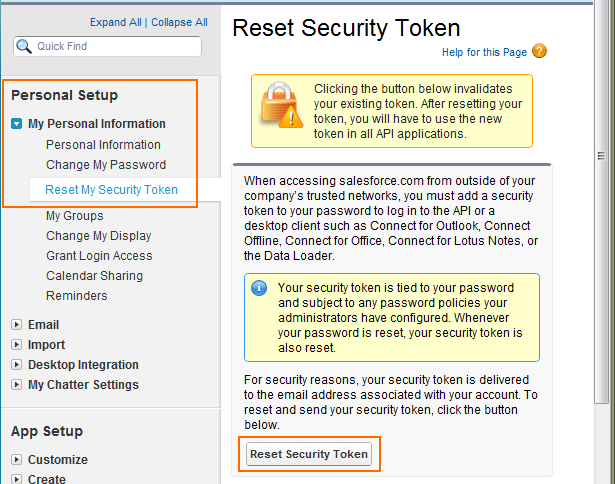
Generate a Salesforce Security Token
Salesforce security tokens ensure that your data is safe when using web services. You can read more at trust.salesforce.com. If you do not already know your security token then generate a new one. If this account is currently using other Salesforce web services then generating a new security token will invalidate old ones.
1. Setup
2. My Personal Information | Reset Security Token
3. Save your security token in a safe place
Create or Modify an Existing Opportunity to Synchronize
The Salesforce opportunity must have the following criteria specified in order to come over to Projector properly. If not all information is correct then some data may synchronize and some may not.
Required Salesforce fields | Description |
|---|---|
Probability | Must be between 25% and 90%. Maps to Projector's % Likelihood field. |
Account | Maps to a Projector Client Name. If a client does not exist with that name one will be created |
Type | This should match an existing Projector engagement type |
Amount | Must be a positive number. This maps to a Projector estimate for Salesforce created projects only. |
Opportunity Owner | Must match a Projector Resource |
Cost Center Name | Must match a Projector Cost Center |
Project Location | Must match a Projector location |
Project Start Date | Becomes the Projector project start date |
Project End Date | Becomes the Projector project end date |
Initiate a Synchronization
- In the Projector Management Portal navigate to the Integration Tab | Salesforce.com section
- Tick Enable automatic import of Salesforce.com data into Projector
- Press Set Credentials
- Enter your Salesforce username
- Enter your Salesforce password and append your security token. If your password = "mypassword" and your security token = "1234" you must enter "mypassword1234".
- Press Start Import Now to manually initiate a synchronization.
- Press the refresh button to check the status of the import.
- The Import Status will change from idle to running to pending and then back to idle. If there is a problem connecting to Salesforce the status will change to disabled. If this happens see the troubleshooting section below.
- The Migration Status will move entities from Total Imported to Pending Migration and finally to either Migrated or Failed Migration. If some of your entities have failed migration please see the troubleshooting section below.
- Your opportunity should now appear in your projects list. If status changes to 'Disabled' then please see the troubleshooting section below.
Troubleshooting
Problem | Solution |
|---|---|
Start Import Now and Reenable Import are disabled | Check the Enable automatic import of Salesforce.com data into Projector checkbox |
Status has changed to Disabled | Click the ellipsis button and send the results to Projector support. If the problem has been corrected then click Reenable Import. |
Entities failed migration | Click on the ellipsis button for the failed migration row. A detailed migration chart will be displayed for each entity. You may then click on the ellipsis for a failed entity and see the error message. If you require help decoding error messages please contact Projector Support. |

