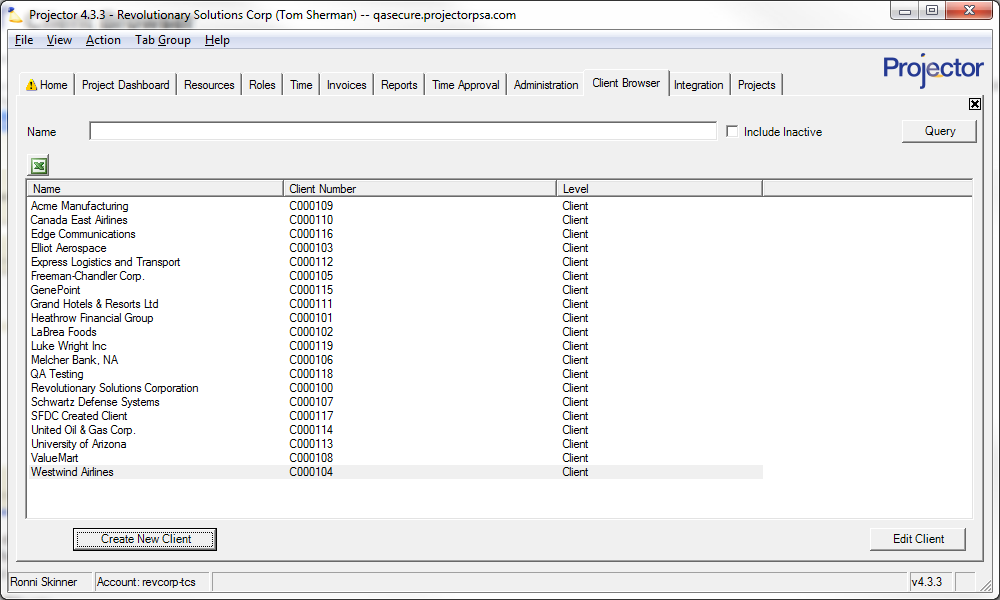
Client Browser
You can now create and manage clients through Projector Web. See the Clients help page to learn more.
Clients are organizations you do business with. Use the Client Editor to manage rates, billing information, and invoicing settings on a per client basis.
This browser is reached by choosing View │ Clients.
Permissions and Settings
To maintain client information you must have the Clients global permission set to update.
Client Levels are managed on the System Settings General Tab.
General & Administrative
Projector recommends that you create a client with the same name as your company. This client should be used for G&A engagements. Now when you compile your reports you will see internal time and expenses roll up against your own company.
Client Levels
Client levels are a means of grouping clients in an hierarchical structure. A common scenario would be to have a top level corporation, then child levels of Division and Subdivision. A real world example would be a giant company like General Motors. GM has many divisions and you may do work for the automobile, aerospace and alternative energy divisions. Each of these may have subdivisions like engineering and quality assurance.
There are two main benefits to client levels. The first is that you can setup inheritance for rates, billing data and invoice settings. In the aforementioned GM example, this could mean that all your invoices go to GM and you don't need to set up duplicate addresses for each division. The second benefit is you can run reports on these client levels for data grouping purposes. In this way you can see how performance for subclients rolls up to the parent client.
Before you can create parent/child client relationships, you must first define a minimum of two client levels on the System Settings General Tab. Once you have defined the levels, you start creating client relationships via the Client Editor.
Actions
Search for Clients
To locate a specific client, type the client's name or number in the box titled Name, and then press the Query button. Include inactive clients by ticking the Include Inactive box.
Create a New Client
Click the Create New Client button. This opens the Client Editor. Fill out the form and save.
Edit a Client
Double click a client to open the Client Editor.
Delete a Client
To delete a client right click on it and choose Delete Client. In order to preserve historical reporting, you cannot delete a client if an engagement or a project is associated with it or if it has client levels.
To check if the client is currently on a project/engagement you can use the project browser and customize the query to search by client. Ensure that you tick the include closed projects checkbox.
To check if there are client levels, double click to open the Client Editor. In the Client Tree area you will see whether there are any children.
If you cannot delete a client you may make the client inactive instead. Once a client is deleted, it cannot be recovered.
Inactivate a Client
Inactivate a client when you do not want any more engagements or projects created for them. Double click the client from the browser to open the Client Editor and tick the Inactive checkbox.
Reactivate a Client
In the query window, tick the Include Inactive checkbox and Query for the client. The inactive client will appear grayed out. Double click it to open the Client Editor and untick the Inactive checkbox.
Customizing the Client Browser
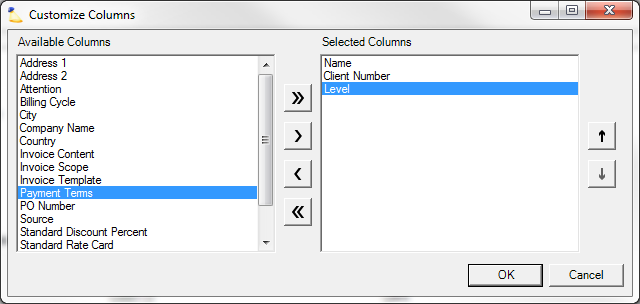
You can customize the client browser to display more columns of information and you can also choose the order that those columns are displayed in. Customizing the display of the client browser is useful for two things. The obvious reason is to format the display of the clients in a way that suits your viewing preferences. The second reason is to export all your client data to an Excel spreadsheet. There isn't a client report in Projector's reporting engine, so using the Export to Excel button on this screen is the best way to get a client list.
To start customizing the screen, right click anywhere in the results area and choose Customize Columns. Double click on a field to move it or use the arrows to move either all fields or one field at a time. In the righthand panel you can drag to reorder columns or use the up/down arrows to reorder.
Column Name | Description |
|---|---|
Name |
|
Client Number |
|
Level | See the client levels section of this page for more information. A level |
Address 1 |
|
Address 2 |
|
Attention |
|
Billing Cycle |
|
City |
|
Company Name |
|
Country |
|
Invoice Content | Either time and cost together or time and cost separately |
Invoice Scope | When creating an invoice, determines which time and expenses to include. Choose from all time and expense for the client, under an engagement, under a PO, or under a project. |
Invoice Template | Default invoice template for the client |
Payment Terms | NET 15, NET 30, etc. Defined on a per installation basis in the Payment Terms Editor |
PO Number |
|
Standard Discount Percent | Default discount percentage to be applied against standard rate card for the client |
Standard Rate Card | Default rate card to be used for the client |
State/Province |
|
Time Billing Type | |
Zip/Postal Code |
|

