Role Hours Tab
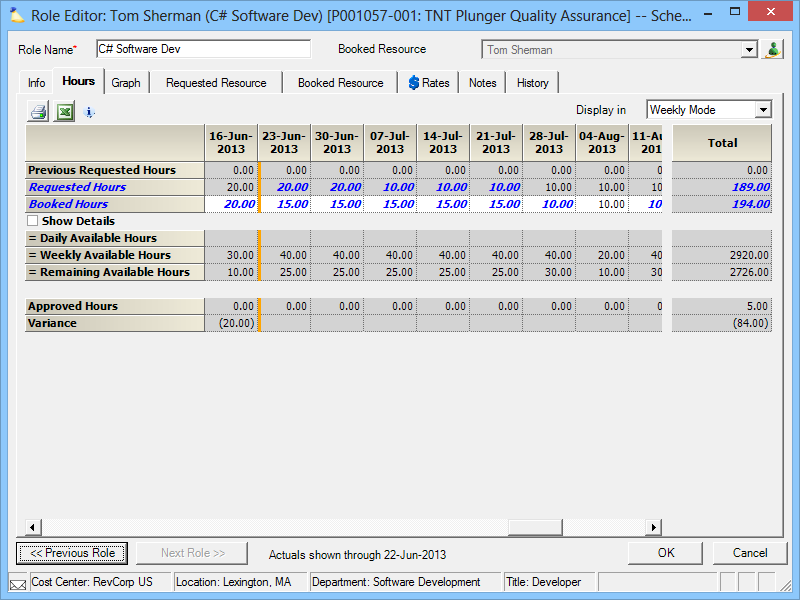
This tab is used primarily for requesting hours and booking hours on a role. To learn about how and why the request/booking procedure is done, please see the Scheduling How-To. This tab is also useful for viewing the variance between what was booked and what the resource actually worked. In addition, there are a number of other types of hours shown to aid in scheduling. For example, the resource's working hours for a day.
This is a subtab of the Role Editor. You will need to open the role editor to access it. Please see the Role Editor documentation for a list of locations that provide access.
Permissions and Settings
The changes you are allowed to make on this tab are dependent on how the project was opened. Roles can be opened in one of three modes - Scheduler Mode, Project Manager Mode, or View Project. Your current mode is displayed in the window title bar.
- Scheduler Mode allows you to schedule hours for the role
- Project Manager Mode allows you to request hours for the role
- View Project Mode is read-only
If you have sufficient permissions to both schedule and request hours, projector defaults to schedule. You can explicitly open a role in a certain mode by opening it via the project editor. Make sure that you right click on the project name and choose the mode.
To learn who can request or schedule resource see the Permissions and Settings section of the Project Resource Scheduling Tab help page.
Hours
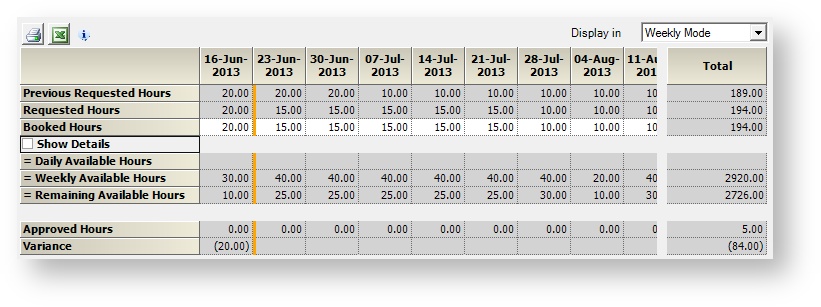
Each row in the grid shows different types of hours. The hours are then sorted into columns by date. Use the Display in dropdown to determine how you want to display the dates. You must choose a display mode that matches your scheduling mode. For example, if the role I am editing is scheduled by day, then view in daily mode to add hours. Vice versa with weekly. You can also choose Hybrid if you want a mix of both. Each row type is described in the table below.
Row | Description |
|---|---|
Previous Requested Hours | Hours previously requested for the role |
Requested Hours | An open request displays a red flag at the bottom of the role editor. Hours that are currently requested appear in blue. |
Booked Hours | Hours currently booked for the role. Unsaved changes are shown in blue. |
= Daily Available Hours | The total hours remaining in a day after all allocations on other roles, including other projects |
= Weekly Available Hours | The total hours remaining in a week after all allocations on other roles, including other projects |
= Remaining Available Hours | The total remaining available hours for this resource, after taking the hours for this role into account. |
Reported Hours | The number of actual hours that have been reported by this resource for this role. |
Variance | The difference between the actual hours reported and the hours that were booked or requested for the resource. This row will always be empty for columns after the cutoff date. |
Notice that some of the just described rows are preceded with an equals (=) sign. These values are calculated by subtracting a resource's obligations to other projects from their normal working hours. Tick the Show Details checkbox to show additional rows that explain the math behind a resource's availability. These rows are preceded with a minus (-) sign to indicate that they are subtracting from the previous line item.
| Details Row | Description |
|---|---|
Working Hours | The resources working hours for the day (or week). This is determined by the resources normal working hours and any holidays or scheduled time off during the period. |
Other Daily Allocated Hours | This row is only displayed if the Show Details box is checked. The total of hours booked on a daily basis only to this resource on other projects or on other roles on this project. |
Other Weekly Allocated Hours | This row is only displayed if the Show Details box is checked. The total of hours booked on a weekly basis only to this resource on other projects or on other roles on this project. |
Current Requested/Booked Hours | This row is only displayed if the Show Details box is checked. The number of hours requested or booked for this role. Note that this is always rolled up to a weekly level, even if the particular week is requested or booked on a daily basis. |
Request Hours
Open the role in project manager mode. Enter hours in the requested hours row. Make sure that your Display in dropdown matches your scheduling mode or the cells will be grayed out.
Book Hours
Open the role in scheduler mode. Enter hours in the requested hours row. Make sure that your Display in dropdown matches your scheduling mode or the cells will be grayed out.
Fill
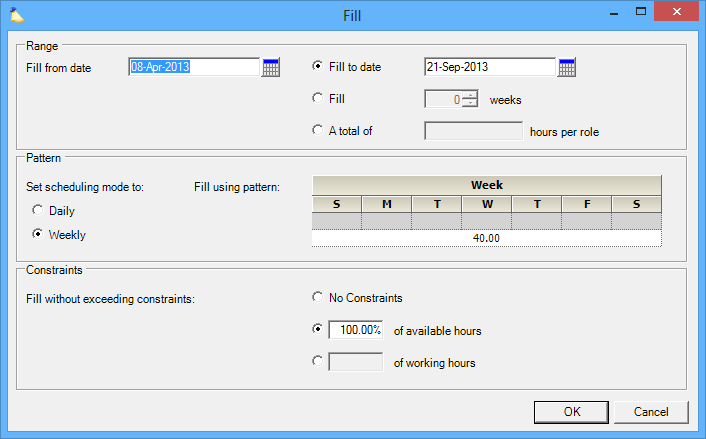
Quickly populate a resource's schedule by right-clicking on a role and choosing Fill.
Range
Use these options to control the date range that will be affected by the fill. The initial settings will reflect the range of dates that you originally selected, however you may change these settings as desired. You specify a range by selecting a Fill from date and either a Fill to date, a number of weeks or a total number of hours.
| Option | Description |
|---|---|
| Fill from/to date | Specify the first date that will get filled by pressing the button, which opens a calendar. If a Fill to date is given, Projector will fill all days starting with the Fill from date and ending with the Fill to date. |
| Fill | If this option is chosen, Projector will fill the specified number of weeks, starting with the Fill from date. |
| A total of | If a total hours per role is given, Projector will attempt to fill the specified number of hours, starting at the Fill from date and extending as far as possible into the future. Note that if you specify the date range using this option in conjunction with a constraint to available or working hours, there is a possibility that Projector will not be able to fill the prescribed amount of hours due to a lack of available or working hours for a role. If this is the case, Projector will fill as many hours as it can and inform you of the role or roles for which it was unable to completely satisfy your fill request. |
Pattern
Use these options to specify what values Projector should use when filling. You choose whether to set the scheduling mode to daily or weekly for each filled week and the pattern of hours to use when filling.
| Option | Description |
|---|---|
| Daily/Weekly | Choose whether you want to fill hours by week or day. See the daily/weekly scheduling section of this page for more information. |
| Fill Using Pattern | Enter hours by the day (top row) or week (bottom row) |
Constraints
Use these options to optionally enforce constraints while the fill operation is being performed:
| Option | Description |
|---|---|
| No Constraints | Do not apply any constraints, fill each cell with the requested number of hours regardless of available or working time. |
| % of Available Hours | Do not exceed a given percentage of available hours in any cell. |
| % of Working Hours | Do not exceed a given percentage of working hours in any cell. |
Advance/Delay
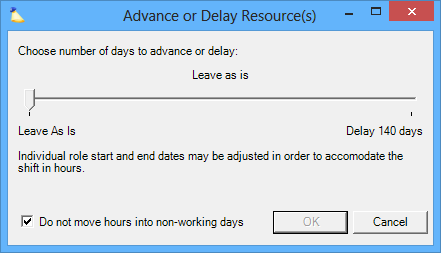
Advancing or delaying a schedule often happens when managing your projects. Projector allows you to advance or delay roles, groups of roles or your entire schedule. See Advance or Delay Schedule.
Delay from Date
The advance/delay feature affects the entire date range for the roles. Sometimes you want to delay just a portion of hours. For example, all work after September 1st. This will need to be manually delayed. You can export the hours to Excel, make your changes, and then cut/paste them back into Projector.
Copy From
Auto-populate the cells by right clicking on a role and choosing Copy From.
Notes
Notes are used to convey information between requestors and schedulers. Notes can be added in two places. You can add notes by editing the role and selecting the Notes tab. Roles with a note display a icon.
Or you can add notes directly to cells on this tab. A cell with a note displays a small triangle in the upper corner .
Add Note
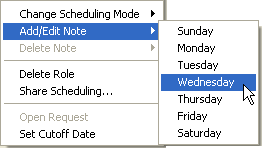
Right click on the desired cell and choose Add/Edit Note. You may see an additional sub-menu that enables you to choose which day of the week for the note. This sub-menu appears when you are adding a note for a daily schedule person, but the view is not in daily mode.
Delete Note
Right-click on a cell with a red triangle and choose Delete Note. You may see an additional sub-menu that enables you to choose the day for which the note will be deleted. This sub-menu appears when you are adding a note for a daily schedule person, but the view is not in daily mode.
View Note
Hover your mouse over the cell and the note appears. If you hover over a daily scheduled person, but the view is not in daily mode, then you will see all the notes for that week.
