Resource Browser
The resource browser shows your supply of labor. It is typically used by schedulers or project managers to see the availability of resources. The availability is shown in a graphical layout so that you can quickly assess a resource's current booked and scheduled hours.
As a scheduler or PM you might come here to answer the following kinds of questions:
- How busy are my technical consultants?
- How much time is someone devoting to billable vs. non-billable work?
- Who is overallocated?
This tab is often used in conjunction with the Role Browser. The two show your labor demand vs. supply. With this information on hand, you match the two to fulfill your scheduling needs. More is covered in our how-to article, Role and Resource Browser Workflow MP.
If you are unfamiliar with roles, please see the Roles MP help page.
This browser is reached by choosing View | Scheduling | Resources.
Permissions and Settings
To use the resource browser you must have the cost center permission View Resources.
Query
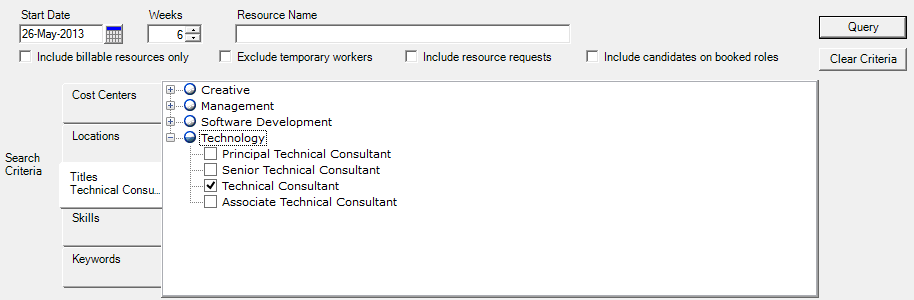
The upper section of the resource browser contains query information. Here you define the resources that you are interested in via several filters described below. If you find yourself running the same queries again and again, you can save time by add clicking View | Scheduling | Resource Browser. This adds additional tabs that you can rename. Each tab will remember the search settings last used.

This is your query window. The table below explains each of the query parameters. After the table we provide some example searches.
| Search Filter | Description |
|---|---|
| Start Date | Show resource schedules starting on this date |
| Weeks | How many weeks of data are you interested in seeing? |
| Resource Name | This field searches the resource's first, last, middle and id number. You can specify multiple search terms by using complex search criteria. |
| Include billable resources only | A resource is billable if the billable checkbox is ticked on their resource profile |
| Exclude temporary workers | Temporary workers are typically contractors. A worker is temporary if the Tempary checkbox is ticked on their resource profile. This flag is being deprecated in favor of the more robust resource types feature. |
| Include resource requests | Tick this to show requested hours along with booked hours. Requested hours are displayed using a special, dotted mask as seen in this image.
|
| Include candidates on booked roles | A candidate is someone who is recommended to fulfill a role. A role can have multiple candidates, so ticking this may cause you to see 'more' hours in a given week than actually requested. |
| Search Criteria | The search criteria section has four subsections, Cost Centers, Locations, Titles, and Skills. Use these to narrow down the roles that you are interested in. Clear the checkboxes completely to display all roles. Tick the checkboxes to only show the selected roles. For instance, I know I need a consultant in Lexington. So search on all Consultant titles in the Lexington location. |
Example Queries
There are many permutations of searches that you can run, but some cpmmon queries schedulers or PMs might run are:
- Show me John Doe's work schedule for the next month.
- Show me all Technical Consultants in the UK for next week
Common Queries
If you find yourself frequently running the same queries, you can make duplicates of this tab and save the query parameters. For example, I might make a new tab and name it "Open Requests." Then set my search parameters to Show Projects With Open Requests. Similarly I might make another tab named "Unnassigned Roles" and set my search parameters to Show Projects With Unnamed Bookings. Now I can quickly hop between tabs and find what I need.
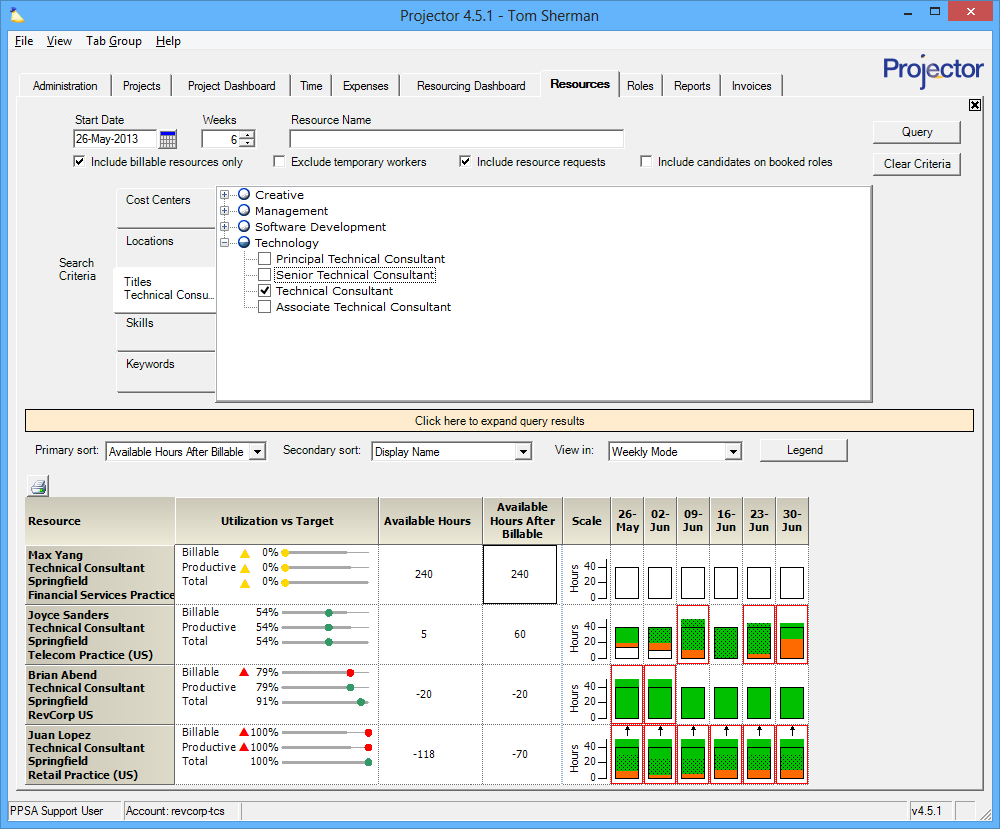
Results
Once you have specified your search, click Query to display the results. The upper section collapses and the results are shown below in a six column grid. Each resource has its own row. In the screenshot below I searched for Technical Consultants and three resources were returned.

Sorting
The following controls allow you to sort your results.
| Control | Description |
|---|---|
| Primary sort | Resources are ordered according to the dropdown list option selected:
|
| Secondary sort | You can subsort your results by a secondary option. For example, show resources alphabetically by cost center. |
| View in | Enables you to view data by individual days or entire weeks. Useful when your organization leverages daily scheduling. |
Bar Graph Columns
The first thing that probably jumps out at you are the colored bars. This visualization gives you insight into hours assigned to the resource and how much free time they have. Let's walk through the different ways the graph can be colored to learn how it works.
At the most basic level, a white rectangle is shown. The rectangle represents the normal working hours for this role. The white rectangle then fills in with information as hours are requested and booked.

By default the scale only goes up to 50 hours per week. If your resource works at least 51 hours per week we remove the cap from the top of the box and display an up arrow. Same goes if your resource is scheduled for at least 51 hours of work in a week.
As hours are assigned to this resource, the colored bars fill in from the top. This may be confusing at first, but once you understand how it works, everything makes sense. We fill down from the top because the white bar, on the bottom, represents available time. As the white bar shrinks, the resource is less and less available.
 10 hours
  22 hours
  40 hours
  Overallocated (boxed in red)
  (hatched hours are special)
So what do the different colors mean? Well they all mean hours, but these hours are then subgrouped by color. You define the color groupings using the color map editor. In the screenshot below I have colored billable work as green (money!), non-billable work as orange, and internal projects as blue. You can see your own installation's color map from this screen by clicking the Legend button. If you see cross-hatching on a resource's hours, then it indicates a candidate, new request, or tentative role.
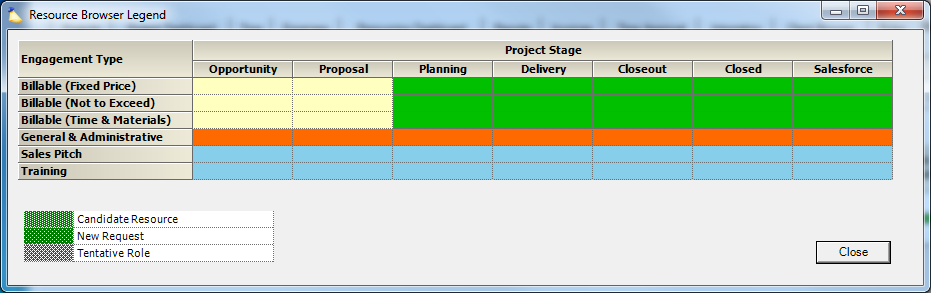
There are three different types of hatching that flag specific types of hours.
| Hatching | Hatching | Description |
|---|---|---|
| Candidate Resource | Dense | Used when the checkbox Include Candidates on Booked Roles is used. More dense cross-hatching represents hours for a booked role where the resource is still a candidate on that role. |
| New Request | Light | Used when the checkbox Include Resource Requests is used. Less dense cross-hatching signifies that for those hours, the resource has been requested on a role for a project. |
| Tentative Role | Inverted | Dependent on the account setting Tentative Role String. |
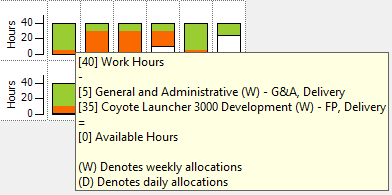
View Details
For more specific information on any block of time, hover your mouse over the cell to display a tool tip, as shown below:
Open Project
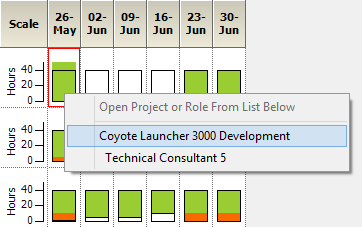
To jump directly to the project to which a resource is assigned, right-click the colored cell. From the context menu, shown below, choose the project you want to open. In this I'll open the Coyote Launcher project.
Open Role
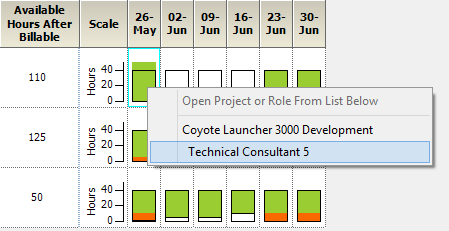
To jump directly to the project to which a resource is assigned, right-click the colored cell. From the context menu, shown below, choose the role you want to open. In this I'll open the Technical Consultant 5 Role.
Open or Edit Resource Info
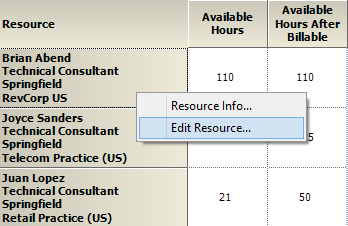
Open the Resource Info form to view all assignments, skills, and other information. Just right-click on their name and choose Resource Info.
Other Columns
Now that you understand how the bar graphs work, let's look at the rest of the columns in the grid. Each is explained in the table below.
| Column | Description |
|---|---|
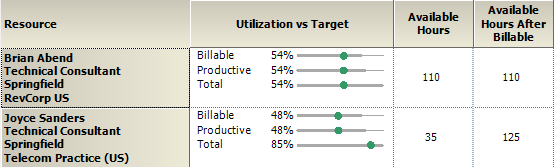
| Resource | We show four data points in this column. They are resource:
|
| Utilization vs Target | Utilization targets are defined by your resource type. They show how well you are tracking towards your utilization goals. The data shown is based on your queried dataset, not on any historical data. Use this to make sure that you are assigning appropriate amounts of work to your resources. For example, not overburdening someone with billable work. |
| Available Hours | Their working hours minus any booked hours. Useful for seeing if a resource has any availability in the search time frame. |
| Available Hours After Billable | Their working hours minus any nonbillable, booked hours. Useful for seeing a resource's available + non-billable hours. You could perhaps switch them from non-billable to billable work. |