Invoice Template Manager
Additional Resources
The Topic of the Day: Invoice Templates Customization webinar provides a general overview of Projector’s invoice template editor, as well as guidance on common customizations. (go to 6:00)
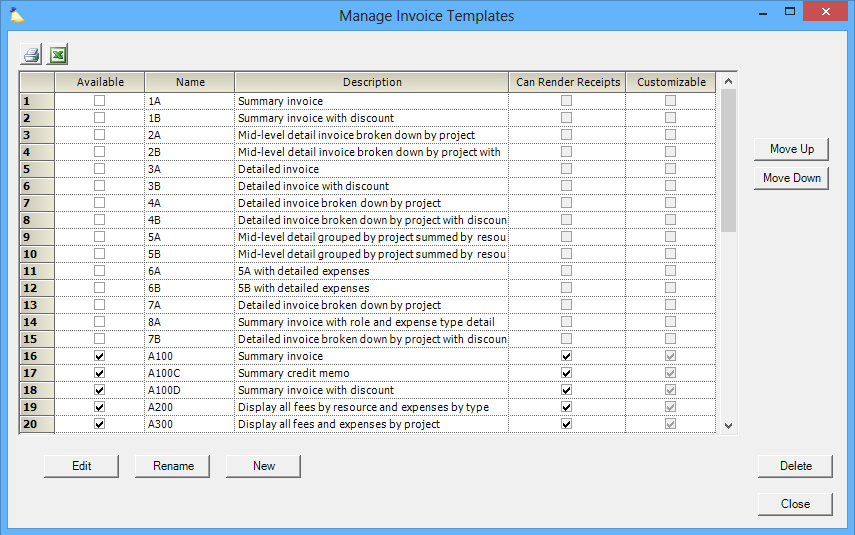
Invoice templates determine how your printed invoices are displayed. The template manager is where you control template availability, edit templates, and rename templates.
To start managing templates:
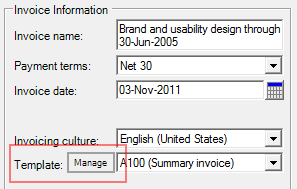
- Open an existing invoice
- Choose the Invoice Tab
- Click the Manage button
Permissions and Settings
You must have the global permission Invoice Templates set to view or update to access the manager.
Templates are specified on the:
We recommend setting the default invoice at the client level. This way all new invoices for that client use the same template. The template can then be overridden at the engagement level or on a per invoice basis as necessary.
Invoice Template Manager
The template manager consists of a grid where each row represents a template. Each column in the grid is described in the table below. Changes made on this screen take place immediately.
Columns
Column | Description |
|---|---|
Available | Determines whether this template may be chosen. When set to available a user can change an invoice to this template or preview an existing invoice with this template. If you make a template unavailable and an invoice is already using it - the template remains enabled for just that one invoice. But is unavailable for all new invoices, for previewing invoices, and for switching from an existing template to this template. |
Name | A short name that will appear in the template dropdown list. Your installation may have preinstalled templates that use the naming convention A100, A200 or 1A, 2B. The A100, A200 series are part of our Invoice Template Examples. The 1A, 2B series are part of our Legacy Invoice Template Examples. To edit the name, click the Rename button. |
Description | A description of the template. When a user browses available templates they will see this description. To edit the description, click the Rename button. |
| Can Render Receipts | There are two ways to include receipts on Projector invoices. One is to have Projector simply append the receipts to the end of your invoice. This is a simple mechanism that shows one receipt per page. The other way is to have the template determine how receipts can be displayed. This has advantages. You can determine the image size, whether expenses associated with the receipt should be shown on the same page, and much more. It is up to you to make sure that this checkbox is appropriately ticked. If your template can render receipts then tick the checkbox. If it cannot, then leave it unticked. Our legacy invoice templates (1A, 2B, etc) can never be edited, so the checkbox is always unticked and unavailable for these. For more information on receipt rendering and previews of rendered receipts, see Invoice Template Examples. |
Customizable | You cannot make changes to this column. It is informational only. Our Legacy Invoice Template Examples (1A, 2B, etc) cannot be edited because they use a different rendering system. All new templates or templates based off our new Invoice Template Examples are editable and have the checkbox ticked. |
Buttons
| Button | Description |
|---|---|
New | Create a new, empty template |
Rename | Click to give the template a new name or description |
Edit | Open the current template in the Template Editor. If you want to create a new template based on an existing one, then press the edit button on the existing template. The old template will open in the DevExpress Report Designer. Choose Save As. You will be prompted to enter the name and description for the new template. |
Move Up / Move Down | When users pick a template either through the invoice editor, engagement billing tab, or client editor, they use a dropdown list. The order of the templates in that dropdown list is determined by the order on this screen. Use the Up/Down arrows to reorder templates. |
Create a New Template
To create a brand new, empty template, click New from the template manager. Then click Save or Save As from the template editor.
To create a new template based on an existing template
- Select the existing template in the template manager
- Click Edit. The existing template opens in the editor.
- In the template editor choose File | Save As
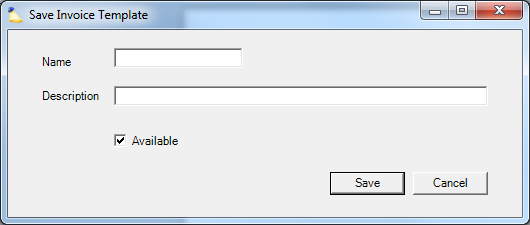
The following dialog will be displayed. See the* Name*, Description and Available flags described above.
Modify an Existing Template
- Select the existing template in the template manager
- Click Edit. The existing template opens in the editor
- Click File | Save
Base a New Template on an Existing Template
- Select the existing template from the manager
- Click Edit
- Choose File -> Save As from the menu.
- Give the new template a name and description
- Close the editor
- Find the new template in the list and choose Edit.


