Requesting Resources
Requests for staff are made via the Project Editor of the project for which you need resources.
Begin by selecting a project for which you would like to request resources by accessing the Project Browser tab. Open the project to view and work in the Project Editor.
Creating Roles
The way Projector lists resources on a project is by role. The role a person plays on a project may be the same as the person's title, or may be more descriptive in terms of the work the person will do. Each role will ultimately be associated with one resource, although when requesting staff you have the ability to create a candidate list of one or multiple names. Creating and defining the roles for your project is the first step in requesting resources.
From the Project Editor, choose the Roles tab or the Resource Scheduling tab. If any roles already exist they will be displayed here. Press the Create New Role button, which will open the Create New Role form.
Type a short description into the Role Name field. Otherwise, the default text (Role 1, Role 2, etc.) will be used.
You will now need to add a candidate list for each role on the project.
Adding Candidates
For each role on a project, a project manager creates a list of one or more candidates.
Note: In organizations using separate requesting and scheduling functions, adding a candidate list to a project does not have the effect of confirming resources on the project. Until the scheduler has booked a resource into a role, resources are considered to be only candidates for working on that project.
Adding a Single, Named Candidate
If you know the name of the person you would like booked to a given role, you can easily add that person, by name, to your candidate list.
To request a resource by name, begin by pressing the Create New Role button to open the Create New Role form; allowing you to define the role this resource will have on the project. For more on roles see the section on Creating Roles.

Query for your resource by typing some, or all, of the person's name into the Name field and pressing Query. Depending on how specific your query was, a name or names will be listed.
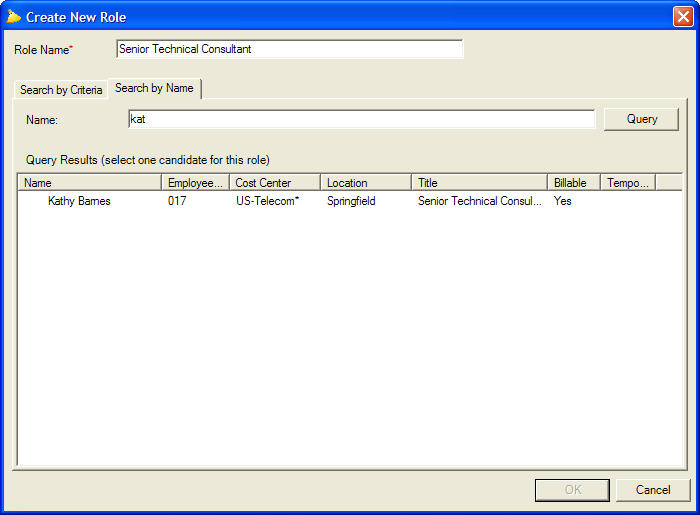
Double-click on the name you want from the list to add them to your project. The name and role will appear on the Project Editor form. If you are done creating roles you can now request hours for each role.
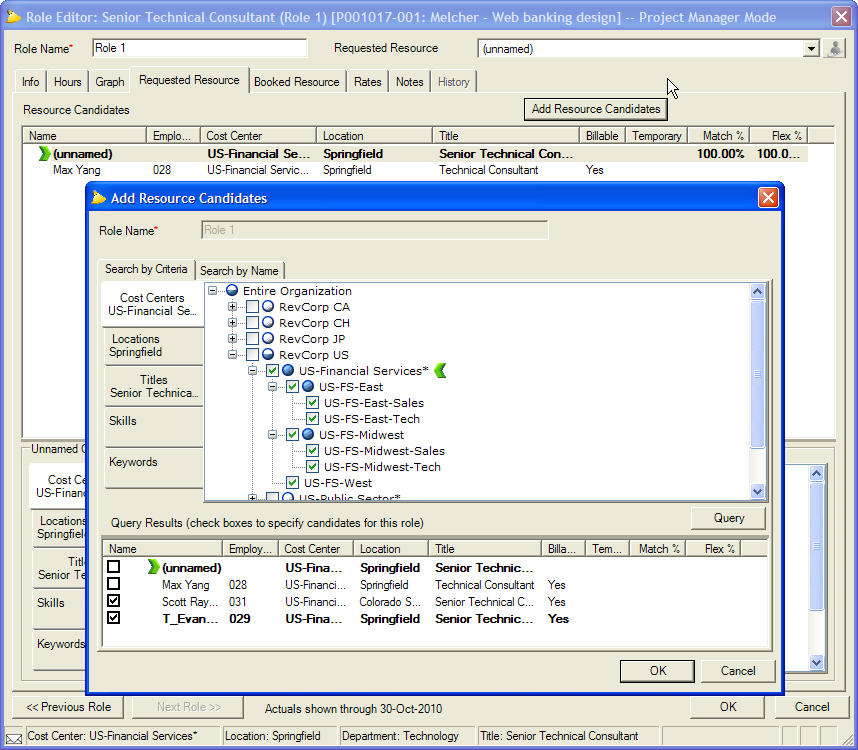
Adding Candidates by Criteria
You can search for and specify a list of candidates to add to a given role. This is most useful if you are unsure of the person you would like, or if you would be willing to take one of a number of people with a similar skill set.
To search for candidates by criteria, begin by pressing the Create New Role button and defining the role this resource will have on the project. Choose the Search by Criteria tab.
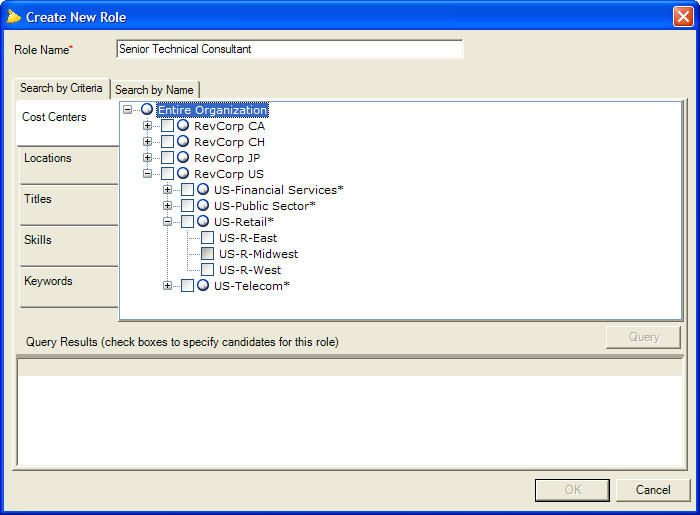
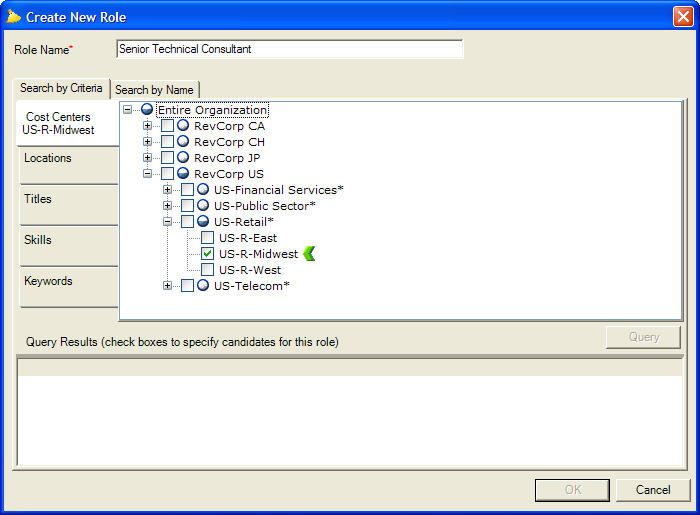
Press the Cost Centers button to view cost centers and indicate the preferred cost center by double-clicking. The preferred choice mark (  ) will be displayed beside the cost center indicating this is the preferred choice.
Press the Locations button and check the boxes to indicate the locations in which to search for this resource. Double-click on one location to specify it as the preferred location. The preferred location mark ( ) will appear next to that resource, and the location will appear on the Locations button.
Press the Titles button and check the boxes to indicate which titles would be acceptable for this resource to have. Indicate preferred title by double-clicking on the title name. The preferred title mark ( ) will appear next to that title, and the title will appear on the Titles button.
If your organization is using Projector's skills capabilities, press the Skills button and indicate which skills the resource should have. No preference is indicated for skills, as Projector will assume all skills indicated are necessary to fulfill the role.
Press Query to display a list of names fitting the criteria selected. Note that the Query button will be inactive until you have specified at least one cost center, one location (if your organization uses locations), and one title. Then, check the names from the list that would be acceptable resources for the role. In addition to or instead of named resources, you may select the unnamed candidate.

Indicate your preferred choice for this role by double-clicking on that name. The preferred resource mark (  ) will indicate that this is the preferred choice. A preferred choice of the unnamed candidate means that any resource matching the cost center, location, title, and skills of the unnamed candidate might be a good fit.
A yellow warning triangle will appear beside the names of resources who partially meet the role criteria. Hover over the triangle to view a tooltip with information on the resource with regards to the role.
Press OK to add the resource candidate list to the project and to return to the Resource Scheduling tab of the Project Editor, where you will see the role and preferred candidate listed. If you are done adding roles, you can now request hours by role.
Requesting Hours
To request hours for a particular project you must first:
- Be authorized to ask for resources for the project in question. This means that you must either be the project's project manager, or be listed on the project with Can Act As PM permission. Both of these settings can be changed from the Project Info tab of the Project Editor.
- Add roles to your project and for each role define a list of named or unnamed candidates.
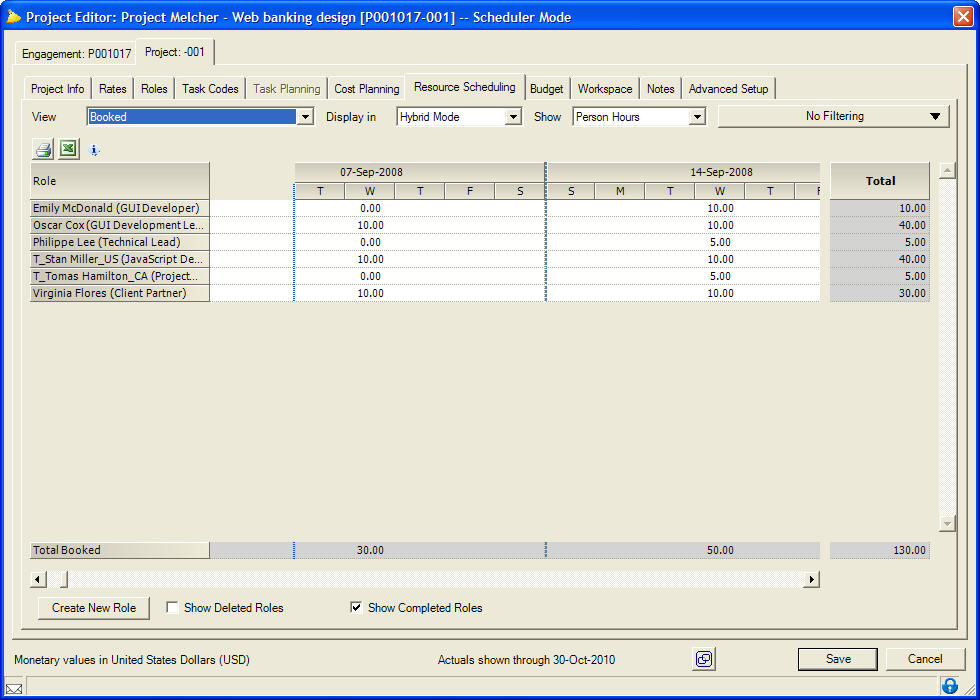
Begin by selecting a project for which you would like to request resources by accessing the Project Browser. Open the project to view the Project Editor. Choose the Roles tab or the Resource Scheduling tab. Resources requested or assigned to this project will be displayed here.
There are three ways to enter requested hours for a given resource:
- In the Project Editor on the Resource Scheduling tab – Displays a complete list of all roles on the project.
- In the Role Editor on the Hours tab – Displays a detailed view of availability for each candidate.
- In the Role Editor on the Graph tab – Displays a detailed view of availability for each candidate in graphical form.
Requesting Hours in the Resource Scheduling tab of the Project Editor
Enter the desired hours in the fields following the name of each resource. The hours you enter will be blue, indicating a new or outstanding request. To make several changes at the same time:
- Choose the Edit menu to copy and paste a cell or range of cells.
- Choose the Actionmenu to:
- Copy from Available – Fills selected cells with the candidate's available hours.
- Copy from Working – Fills the selected cells with the candidate's working hours.
- Advance/Delay – Causes hours for selected roles to advance or delay by a given time period via the Advance or Delay Resource(s) form.
- Fill – Fills selected cells with values via the Fill form.
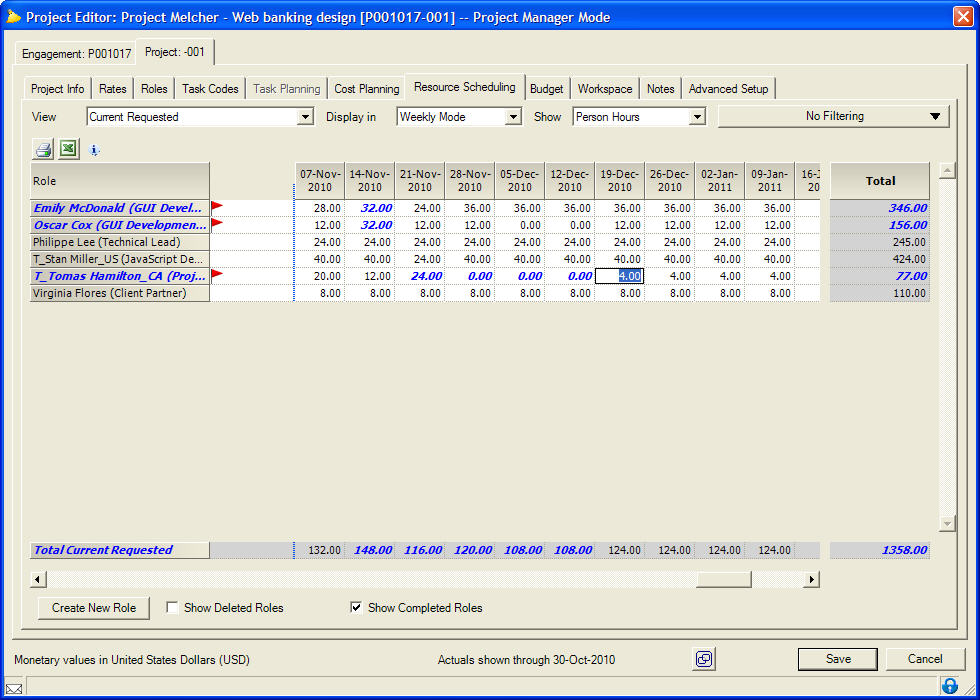
Note: A flag ( ![]() ) will appear next to the role indicating that there are open requests. An open request is a request for hours that has not yet been answered by the scheduler.
) will appear next to the role indicating that there are open requests. An open request is a request for hours that has not yet been answered by the scheduler.
Press Save to store your changes and return to the Project Browser.
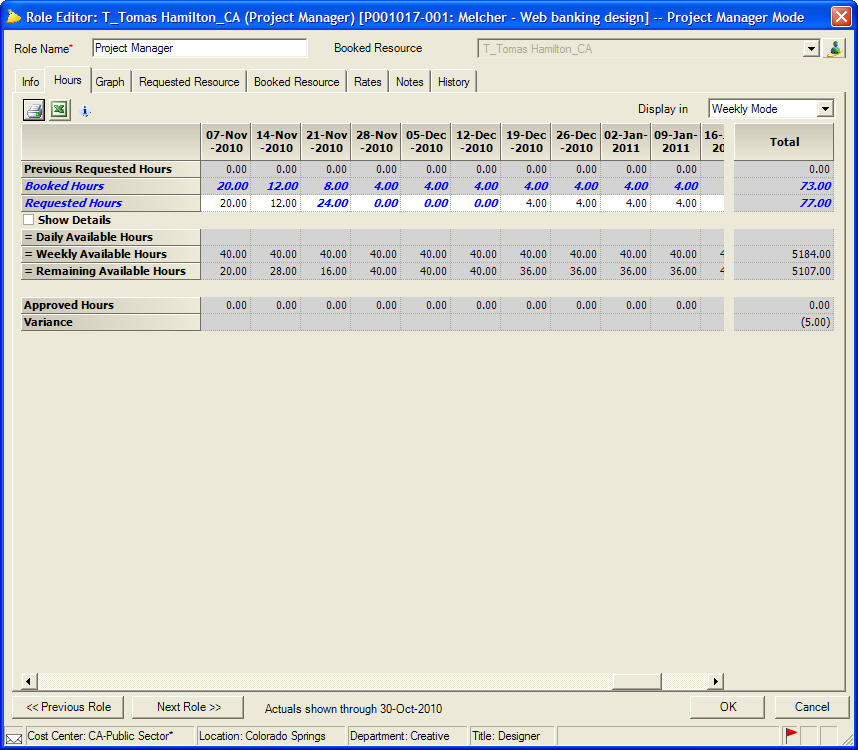
Requesting Hours from the Hours tab of the Role Editor
From within the Role Editor choose the Hours tab. Enter the desired hours in the Requested Hours fields. The hours you enter will be blue, indicating an open request. Press OK to return to the Project Editor, and then press Save to save your work. To navigate between roles, use the <<Previous Role button and the Next Role>> button.
Requesting Hours from the Graph tab of the Role Editor
From within the Role Editor, choose the Graph tab. Move the red hours adjuster ( ![]() ) to indicate the number of desired hours. If a resource has less than 100% availability for this role, a yellow shaded area will indicate how much time this resource is busy on other work. The un-shaded area is the balance of a resource's time available for requesting without overallocating that resource.
) to indicate the number of desired hours. If a resource has less than 100% availability for this role, a yellow shaded area will indicate how much time this resource is busy on other work. The un-shaded area is the balance of a resource's time available for requesting without overallocating that resource.
Holding the shift key down will allow a range of time periods to be selected and adjusted as a group. Holding the Ctrl key down will allow non-sequential time periods to be selected and adjusted. To select all time periods press Ctrl A.
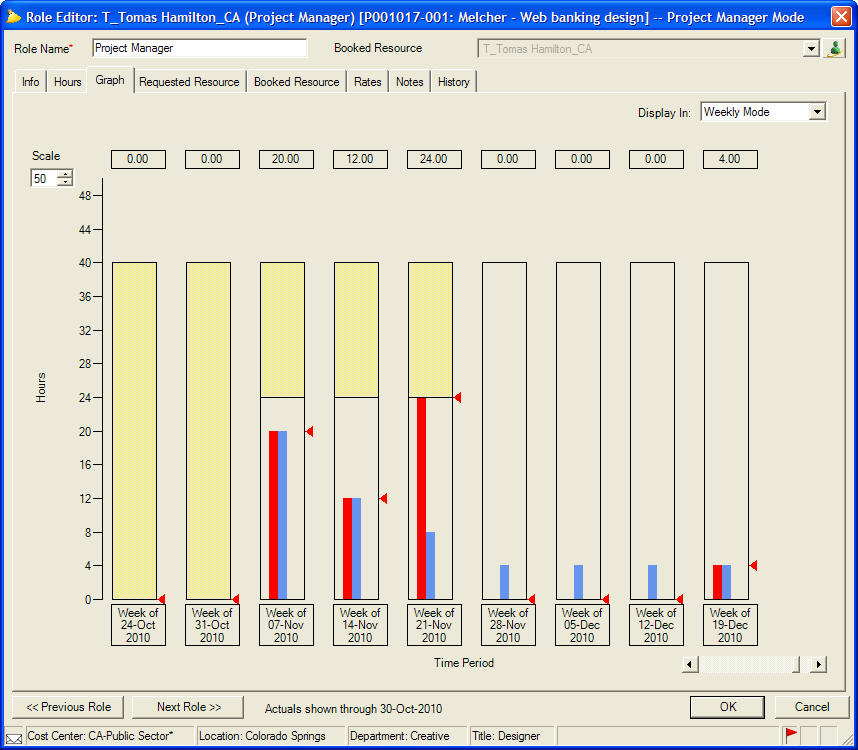
Press OK to return to the Project Editor. Then press the Save button to save your work.
Removing a Resource Candidate
To remove a candidate from a role, double-click on the role associated with the candidate. Press the Requested Resource tab to view the list of candidates requested. Right-click on the candidate and choose Remove Resource.
Changing the Preferred Resource Candidate
To change the preferred candidate, thus changing the name that appears on the Resource Scheduling tab of the Project Editor, double-click the role that you would like to change. Press the Requested Resource tab to view the list of candidates. The preferred candidate for the assignment is indicated with the preferred candidate mark ( ). To change this, choose the new preferred candidate and choose Action | Set Preferred Resource, or right-click and choose Set Preferred Resource.
Deleting a Role
A role can be deleted from a project only if no resources have been booked to the role and no time has been reported against the role. Choose Action | Remove or right-click and choose Remove.
Adding to Candidate Lists
To add more names to an existing candidate list, double-click on the role to access the Role Editor. Press the Requested Resource tab to view the list of candidates requested so far. Press the Add Resource Candidates button. Review and select the criteria to query on, including cost centers, locations, titles, and skills.
Press the Query button to display a list of names fitting the criteria selected. Check as many names from the list as desired.
Press the OK button to return to the Role Editor. The additional names will appear in the Resource Candidates box.
Reviewing Booked Resources and Editing Hours
The request for hours made prior to the most recent booking will appear on the Previous Requested Hours field. The booked hours based on that request will appear in the Booked Hours field. The Requested Hours will be the same as the Booked Hours until new requests are made.
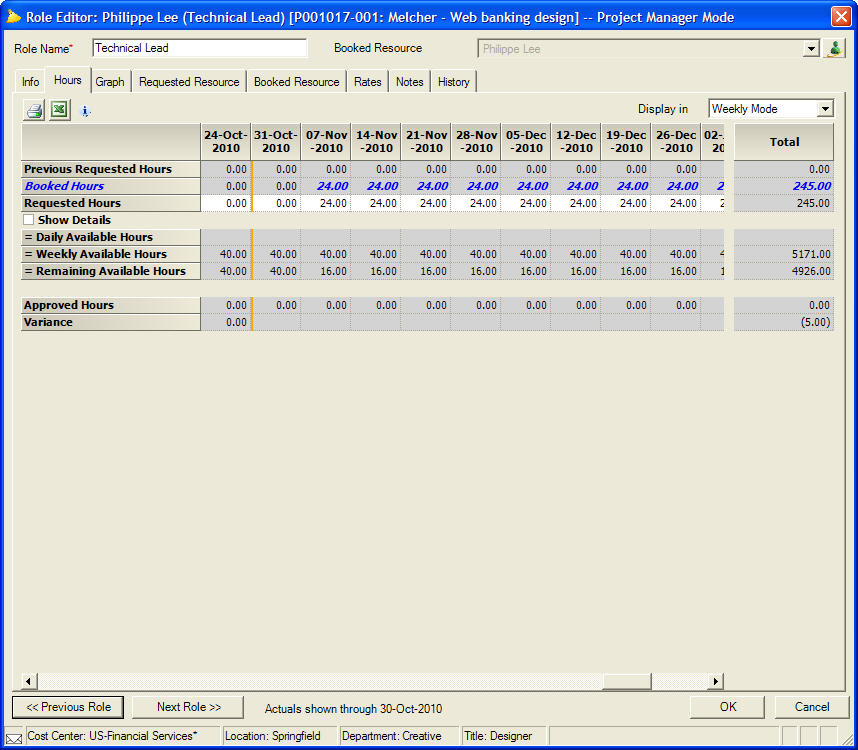
To make further requests regarding time for this booked resource, edit the Requested hours. Press OK to return to the Project Editor. A flag ( ![]() ) will now appear next to the role, indicating the open request.
) will now appear next to the role, indicating the open request.