Booking Resources
After requesting resources, booking resources is the second part of Projector's scheduling process. In many organizations booking resources is a separate function from requesting, in which one or more people are designated schedulers and granted permission to schedule resources.
The process for booking resources uses many of the same forms as the process for requesting resources and includes the following steps:
- Reviewing requests for resources.
- Adding additional candidates if desired.
- Selecting the best resource.
- Booking the hours.
Begin booking resources by reviewing all open requests for resources within your organization via the Project Browser.
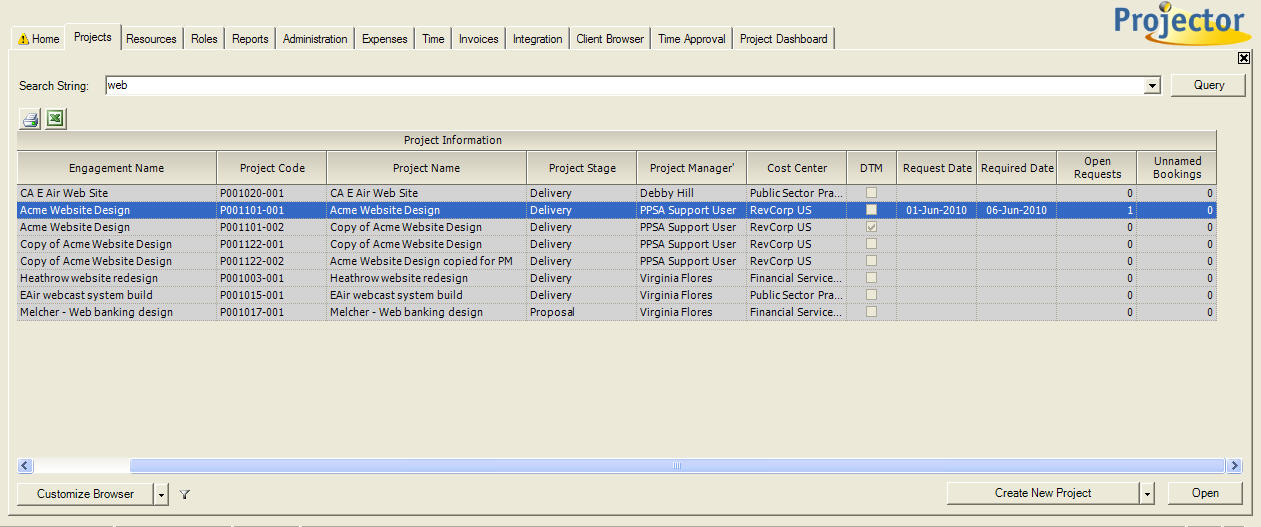
On the Project Browser, choose the Customize Browser option off of the drop down arrow beside the multi-function button in the lower left corner of the Project Browser form. You can select a filter to Show only projects that require action or Show only projects with open requests. You can also customize your view to include the column Open Requests. The Open Requests column indicates how many requests there are for each project. Other related columns that might be valuable include:
- Request Date – Indicates the earliest date on which an open request was made. This will be blank if there are no open requests.
- Required Date – Indicates the earliest date that work is scheduled to start for any open request. This will be blank if there are no open requests.
- Unnamed Bookings – Indicates how many roles have been booked with unnamed resources.
Viewing Resource Requests
Double-click on one of the projects to open the Project Editor and choose the Resource Scheduling tab. You will see the list of resources currently associated with the project. Resources with open requests will have a flag (  ) next to their names. Double-click on the role you wish to view, which will open the Role Editor.
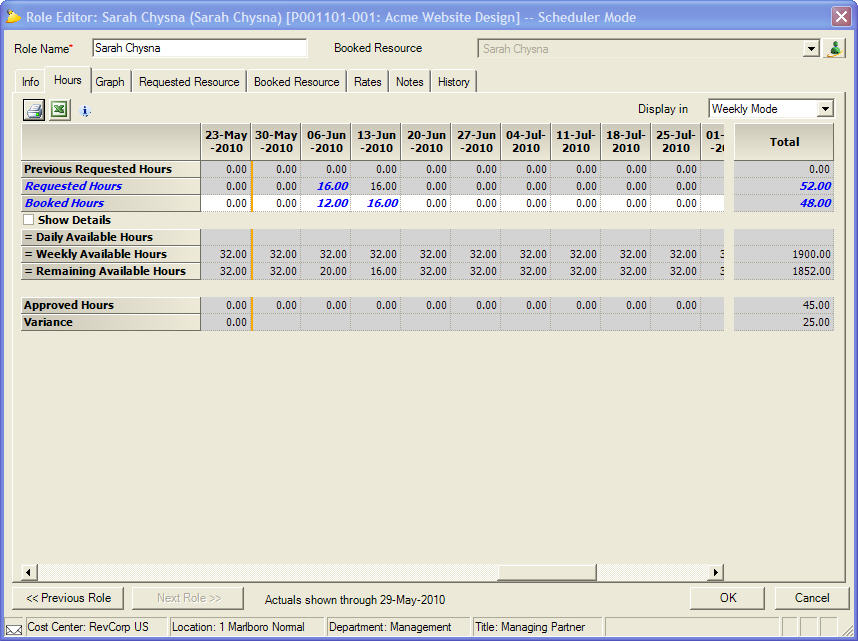
Choose the Hours tab to view requested hours by role. Requested Hours that differ from Booked Hours are shown in blue. So the blue numbers represent the changes in bookings desired by the requestor.
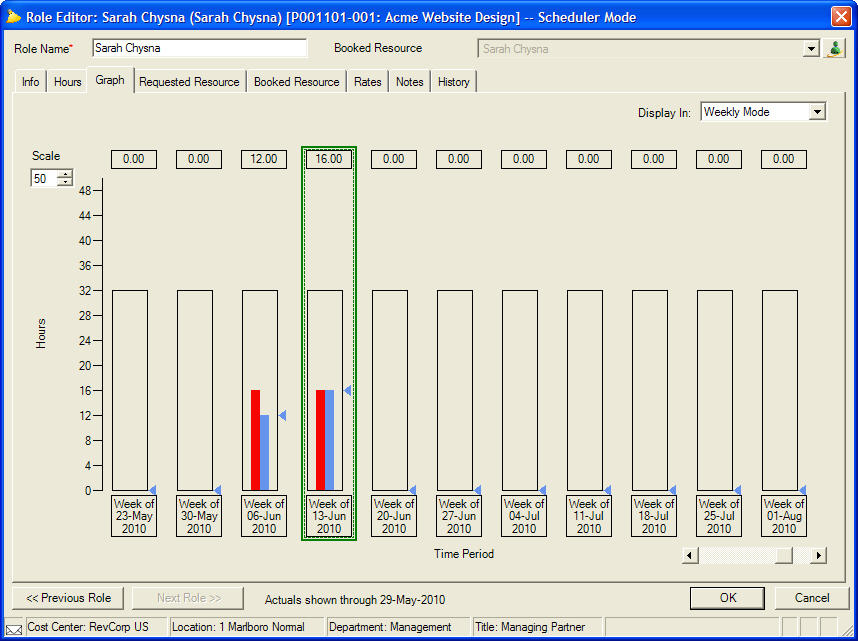
Choose the Graph tab to view requested hours in a graph format. Requested hours are represented with red bars and booked hours are shown with blue bars. Whenever the height of a red bar differs from the height of a blue bar, there is a request for a change in booked hours.
Choose the Requested Resource tab to see the candidate list developed by the requestor, including the preferred resource, who is indicated with the preferred resource mark (  ).
).
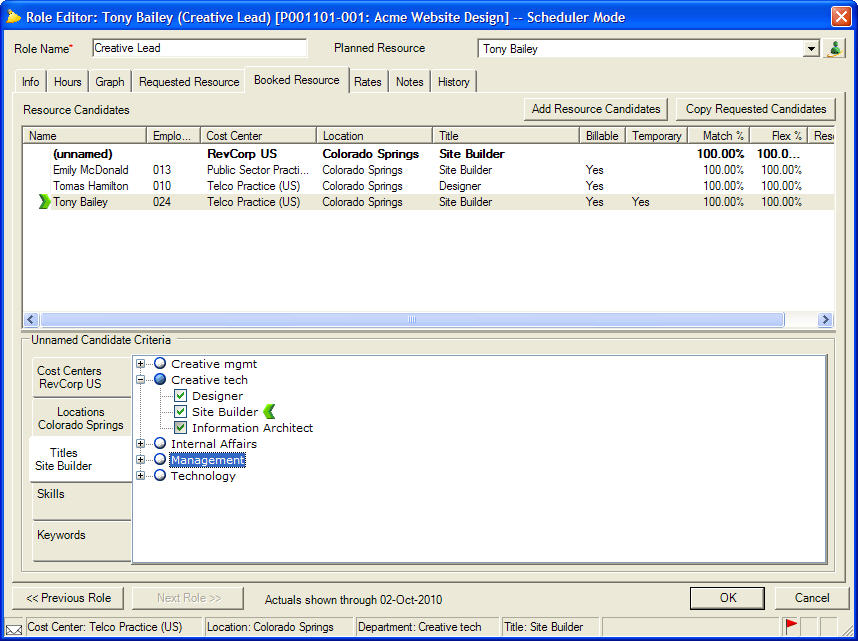
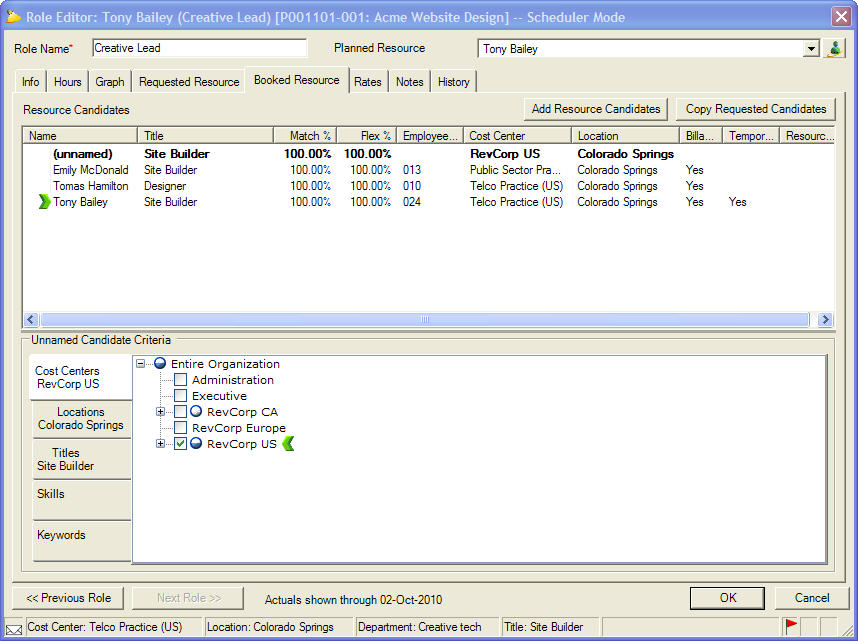
Viewing and Modifying the Booked Candidate List
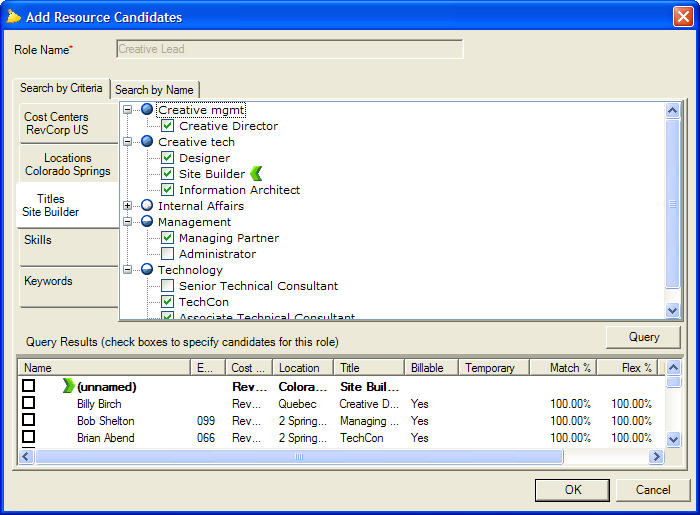
The Requested Resource tab of the Role Editor shows the candidates specified by the project manager. As the scheduler, you maintain your own list of candidates on the Booked Resource tab. By default, that list starts with the list submitted by the project manager. You can add or delete candidates from your list. This can be helpful when you are trying to determine the most appropriate resource for the role. You can also revert back to the list submitted by the project manager by pressing the Copy Requested Candidates button on the Booked Resource tab. To add candidates, choose the Booked Resource tab in the Role Editor and press the Add Resource Candidates button. When you search for candidates by criteria, the candidates displayed in the Query Results will be light gray if they are already on your candidate list.
Viewing Candidate Availability
To find the best candidate for assignment on the role, you will need to review all candidates' available hours and compare them against requested hours.
There are several places to view the availability of a resource in the Role Editor:
- In the Resource Candidates list on the Booked Resource or Requested Resource tab.
- On the Hours tab.
- On the Graph tab.
Regardless of which view you use to see available hours, you will be able to scroll through the list of candidates to test-fit each one against the request.
Viewing Availability on the Booked Resource Tab
Open the Booked Resource tab to view available hours for several resources at once. To the right of each resource candidate are columns indicating Match % and Flex %.
- Match % – The percent of the hours requested that could be fulfilled exactly as requested.
- Flex % – The percent of the hours requested that can be fulfilled if you are willing to be flexible as to when they are scheduled, but keeping the same start and end date as the request.
Drag and drop columns to reorder and view Match % and Flex % without scrolling.
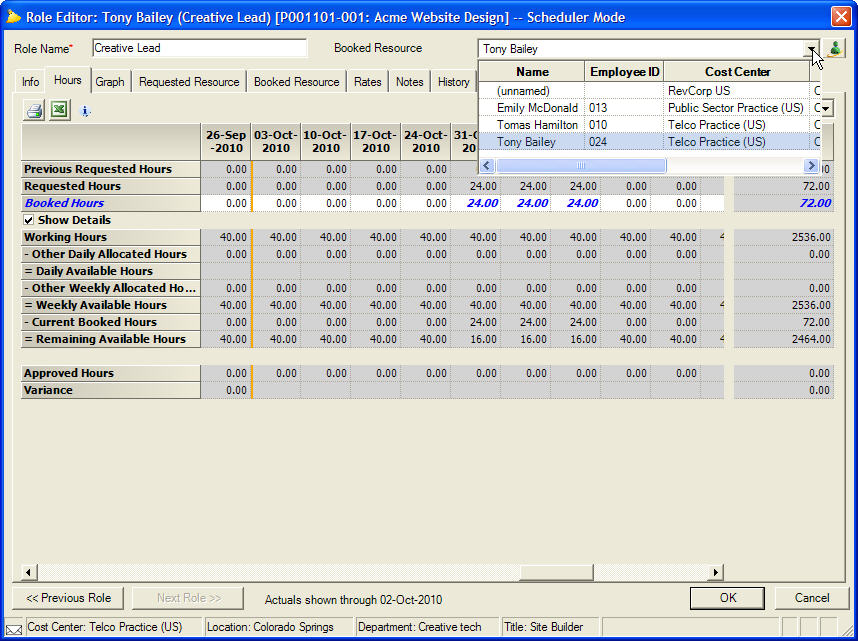
Viewing Availability on the Hours Tab of the Role Editor
Open the Hours tab to view available hours for a given candidate.
- Previous Requested Hours – Displays hours that were requested as of the last time the scheduler booked hours for this assignment.
- Requested Hours – Displays hours currently requested by the project manager.
- Booked Hours – The hours booked for this assignment.
- Working Hours – The resources working hours for the day (or week). This is determined by the resources normal working hours and any holidays or scheduled time off during the period.
- Other Daily Allocated Hours – This row is only displayed if the Show Details box is checked. The total of hours booked on a daily basis only to this resource on other projects or on other roles on this project.
- Daily Available Hours – The total hours remaining after all daily allocations on other projects or other roles on this project have been accounted for.
- Other Weekly Allocated Hours – This row is only displayed if the Show Details box is checked. The total of hours booked on a weekly basis only to this resource on other projects or on other roles on this project.
- Weekly Available Hours – The total hours remaining after all daily and weekly allocations on other projects or other roles on this project have been accounted for.
- Current Requested/Booked Hours – This row is only displayed if the Show Details box is checked. The number of hours requested or booked for this role. Note that this is always rolled up to a weekly level, even if the particular week is requested or booked on a daily basis.
- Remaining Available Hours – The total remaining available hours for this resource, after taking the hours for this role into account.
- Approved Hours – The number of actual hours that have been reported by this resource for this role and approved.
- Variance – The difference between the actual hours reported and the hours that were booked or requested for the resource. This row will always be empty for columns after the cutoff date.
To view data for other candidates, use the Booked Resource dropdown. After opening the dropdown, use the up and down arrow keys to quickly switch between resource candidates.
The Booked Resource dropdown is labeled Planned Resource until non-zero booked hours are entered into at least one time period. This happens because a role is not "officially" booked until it has booked hours.
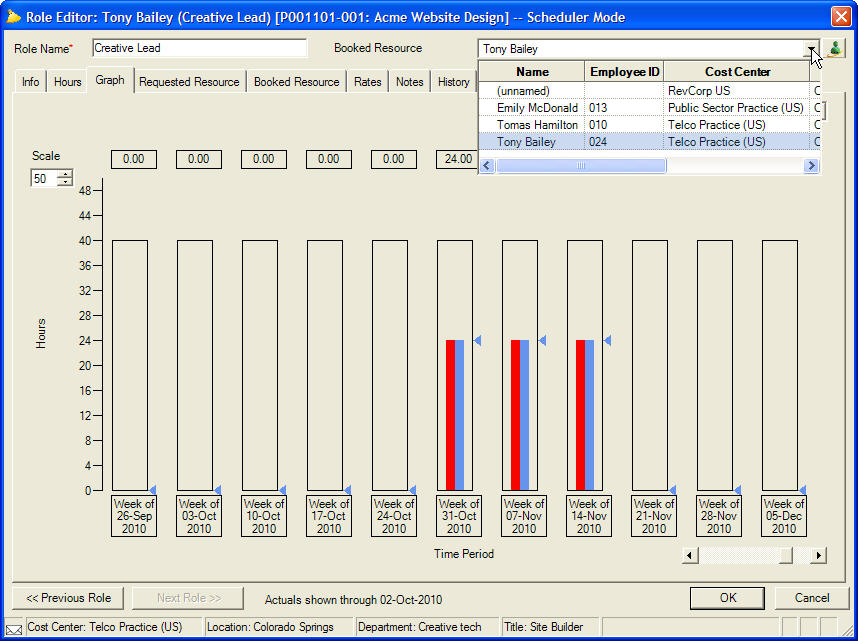
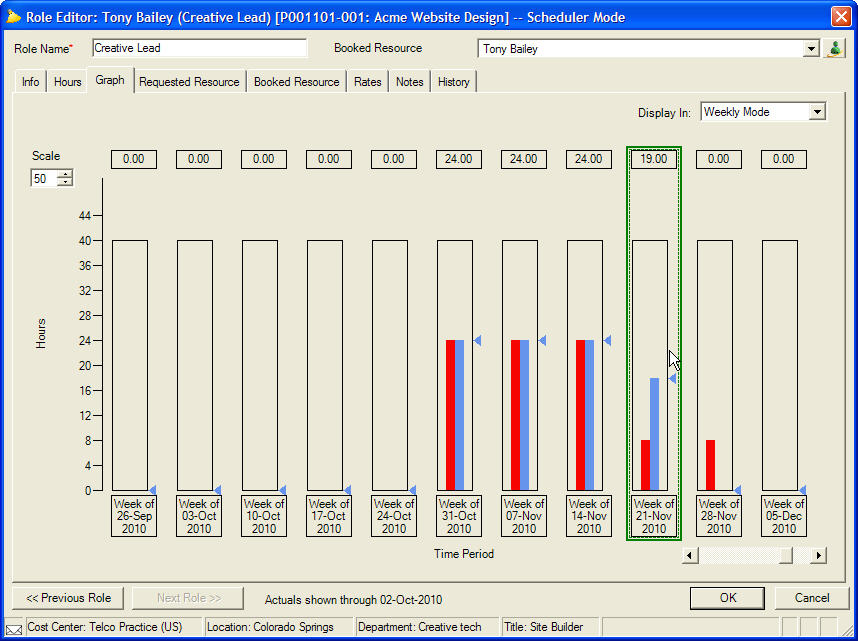
Viewing Availability on the Graph Tab of the Role Editor
Open the Graph tab to view available hours for a candidate in a graph format. If a resource has less than 100% availability for this role, a yellow shaded area will indicate how much time this resource is busy on other work. The un-shaded area is the balance of a resource's available time without overallocation.
To scroll through the list of candidates for a role, use the Booked Resource dropdown. After opening the dropdown, use the up and down arrow keys to quickly switch between resource candidates.
Booking an Unnamed Resource
Booking an unnamed resource to a role has the effect of telling the project manager that hours are booked to the project, but the actual person doing the work has not yet been specified. Ultimately, these unnamed assignments will have to be resolved by the scheduler, most likely by returning to the role to review the candidate list and designating a resource to take the place of the unnamed place-holder.
Booking Hours
To confirm a candidate for a given role on a project, hours must be booked for that resource. The hours may reflect the request made by the project manager or may differ due to availability, demand for this resource on other projects, or a variety of other factors. Regardless of what the right number of hours is for a resource, Projector will record what was asked and what was given.
Booking a resource candidate to a project has the effect of:
- Confirming the assignment of a person for a given role.
- Specifying the amount of hours that person will be working on that project, in that role.
- Causing the person's available time to decrease as a result of now being assigned, thus making the person less available for other assignments.
Once a booking is made and saved, the request is considered by Projector to be fulfilled (i.e., it is not an open request).
Booking Hours on the Resource Scheduling Tab of the Project Editor
To book hours for a resource, enter time for the role on the Resource Scheduling tab of the Project Editor.
Booking Hours on the Hours Tab of the Role Editor
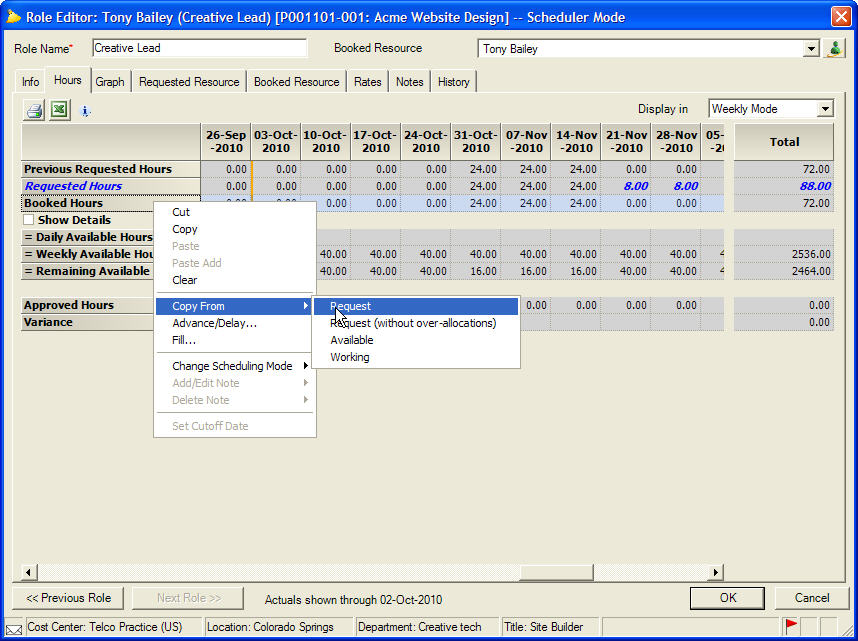
In Scheduler Mode, enter booked hours in the Booked Hours field. A booking that exactly matches the requested hours will cause the requested hours to change from blue to black, signifying to the project manager that the request has been granted in full. Requested hours that remain in blue indicate a difference from what was requested to what was booked. Any bookings that cause a resource to become over-allocated will turn red.
Additional booking options are available by right-clicking and choosing:
- Copy from Request – Copies the requested hours into the booked hours for the fields selected.
- Copy from Request (without over-allocations) – Copies requested hours into booked hours, without causing the resource to become over-allocated.
- Copy from Available – Copies the available hours into booked hours.
- Copy from Working – Copies the working hours into booked hours.
Booking Hours from the Graph Tab of the Role Editor
To view a graph of requested hours over a longer period of time, and to book hours according to those requests, use the Graph tab. Requested hours are indicated with red bars. Booked hours are indicated with blue bars. Use the blue hours adjuster ( ![]() ) to assign the amount of booked hours.
) to assign the amount of booked hours.
You can move one hour at a time by using the up and down arrow keys. By holding Ctrl and pressing the up or down arrow key you can move the smallest possible time increment.
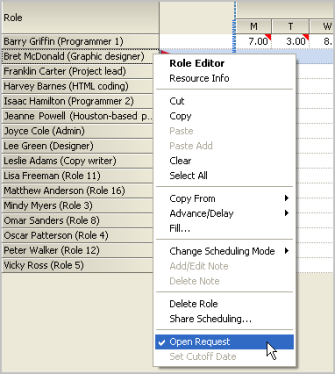
Manually Setting and Clearing the Open Request Flag
Any hours booked against an open request will automatically turn off the open request flag ( ), indicating that a request is fulfilled. However, there are times when a scheduler might want to book hours to a role and still keep the flag on. Conversely, sometimes it is necessary to clear the open request flag without booking any hours to a role. To manually control the open request flag, choose the Resource Scheduling tab from Scheduler Mode in the Project Editor. Right-click the role for which you would like to turn on/off the open request flag and select or deselect Open Request.
Booking an Unscheduled Resource
At any time, a scheduler can book a resource to a project by adding a role and booking hours.
Borrowing Resources from Other Cost Centers
Permissions for scheduling are assigned based on cost centers, and only the people in cost centers for which you have Schedule Resources permission are considered in your domain and available to be scheduled by you. However, Projector does support booking resources from outside your domain, with the cooperation of a scheduler with Schedule Resources permission for an "external" cost center.
In order to borrow a resource, you must first share the role you are trying to staff with an external cost center. Sharing a role will:
- Allow schedulers with Schedule Resources permission for the external cost center to be able to book resources onto the role.
- Cause the project on which a role is shared to show up when either you or the external scheduler filter a project browser for Show Projects I Can Change.
- Give both you and the scheduler supplying the resource the ability to modify hours booked for that resource for the course of the assignment.
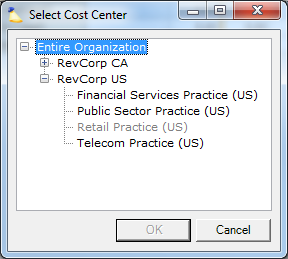
Steps to Borrow A Resource
- Know which cost center the resource you want is in. If you know the name of the specific resource you want you can use the Search by Name feature. This will show the resource's cost center.
- If the role does not already exist, create a role with the criteria of the resource you want
- Right-click the role and choose Share Scheduling The following dialog is shown. Select the cost center you noted in step 1. The engagement's current cost center will be grayed out.
- The role will have two blue arrows added (
 ), indicating it is shared
 - Contact a scheduler in the resource's cost center. Ask them to assign someone to the role.
- The scheduler MUST also book one hour of time to the resource.
You will now be able to book the resource on your project. The booked resource will appear on the project assigned to the shared role, and will be indicated by the borrowed resource icon (  ).
).