Resources and Users (CQ)
A resource is a person whose time, expenses, or schedule are managed in Projector. A user is a person that can log into Projector. Most people are both resources and users. You can make some people users without making them resources. For example, you might have a finance clerk that uses Projector but never reports time and expenses in Projector. But each resource is always a user (note that you can prevent resources from logging in if you'd like). Keep these two important rules in mind:
- When you want to add a resource, go to Users & Resources | Resources. Projector will add both a resource and a user.
- When you want to add a user only, go to Users & Resources | Users. If you need, later, to make the user a resource, just add him as a resource. If you use the same email address then Projector will link the user and resource records.
Some information, such as the person's email address and name, is kept both on that person's resource and user records. Changing it in one place changes it in both places. The unique information on each record can be summarized as follows:
- User
- Permissions
- Contact information
- Resource
- Title
- Cost Center
- Location
- Normal working hours override
- RDC override
- Temporary worker flag. This flag was previously used to identify contractors. You should now use the Resource Type for this instead.
- Billable flag (i.e., is the person expected to be billable?)
It is much easier to manage large numbers of users and resources by using user types and resource types. User types allow you to manage permissions in groups rather than individually. For more information on user types, refer to Setting a User's Permissions.
To manage resource settings, use resource types. Resource types are defined in the administration tab, under Users & Resources | Resource Types. An example of a resource type definition is shown below:

Resource types helps you create new resources with the correct attributes, so that resources are created in a consistent fashion. It also provides a convenient way to group resources for reporting. Once a resource is created, changing the definition of the resource type will not change the attributes of that resource, but it will update the utilization targets, time off reasons and the effect of the rate type on the resource's RDC, which are set exclusively based on the resource type. If you change a resource's type then Projector will ask if you would like that resource's attributes to be changed to match the selected resource type.
To begin, try entering a few resources. The Add Resource screen is shown below:
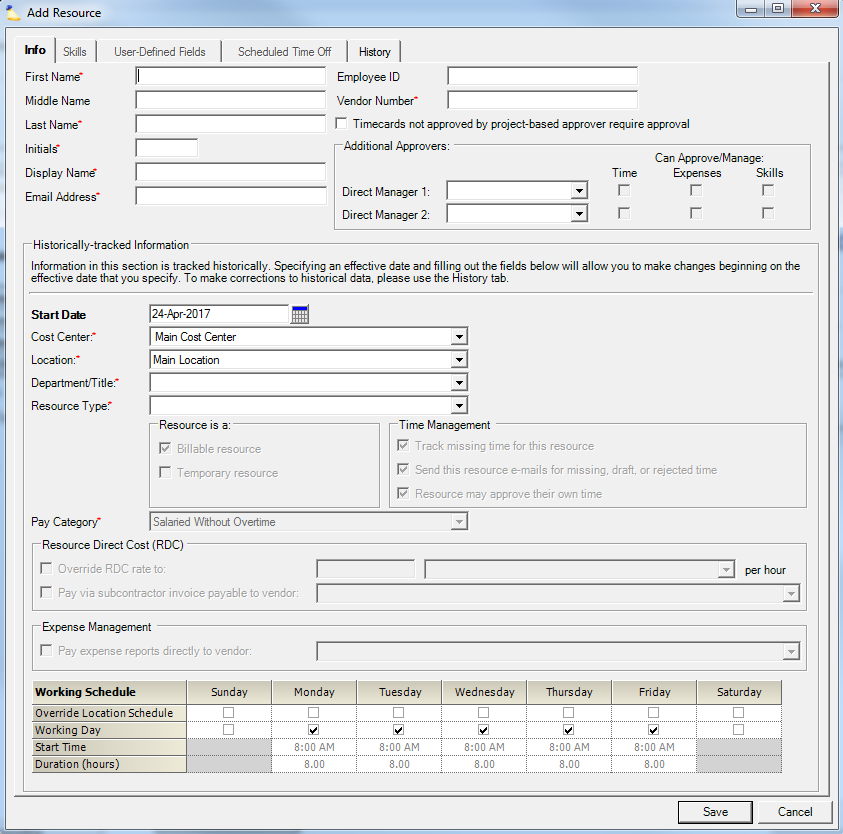
Consider the following when entering data into the fields:
- The display name must be unique.
- By default, Projector creates display names in the format "FirstName LastName". This can be changed to "LastName, FirstName" in Administration | Setup | Account Settings. Change the Display Name Format from "{0} {2}" to "{2}, {0}". That won't change any existing display names, but it will change the default format of new display names.
- Vendor Numbers are used by Projector when sending expense reports to the accounting system. The display name is used by default to populate this field.
- If all time reported by the resource requires approval, then place a check in the Timecards not approved by project-based approver require approval box.
- If you assign a Direct Manager for a resource and check the box for Time, that individual will be able to approve the resource's time off and project time that requires a "resource-based approver". Alternatively, you can give selected users the permission to approve time for all resources in specific cost centers. Those users can also approve the resources' time off and the resources' time that is reported on projects configured for "resource-based" time approval. Most project time is approved by either a project manager or a project's management team, but a project can also be configured to have a specific time approver or no approver at all (auto approval).
- A Direct Manager can also be specified as a resources Expenses approver and Skills approver. These approvals work similarly to time approvals, in that an approver can be set for all resources in a particular cost center. Expense approvers can be set on a project by project basis, similar to project time approvers (project manager, project management team, resource-based approver, specific approver, etc.).
- The resource's start date does not need to be accurate when you are first setting up Projector, but it does need to be at least as early as the first day for which that resource might enter time or expenses.
- The Billable Resource box should be checked if the resource is expected to report time on billable projects. (This will be set by default, based on the resource type selected.) It is used in reports, primarily to separate the billable employees for the purpose of utilization reporting. Checking or not checking this box does not impact a resource's ability to report time on billable projects.
- The Temporary Resource box identifies contractors for reporting purposes. This will be set by default based on the resource type selected.
- If the resource is paid by the hour then use the pay category "Hourly". If the resource is paid a fixed amount each period then use "Salaried without Overtime". If the resource is paid a fixed amount per period, plus an additional amount per hour of overtime, then use "Salaried with Overtime". These settings enable Projector to correctly report utilization and resource profitability.
- The resource direct cost rate is normally determined by the resource's title. That allows managers to view project profit without knowing any employee's exact compensation. However, contractors are often paid at a much higher rate than full-time employees. Use the Override RDC Rate field to set the hourly rate for contractors. Use it for all employees if you are not willing to use average rates by title. If you need to restrict who can view resource direct cost data, then give only selected users permission to view Resource Direct Cost (RDC) Data and Financial Data in Utilization Reports. Permission settings are described later.
- The normal working hours are determined based on the location. If the resource normally works a different number of hours, then enter the user's working schedule in the Working Schedule grid.
- For more guidance on setting up resources, click here.
Projector tracks many of a resource's attributes historically. To learn how to change historical information and how to add new historical information, click here.
Once the fields are filled in then save the new resource. Projector will prompt you for user information as shown below:
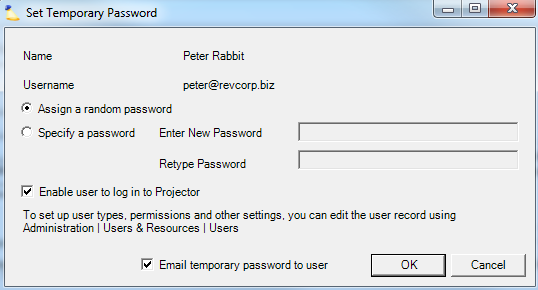
A good practice is to let Projector assign a random password, but not to let Projector send an email with that password (unless the user is expecting an email). You might, for example, be entering a resource that will start in a few weeks. Instruct new users to use the "Forgot Password" link on the login screen.
The resource's initial user permissions will be determined by the user's User Type. The default User Type is the one listed first in Administration | Users & Resources | User Types (usually "Resource").
To learn more about setting user permissions click here.