A time baseline is the basis for a budget. A baseline can be very simple - this project must be completed within 100 hours. Or very complex - this project has three tasks and each task cannot cost the client more than $3,000 every week. This help document guides you through the baseline creation process.
This form is reached from multiple Management Portal locations:
- Clicking Create New Baseline from the Project Budget Tab
- Any subtab of the Project Task Planning Tab choosing Create Time Budget Baseline from the multi-select dropdown
- The Baseline Browser and choosing Create Time Budget Baseline from the mutli-select dropdown
Permissions and Settings
To create a project time budget you must have at least one of the following permissions:
- Be the engagement manager
- Have the cost center permission Maintain Projects and Engagements
- You are a Project Manager and the current Stage Editor allows you to Create Baselines
The Wizard
The wizard consists of four tabs described below. You can navigate between the tabs by using the Back and Next buttons. When creating a new baseline, it often makes sense to start with the left most tab and work your way right.
You can have multiple baselines, so choose a name that will allow you to differentiate between them. For example, you might have a baseline that shows a budget broken down by Resource or by Task. Your name should reflect this.
To open the wizard go to a project's budget tab. Then pick the time subtab. Finally click the Create New Baseline button in the lower left. Alternatively, you can create a new baseline from the Task Planning tab or the Baseline Browser.
Once the parameters of a baseline have been specified, they cannot be edited. You can only make the baseline inactive or delete it. Both of these actions are performed using the Baseline Browser. If you need to update your plan then you should create a new baseline and recreate it using the copy Current Active Baseline setting on the info tab.
Info Tab
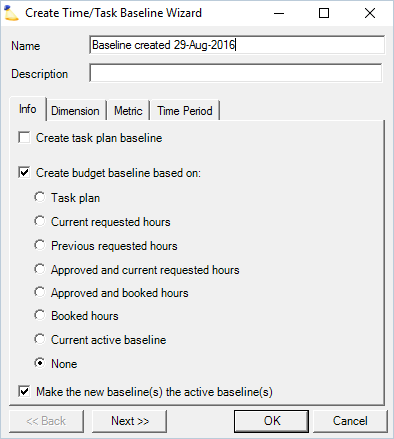
The info tab determines whether you want your budget to be pre-populated with data. You can choose where you want that prepopulated data to come from. For example, I want to create a new budget and prepopulate it based on the scheduled hours. Or, I want to prepopulate my budget based on the old budget. Afterwards I will make some tweaks.
Checkbox | Description |
|---|---|
Create task plan baseline | Check this box to create a new task baseline. This box will default as checked if you are creating a Task Baseline, and the remaining tabs of the wizard will be grayed-out. See Project Task Planning Tab if you are not familiar with task plan baselines. |
Create budget baseline based on | Prepopulate your budget based on one of the choices below. For many of the options you can preview the data that will be used by going to your resource scheduling tab and choosing the corresponding value from the View dropdown.
|
Make the new baseline(s) the active baseline(s) | Check this box to make this baseline the active baseline after it is created. Useful when you are replacing the current plan with a new one. Untick this checkbox if you are adding additional budgets for informational or planning purposes only. |
Example
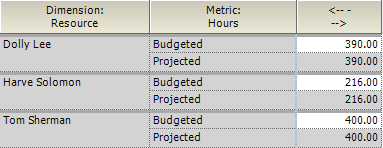
In the screenshot below you can see that the budgets for the individual resource has been prepopulated based on projections. You can then adjust the text in the white cells as appropriate.
Dimension Tab
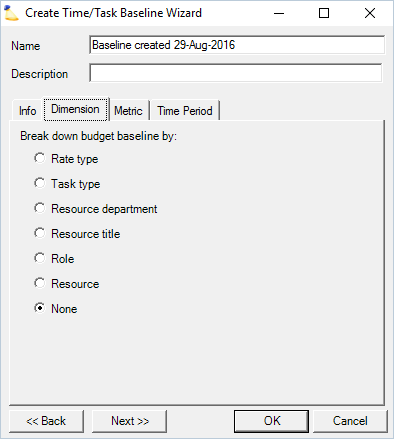
A dimension breaks down a metric into more granular detail. For example, if you had a budget of 90 hours, you could break this down between three resources. If the options on this tab are grayed out, then you have chosen to copy the Current Active Baseline on the Info tab. As Projector cannot reliably translate between say departments and resources, you are locked into the current dimension type. To make this tab editable again, choose a different option on the info tab. See the table below to learn about the different ways you can break down a budget.
Dimension | Description |
|---|---|
| Rate Type | Populated based on each rate type defined on the Project Rates Tab. Using Rate Type as a dimension has one unique aspect. While Projector does track historical time at the task type level, it doesn't currently allow for resources to be scheduled to a task type. As such, Projector has to lump all of the Estimate To Complete hours together under the line item none. |
Task Type | Populated based on each Task Type defined on the Project Task Types Tab. Using Task Type as a dimension has one unique aspect. While Projector does track historical time at the task type level, it doesn't currently allow for resources to be scheduled to a task type. As such, Projector has to lump all of the Estimate To Complete hours together under the line item none. |
Resource Department | Populated by each department defined in the Department and Title Editor |
Resource Title | Populated by each title defined in the Department and Title Editor. If you are using a title based override for a role then the resource's original title is still used. This is because Projector views an override as a billing title or a customer facing title - as opposed to an internal title. |
Role | Populated by each role defined on the Project Roles Tab |
Resource | Populated based on each assigned resource on the Project Editor Roles Tab |
None | Don't break down the budget any further |
Example
In the screenshot below you can see that the budget was broken down by each resource on the project.
Metric Tab
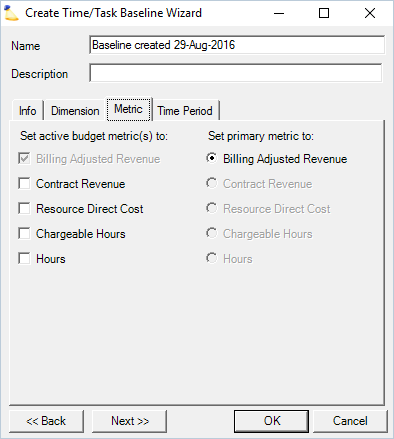
Tick the checkbox next to each metric you want to track. See the grid below for an explanation of each. Choose a radio button for the primary metric. This will be shown in reports and dashboards. If an active metric option is grayed out, it is because the primary metric radio button is ticked for it. Choose a different radio button as appropriate.
Active Metrics
Tick the checkbox next to each metric that you want to track for budgeting. Typically for a fixed price project you would be interested in Resource Direct Cost or Hours. Whereas for a T&M project you would be interested in Billing Adjusted or Contract Revenue.
Active Metrics | Description |
|---|---|
Billing Adjusted Revenue | What the client will be charged |
Contract Revenue | What you would have charged based on negotiated rates without adjustments |
Resource Direct Cost | The internal cost of your employees |
Chargeable Hours | The number of hours with positive billing adjusted revenue |
Hours | All hours against this project |
Primary Metrics
Choose a radio button for the primary metric. The primary metric is used for display in the Project Dashboard and in Reports. It should represent the metric that you most often want to see or be used for checking project performance.
Example
In the screenshot you can see that two metrics have been specified for this project, Chargeable Hours and Hours. The project manager can now track project performance across both metrics. The primary metric is Chargeable Hours because that is what the client is most concerned about.
Time Period Tab
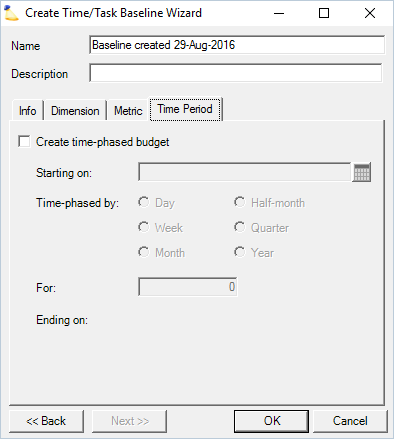
This optional setting allows you to time phase your budgets. For example, you might want to budget 400 hours for each month of a project. Leave this checkbox unticked if you don't care about time phasing.
Control | Description |
|---|---|
Starting On | Enter a start date for the budget. Starting with the Winter 2016 release of Projector, you will no longer be able to enter budget amounts previous to the start date or after the end date. This limitation was added to accommodate a planned change in the user interface around budgeting. If you need budget data outside your time period, simply expand the time period. Existing budgets will remain unaffected and usable. |
Time Phased By | Choose the period by which the baseline will be phased:
|
For | Enter the quantity of units for which the budget will extend. For example, if you chose Week from the Time-phased by section, enter the number of weeks. |
Ending On | Based on the information entered above, Projector will automatically calculate the end date |
Example
In the screenshot below you can see a budget time-phased by week for each of three resources. Each column is a week. Each row is a resource.
