| Excerpt | ||
|---|---|---|
| ||
define access rules, permissions, and notifications to groups of users |
...
Edit a user type and tick the Inactive checkbox. An inactive type cannot be assigned to users, but any existing users with this type will continue to have it. If you want to completely remove the type, you should run a User Report and filter on everyone with the type you wish to deactivate. Then reassign them.
User Type
...
The user type editor is where you define permissions, notifications, and manage which users are assigned to this type. The first four tabs all have to do with permissions. This page does not go into defining all of the individual permissions. You can visit the following help pages to learn what each permission does. What this page will cover is how each tab is generally used.
The last tab, assigned users, has lots of built in functionality for adding, removing, and changing cost centers for individual users.
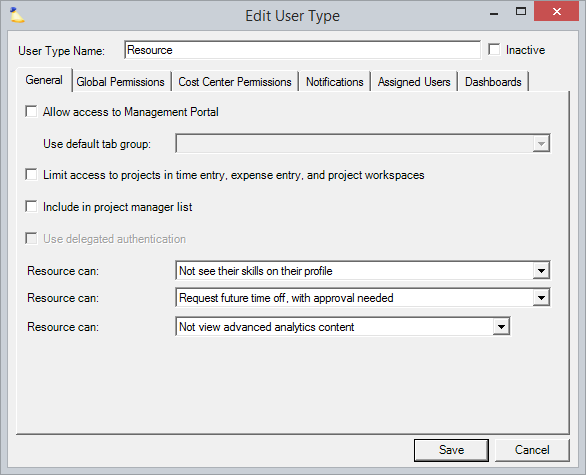
At the top of the dialog you specify the type name and whether the type is inactive.
Fields
The table explains the fields:
Control | Description |
|---|---|
User Type Name | Enter an appropriate name. For instance, scheduler or project manager or contractor. |
Inactive | Tick the checkbox to prevent this type from being assigned to any additional users. Users currently with the type will keep it. |
General Tab
General permissions are either on or off and govern access to a few major areas of Projector. Please see this page for a full explanation of each permission.
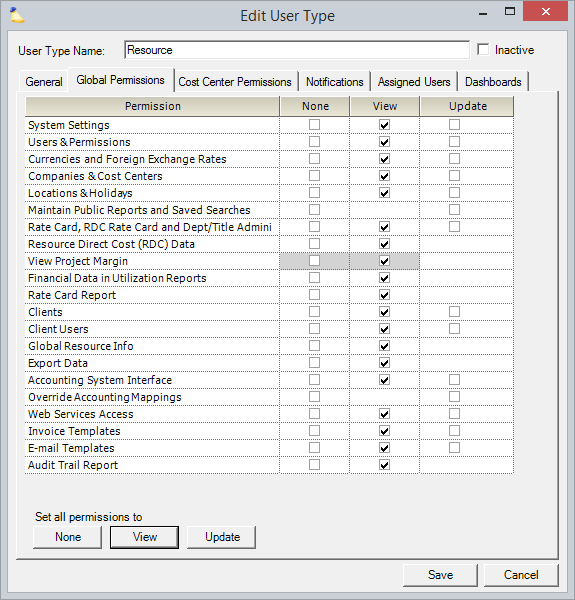
Global Permissions Tab
Global Permissions are used to control access to features which affect the entire system. They are divided into none, view and update. For an explanation of each line-item, see Global Permissions.
| Access Level | Description |
|---|---|
| None | You cannot access or edit the feature |
| View | You are given read-only access to the feature |
| Update | You can view and edit the feature |
Cost Center Permissions Tab
Cost centers are used to model your company's hierarchy in a tree. Your cost center structure will depend on your organization's structure. Some companies may choose to model geographically, others by division, or some combination thereof. Cost Center Permissions are a way of granting access to users based on this hierarchy. For example, your company may be modeled into geographic offices. Jim will be given a cost center permission so that he can only approve time for resources in North America. For a full explanation of each cost center permission see Cost Center Permissions.
You may have noticed that in the screenshot below there is no way to pick a cost center. How are you supposed to specify that Jim has permission to make changes in North America if the editor doesn't let you pick North America? The trick is to look at the last tab in the editor, Assigned Users. Here is where you can define the cost center scope of this user type.
- Tick the checkbox for each cost center permission this type should have
- Go to the last tab in this section, Assigned Users, and apply the permissions to a specific cost center.
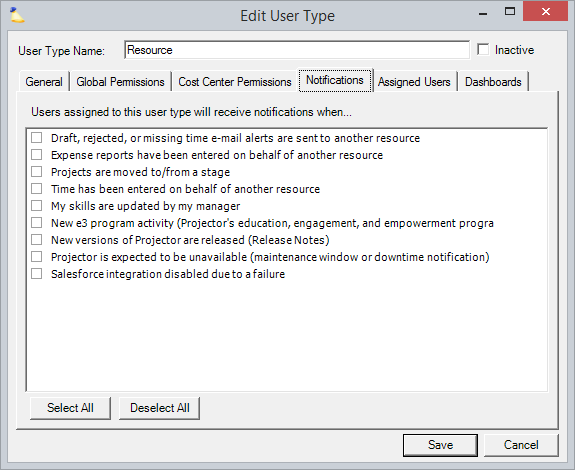
Notifications Tab
Tick which email notifications your users should receive. As with the cost centers tab just discussed, when the type is assigned you will specify which cost centers they receive emails from.
Assigned Users Tab
This tab shows you which users in your installation are assigned this type and allows you to add to and modify that list. Anyone displayed in bold is using this type as their Primary Type. Types that are shown in non-bolded text are Additional Types. A Primary Type cannot be removed, an Additional Type can.
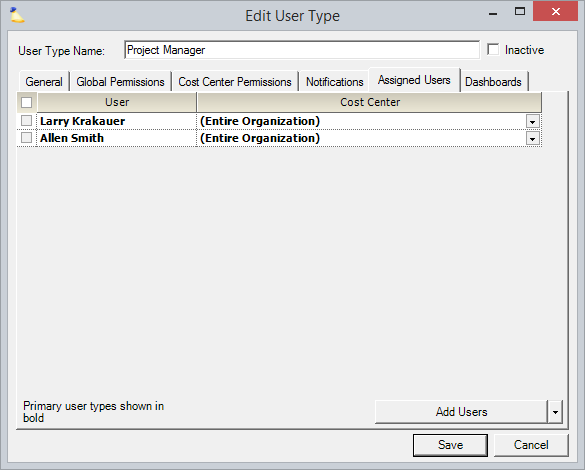
Add User to Type
Click the Add Users button from the multi-select dropdown and find people you want to add.
Remove User from Type
Tick the checkbox next to each person you want to remove the type from. Then choose Remove Selected Users. If the checkbox is unavailable then it is because this is a Primary type. You'll first need to switch the user to a different type before removing the current one. You can either do this on individual user profiles through the User Editor or through the Set as Primary feature discussed below.
Set this Type as Primary
Tick the checkbox next to each resource you want to set the primary type for. Click Set as Primary from the multi-select dropdown box. The current type will become their primary type. Their previous primary type will in turn become an additional type.
Change Cost Center for Type
Use the dropdown list in the Cost Center column to determine which cost center and child cost centers this type applies to.
Dashboards Tab
Display up to five custom business intelligence tables and charts on a user's My Home Page or Performance Dashboards. The dashboards shown to a user come from their Primary User Type. Dashboards are commonly used to show things like:
- Accrued vacation
- Utilization
- Company performance metrics
- Personal performance metrics
This tab is only editable if you have the Advanced Analytics module enabled.
| Tip | ||
|---|---|---|
| ||
Your installation comes with five example dashboards as shown in ProjectorBI Base Home Page Dashboards. You can define your own or edit the base ones as a starting point. Users can only see the dashboards if they are also provisioned in ProjectorBI. Once provisioned in ProjectorBI, users do not need dashboards, reports, or data sets shared to them. The only thing required to view a project dashboard is to ensure it has been published (see alias in table below). Or you may want to review the ProjectorBI Initial Configuration guide. |
...
| Control | Description | |
|---|---|---|
| Dashboard | Name your dashboard. Users will see this name from their home page or performance dashboards. | |
| Alias | To display an AAM dashboard, the dashboard's alias must match the value entered here. To assign an alias to a dashboard -
When a dashboard has an alias, it does not need to be explicitly shared to a user for viewing. Think of an alias as a way of publishing a dashboard to anyone viewing it via My Home Page. | |
| Parameters | Parameters are used to filter a dashboard down to show specific data. The most common use case is to have a dashboard that shows data about many users, but when viewed via My Home Pageit | only contains data about the current user. To accommodate this, the following special short codes are supported. . |