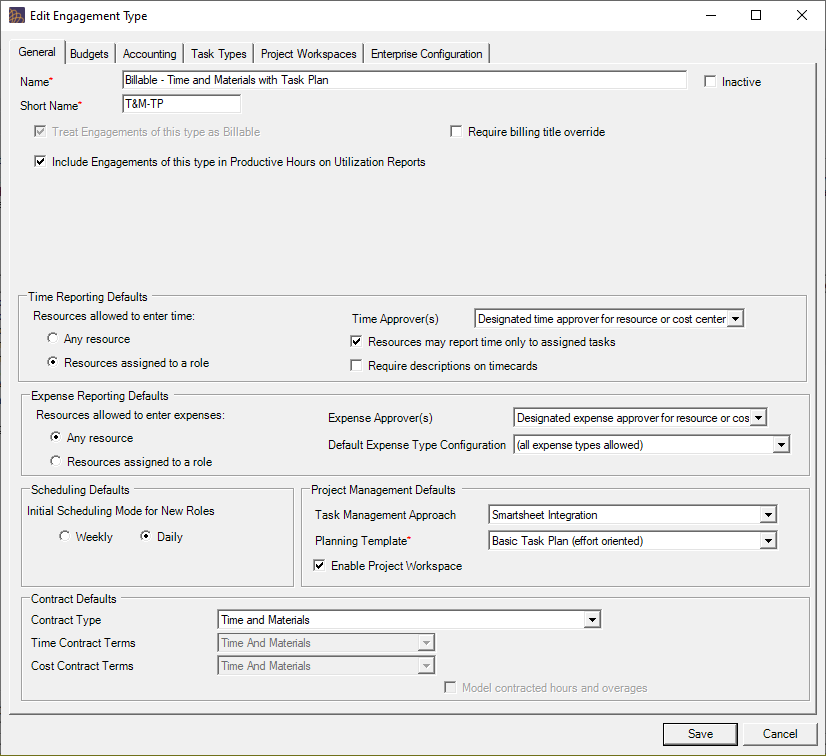
Engagement Type - General Tab
The general tab defines several engagement type attributes and specifies default settings found on the Project Info Tab and the Engagement Contract Tab.
This screen is reached by going to Administration Tab | Job Accounting Heading | Engagement Types Section | Editing an Engagement Type.
Permissions and Settings
To edit Engagement Types you need the global permission Maintain System Settings set to Update.
The Enable Detailed Task Management field will be grayed out if your account settings disallow DTM.
General Settings
These high level settings are used for naming and grouping.

Setting | Description |
|---|---|
Name | This name will be displayed when viewing engagement types in reports or dashboards |
Short Name | Use a name that can easily be identified with the full name. |
Inactive | Check this box to make this engagement type inactive. Although engagement types in use by an engagement may not be deleted, they may be made inactive. Inactive engagement types may not be assigned to engagements. Engagement types may be re-activated at any time by removing the check from the Inactive box. |
Treat Engagements of this type as Billable | Classifying an engagement type to be Billable indicates that work on this type of engagement earns revenue and increases utilization percentages. Non-billable engagements never have revenue associated with them. When working with Projector's reports, you will be able to easily filter engagements based on their billable or non-billable status. Please ensure this setting is correct because it cannot be changed once the engagement type is created. Projector locks this down because revenue routing is dependent on the billable/nonbillable status of an engagement. Changing it midstream could cause errors on the finance side of the equation. |
Include Engagements of this type in Productive Hours on Utilization Reports | Projector allows you to flag an engagement type as Productive. Any hours logged against productive engagements can then be triaged by our reporting engine. This is useful when you need to compare hours across disparate resources. For example, sales work may be on a non-billable engagement type, but it is still important work. You can now compare productive hours for your sales folks against productive hours from your delivery team. The previous example was a case where non-billable engagement types are counted as productive work. The inverse may also be true. Hours on a billable engagement type are considered non-productive. For example, you may have a Travel engagement type. The expenses are billable, but the hours not considered productive. Unlike many other settings in the Engagement Type editor, changes to this setting are immediate and affects both existing and new engagements. |
| Require billing title override | This setting fulfills a very specific business purpose. Please understand it before enabling this feature. Engagements of this type require that every single role on a project be edited and have the radio button Override billing rate to chosen. Then a specific billing title must be assigned. That title's rate will then be used for billing purposes. This setting should be used in conjunction with the Resources Assigned to a Role setting on the project info tab. Otherwise, resources can auto-create roles by submitting time to the project and bypass this setting's intended use. You will not be able to save a project until all roles have the title overridden. |
Dashboard
Time Reporting Defaults
From here you decide what the default time approval process, who can submit time, and whether descriptions are required. Each of these settings can be overridden on a per project basis on the Project Info.

Control | Description |
|---|---|
Only Allow Booked Resources to Report Time | Designates that this project can only accept time from resources that are requested or booked to the project, even if there are no booked hours for that resource. When unticked, anyone can enter time against this project even if they do not yet have a role. A role will be automatically created for them when they submit their time. When ticked, you can lock these people out of the project. This way when you are planning your project, only those that your schedulers have specifically booked to the project will be able to enter time. |
Only Allow Assigned Resources to Report Time to Task | Only resources assigned on the Task Plan Tab can report time. Only availabe if the Detailed Task Management checkbox is ticked under the Project Management section. |
Require Descriptions on Timecards | Designates that this project requires all resources to include a description for each time card when entering time. Time cards entered for this project without descriptions will be automatically rejected and returned to the resource for correction. |
Time Approvers | Open the drop-down menu to choose who will be responsible for approving time cards submitted to this project.
See our Time and Expense Approval article for a detailed walk-through of time approvals and configuration. |
Expense Reporting Defaults
From here you decide the default expense approval process and who can submit expenses. These settings can be overridden on a per project basis on the Project Info Tab.

Setting | Description |
|---|---|
Only allow booked resources to report expenses to project | Designates that this project can only accept expenses from resources that are requested or booked to the project. |
Expense Approvers | Open the drop-down menu to choose who will be responsible for approving cost cards submitted to this project. Remember that regardless of permissions granted here, Projector does not allow anyone to approve their own expenses.
See our Expense Report Workflow how to for more information on configuring expense approvals. |
Scheduling Defaults
The Initial Scheduling Mode for New Roles determines how your schedulers will block out hours for each employee scheduled on a project. Choose from either Daily or Weekly. Use daily mode to assign the number of hours someone needs to work every day. Use weekly mode if you do not care on what day the work is done, just that it is done that week.
This setting can be overridden on the Project Info Tab.
Your schedulers can override this setting for each individual on the project from the Project Resource Scheduling Tab.

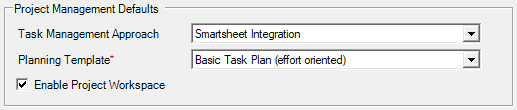
Project Management Defaults
Please see the descriptions below for details.
These settings can be overridden on the Project Info Tab.
Control | Description |
|---|---|
Enable Detailed Task Management | Check this box to enable the DTM. DTM is managed from the Task Planning Tab of this editor. DTM allows for Gantt Chart style tasks. |
Enable Project Workspace | Check this box to enable the Project Workspace. A workspace is an online portal that allows team members to share notes, files, log issues, and otherwise collaborate on projects. In addition, your clients can view their invoices. |
Contract Defaults
These settings specify the default contract terms. Time and cost can each have their own contract type. These options will be grayed-out if the Treat Engagements of this type as Billable box is not ticked.

Contract Type | Description |
|---|---|
| Contract Type | Choose from the dropdown the default contract type for this engagement type. If no available type matches what you need, we recommend you create a new contract type that does. Or, you can pick custom from the dropdown list and manually specify the Time and Cost contract terms. |
| Time Contract Terms | Specify your time contract terms |
| Cost Contract Terms | Specify your cost contract terms |
| Revenue Recognition Method | Choose rom Percent Complete vs Revenue Schedule. See Revenue Recognition Wizard. |
| Holdback | Only available for Percent Complete contracts. Allows you to withold a certain amount or percentage of money until the contract is fulfilled. |
| Model contracted hours and overages | Only available for Revenue Schedule contracts. When ticked, allows you to specify the number of contracted hours for a date range. You can then move overage hours to another project. |