How are resource direct cost (RDC) rates applied?
Resource Direct Cost, or RDC, is the internal cost that Projector has assigned to your resources. This cost is reflected in calculations like project profitability and resource margin. Projector offers several ways to model RDC. This document's goal is to help you identify where a resource's RDC numbers are coming from and all the places in Projector where RDC can be set.
At the support desk we often get questions like, how come my profitability is off for this resource? Or, why is this resource's RDC rate wrong? This article will help you find that answer yourself.
RDC values are set in four different areas of Projector with each area being more specific than the last. By default, a resource's rate is determined by their cost center, department, and title. This can be overridden on a per resource level. This in turn can be overridden on a per project role basis. Finally, depending on the resource type and standard rate type, RDC may be scaled to compensate for things like overtime. Each of these areas are described in the sections below. If you already have an idea of a resource's RDC configuration, you can jump straight to the most relevant section below.
- Default RDC driven by cost center, department, and title
- Override default RDC and set it specifically for a resource
- Override on a specific project role
- Override based on the type of work done
The last area where you will see RDC affected is in reporting. There is an option to look at RDC as purely an hour cost verse what their daily cost is. Your daily cost may scale if you work more or less hours than typical.
Department and Title
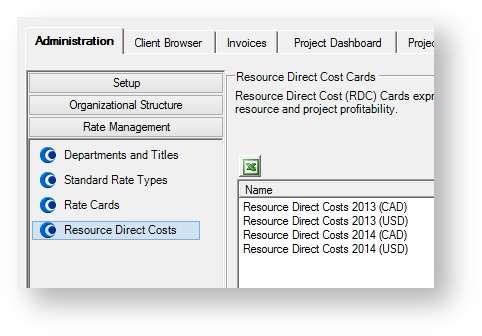
Your installation has what we call RDC cards that define the hourly rate for each department and title in your installation. You will likely have multiple cards defined. Perhaps for each year, perhaps for each location. By default, a resource's cost center, department, and title determine their RDC rate. This section will show you how to look up this information for a specific resource and find their hourly rate. For example, Project Managers in the Software department get paid $50 an hour. Or Interns in the Finance department get paid $12 an hour.
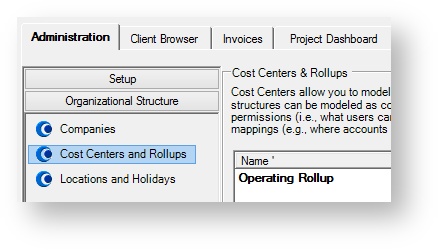
To see your RDC cards visit Administration | Rate Management | Resource Direct Costs.
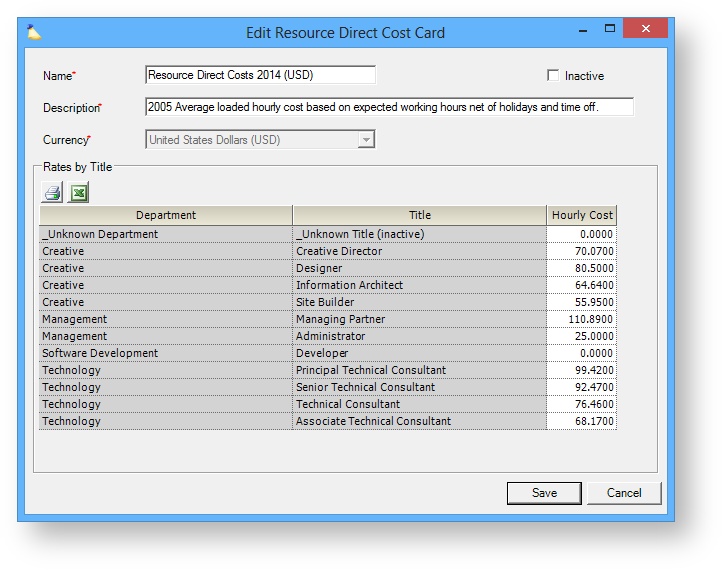
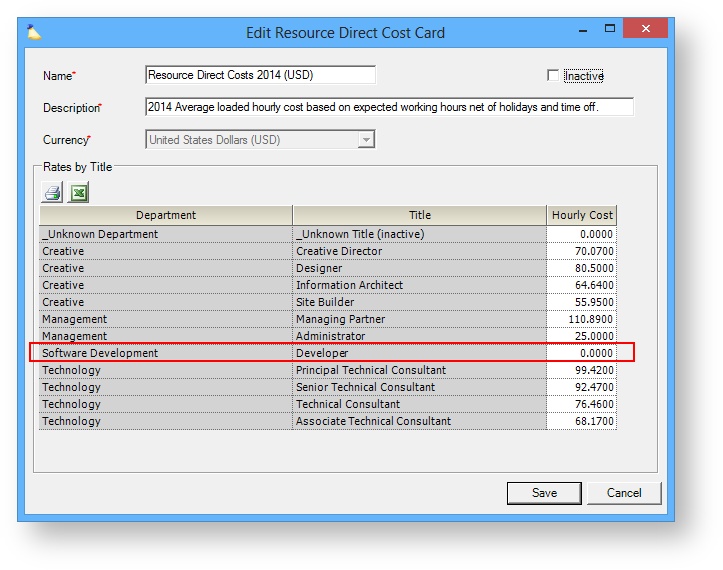
Then double click on a card to open the editor. In the screenshot below you can see the Department + Title combination as well as the defined rate.
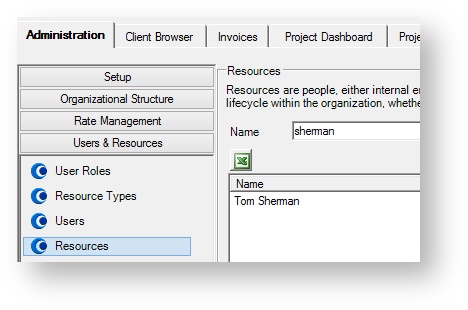
So now you know where high level rates are defined. Let's go to our resource to start figuring out how their rate maps to the RDC Card Editor. Find the resource you are interested in the resource editor. Administration | Users & Resources | Resources.
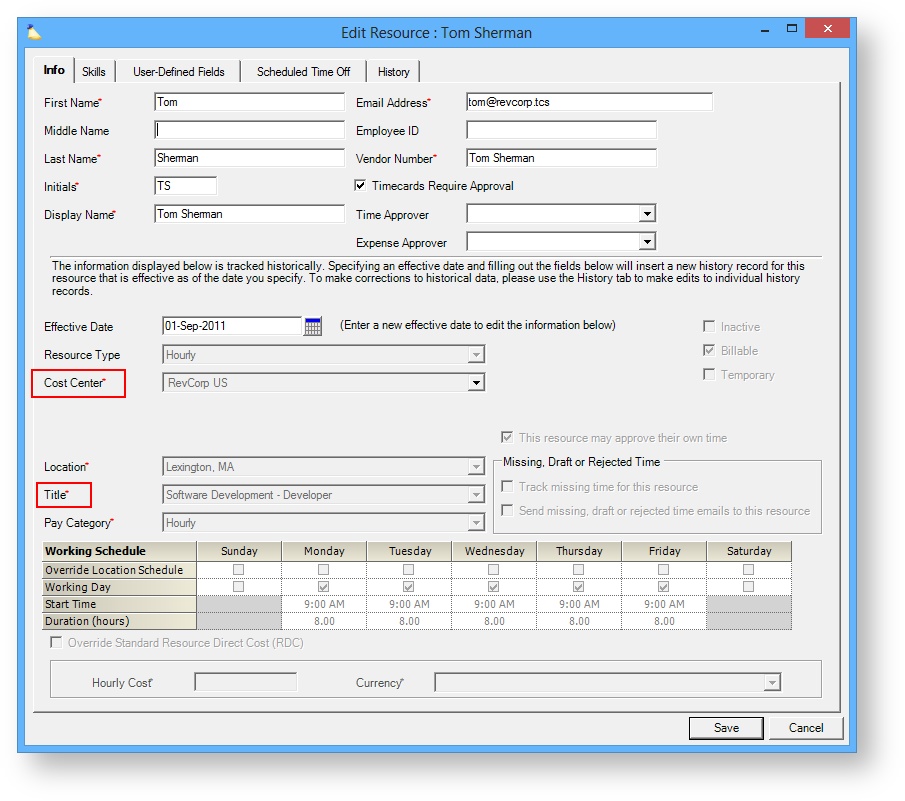
Double click to open the editor and you will see that every resource has a Department and a Title. There is also a new, third bit of information we need. This is the Cost Center. Make a note of the resource's Department, Title, and Cost Center. In the screenshot below it would be
- Software Development
- Developer
- RevCorp US
Now go to Administration | Organizational Structure | Cost Centers and Rollups. Double click on Operating Rollup to open the cost center editor.
In the cost center editor find the CC you noted earlier. Select it and click the Edit button.
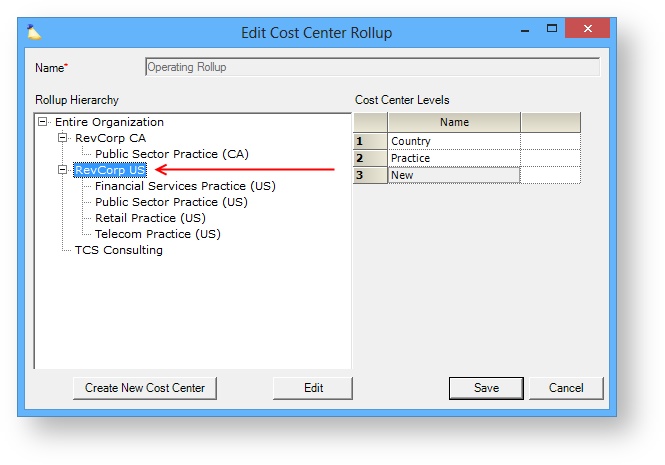
This opens the cost center editor and the last section displays which RDC card it uses. Remember way back to the beginning of this section where I showed you the RDC card editor?
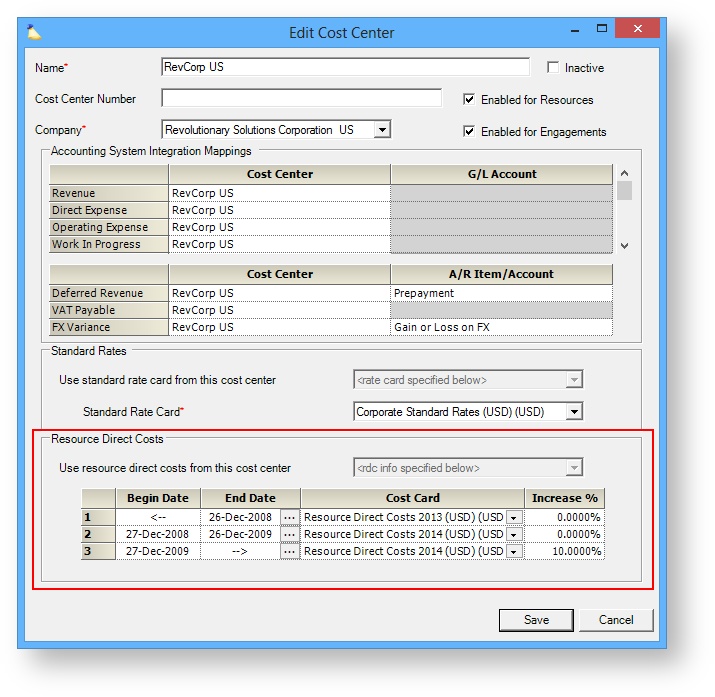
Now you just need to cross-reference the card referred above with the Department and Title we noted earlier. In this example I want the rate card for 2014. So I edit that card (remember I showed you how back at the beginning?) and find the correct Department/Title line item. Tom works for free! That can't be right!!!
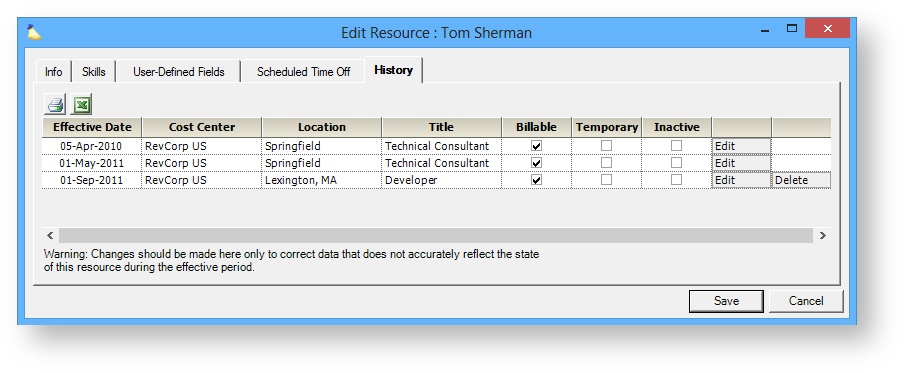
In the previous example we used the resource's current department, title, and cost center. But you should also pay attention to the resource's history if you are examining time cards in the past. You can see in the screenshot below that Tom used to be a Technical Consultant. To find the RDC rate you would follow the same steps as above, but use this title instead. Also note that the Cost Center could have changed.
Resource Based Override
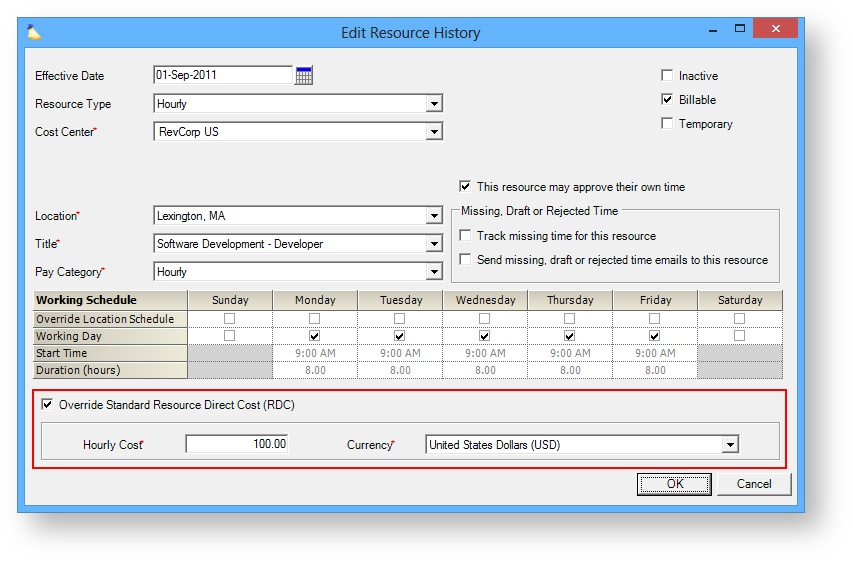
Your resource may not use Title, Department, and Cost Center to determine their rate at all. Instead, a specific rate is defined instead. We often see this with contractors who have a fixed hourly cost. Edit the resource's profile and check the bottom of the editor to see if an override is in place. In addition, you should check the history tab if you are looking at historical time and make sure there is not an override there.
Role Based Override
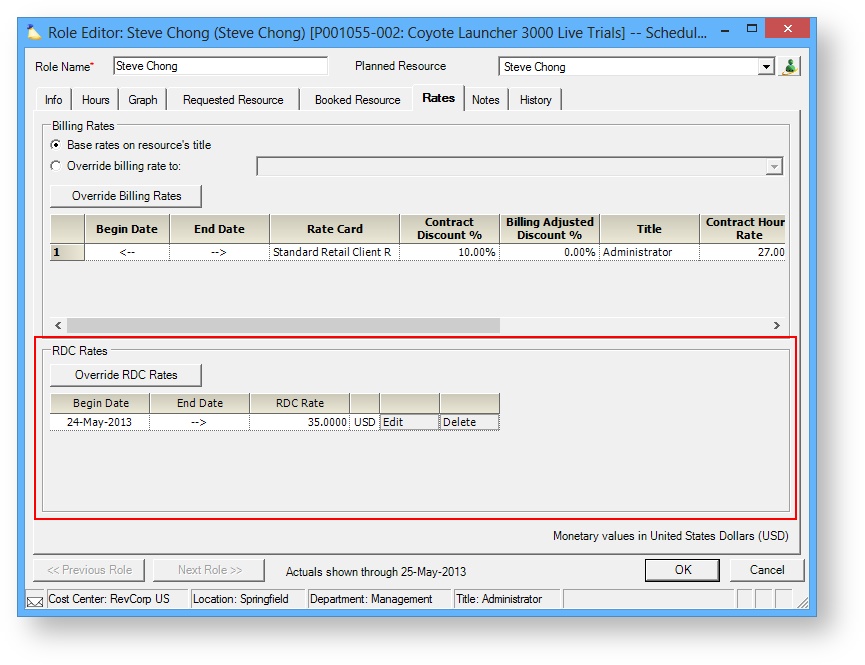
Role based overrides have a specific RDC defined at the role level. We often see this with contractors that are paid X on one project and Y on another. To find whether the RDC data is coming from a role-based override, you will first need to identify the hours and the project/role they were for. The best way to do this is to run a Ginsu Report and bring in the data fields Person Hours and Resource Direct Rate. Then add row fields Project Name, Role Name, Resource Name, and Work Date. You can then edit each project, edit each role, and identify whether there are any rate overrides.
Resource Type + Standard Rate Type
Every resource in your organization has a type. For example, salaried, hourly, or contractor are common types. Some of these types may be paid overtime, and as such their RDC cost should also increase. In this example, I will use OT as everyone should be familiar with it, but your own installation may model other types of work that effect RDC.
To start, we have to identify the type of work that was done. For this you should run a Ginsu report and bring in data fields Person Hours and Resource Direct Rate. Then add row fields Resource Name, Resource Type, Project Name, Standard Rate Type, and Work Date. Identify the hours you are interested in and note the following:
- Resource Type
- Standard Rate Type
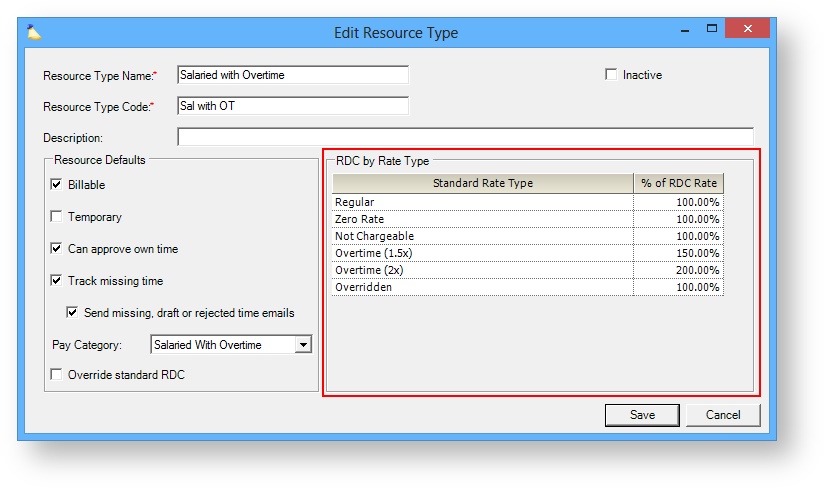
Then go to the Resource Types Editor. Administration | Users & Resources | Resource Types. Edit the resource type you noted above. Cross reference with the Standard Rate Type you noted down to see how RDC is affected. In the example below, any Overtime hours increase the resource's RDC.
If time was improperly marked as OT and you need to correct it, then you can use a pre-invoicing or invoicing adjustment to change the rate type.
If you need to change or edit a resource's type, you can do so from the Resource Editor. Remember to check the history tab if you are looking at time in the past.
Whole-Day RDC
Whole day RDC is a reporting construct used to accurately model RDC when resources work more or less hours than a typical day requires. You'll find on the parameters tab of some reports the option to turn Whole Day RDC on and off. The way it is calculated depends on how an individual resource is compensated. The table below gives some examples, using the assumption that resources are compensated at the rate of $100 an hour.
| Compensation | Description | Example |
|---|---|---|
| Salaried | Daily cost is scaled up or down to their typical working hours. | Jim only works four hours on Monday, but you still need to pay him for a full day. His cost is $800. Jim works ten hours on Friday, but you only have to pay him for a typical day. His cost is $800. |
| Salaried with Overtime compensation | Whichever is greater - daily rate or hours worked. | Sally only works four hours on Monday, but you still need to pay her for a full day. Her cost is $800. Sally works ten hours on Friday, and you need to pay her overtime. Her cost is $1000. |
| Hourly | Hours times rate. | Jen works four hours. Her cost is $400. Jen works fourteen hours. Her cost is $1400. |
Projector intelligently disperses revenue between a resource's projects. So if Jim works 1/3 on project A and 2/3 on project B, then each will be assigned a proportional amount of his whole day RDC.
When should I use Whole-Day RDC?
There isn’t really a “quick” answer on this. It really depends on the goal of your reports. A general philosophy is that anything tied to project or client profitability should not use whole day RDC, which rewards PM’s for working employees beyond their scheduled hours. These reports should typically be run to include “Engagements in the entire organization”, and should charge the project 1 hour of labor for 1 hour worked (or for overtime, if appropriate). That said, it’s really a business decision.
- If an employee works 10 hours in 1 day, should the project be charged for 10 hours of labor or for 7.5 hours of labor? With whole day RDC, the project would be charged for 7.5 hours of labor.
- If the same employee works 10 hours, but now spread over 1.5 days, the project would be charged for 10 hours of labor. (it’s not ambiguous here).
- With whole day RDC, if the employee worked over the weekend, the project would not be charged for any labor.
- Additionally, with whole day RDC, if the employee only entered 3.75 hours for that day, the project would still be charged for 7.5 hours.
That's why we generally don’t recommend whole day RDC for project-related profitability measurement. It makes it harder to compare project performance, because you could have one PM that demands weekend and off-hours work and another who doesn’t, and the one who does would look more profitable.
Anything that is resource based (utilization, resource profitability) should use whole day RDC, but only for actuals so you don’t penalize an employee who isn’t 100% scheduled yet.
You may find yourself running two reports. One by resource with Whole-Day ON and another by engagement with Whole-Day OFF.
Role RDC Override
There is a special case where we ignore RDC values you have entered. This occurs when:
- Whole-Day RDC is ON and
- Apply RDC override on a role
In this case, we fall back and use the RDC rate from the resource's department/title. Why do we choose to do that? It comes down to understanding a resource's total cost for the day including things like hours across multiple projects and time off. When you apply RDC overrides at the project level we can't really know which RDC override is the "correct one" to apply across an entire day. So in this case we use the resource's typical as defined by their resource profile.
Lumpy RDC
When running report projections you may find that project profitability becomes increasingly inaccurate the further into the future you look. This happens when resources are only partially scheduled. For example, Jim is only scheduled on one project currently. He will be assigned to more projects once the future is more clear, but in the meantime, with whole day RDC on, Jim looks very expensive because all his RDC is attached to a single project. There are three ways to solve this problem.
- On the parameters tab for the Ginsu, Engagement, and Engagement Portfolio reports set whole-day RDC ON for actuals and OFF for projections
- Run two reports. One report with whole day RDC ON for the past. A second report with whole day RDC OFF for the future.
- Create a G&A project that holds a resource's typical hours. As the resource's schedule becomes clear, transfer hours from the G&A project to the real projects.
Missing RDC
Another reporting scenario that often comes up occurs when you are looking at projections and your RDC is returning as zero. This occurs when you do not have any booked hours in reporting time buckets. For example, Jim is scheduled for the next two months, then has a gap for three months, and then is scheduled again for two months. If you report by months or something more granular, that gap in the middle isn't going to have any RDC associated with it. Reason being, RDC in the Ginsu is associated with hours. No hours, no RDC! Again, there are a couple ways to handle this.
- Use a Utilization report which returns RDC based on normal working hours rather than booked hours
- Schedule time out on a G&A engagement for all your resources. This ensures there is always some hours to associate RDC with. Notice that this ties in neatly with the solution just discussed about lumpy RDC.