...
...
| Excerpt | ||
|---|---|---|
| ||
check resource availability, book resource requests, and assign users to unnamed roles |
| Info |
|---|
The resourcing dashboard is one of the most powerful areas of Projector. From this one area you can view resource availability, view resource requests, book resources to requests, and assign/reassign roles. Because this area covers so much functionality, you may find it a little confusing at first, but once set up it will likely be one of your "go to" tools. You can even set up multiple dashboards to cover your most frequent needs. The dashboard is role driven. You configure the dashboard to show specific roles you are interested in. For instance, show me all the roles with open requests. Or, show me all the roles that Barry is assigned to. The grid then displays one row for each role found. From there you can jump out of the role editor to perform more actions. Perhaps edit the role, edit the project the role is a part of, reassign the role, and more. As each type of user will have different needs, and configure their dashboards to suit themselves, we won't get into dashboard configuration here. Instead, see the In Practice section below to see some real world examples of people configuring their dashboards and why they made the choices they made. This will help you get ideas of what you may like and also show you how to implement them. In general, we find that schedulers and project managers get the most use out of the resourcing dashboard. |
To reach the resourcing dashboard choose View | Scheduling | Resourcing Dashboard.
Permissions and Settings
The resourcing dashboard does not require any special privileges. It merely provides easy access to actions you can already perform. Because you can perform many different actions from here, we won't get into every individual permission. The resourcing dashboard is all about roles. So if you can't view a role, you can't see anything on the dashboard. Instead, we'll give you a brief overview. To review all permissions possible, please visit the relevant help pages for the actions you are performing. For example, visit the timeoff help if you are booking timeoff. Here are the most basic permissions you need to view roles:
If you view your dashboard by Resource you will need:
- cost center permission View Resources or Request or Schedule Resources
If you view your dashboard by Project you will need:
- cost center permission View Projects
- cost center permission Request or Schedule Resources and the project stage allows a scheduler or requester to do what it is they want to do (request or book hours, change hours, create roles, etc)
- to be a Project Manager on the project you wish to view
The colors you see in the dashboard are defined on the color map editor.
The resourcing dashboard gives you quick access to the Project Editor and Role Editor.
Read the Dashboard
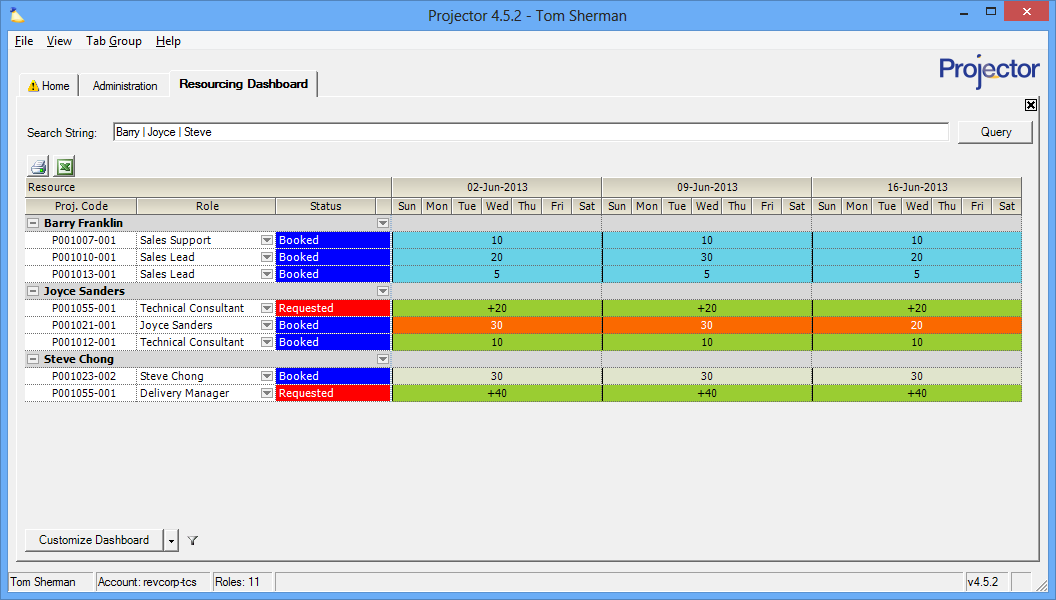
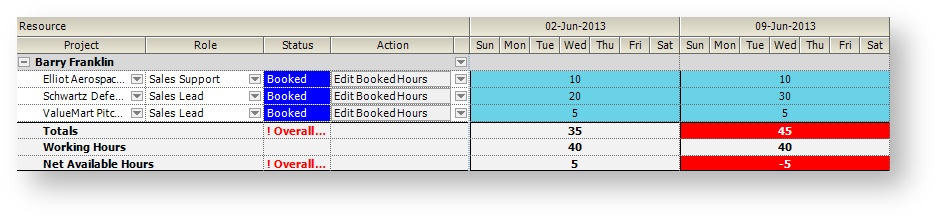
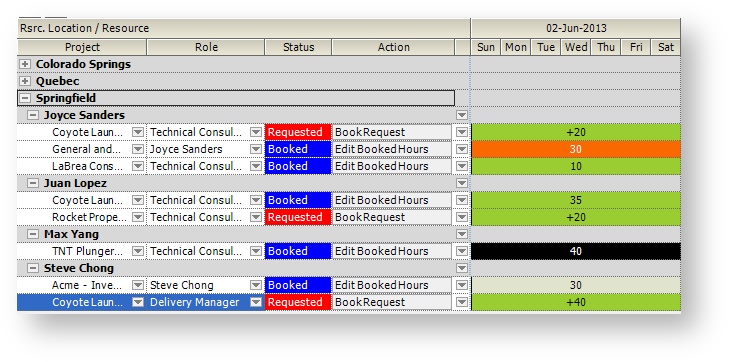
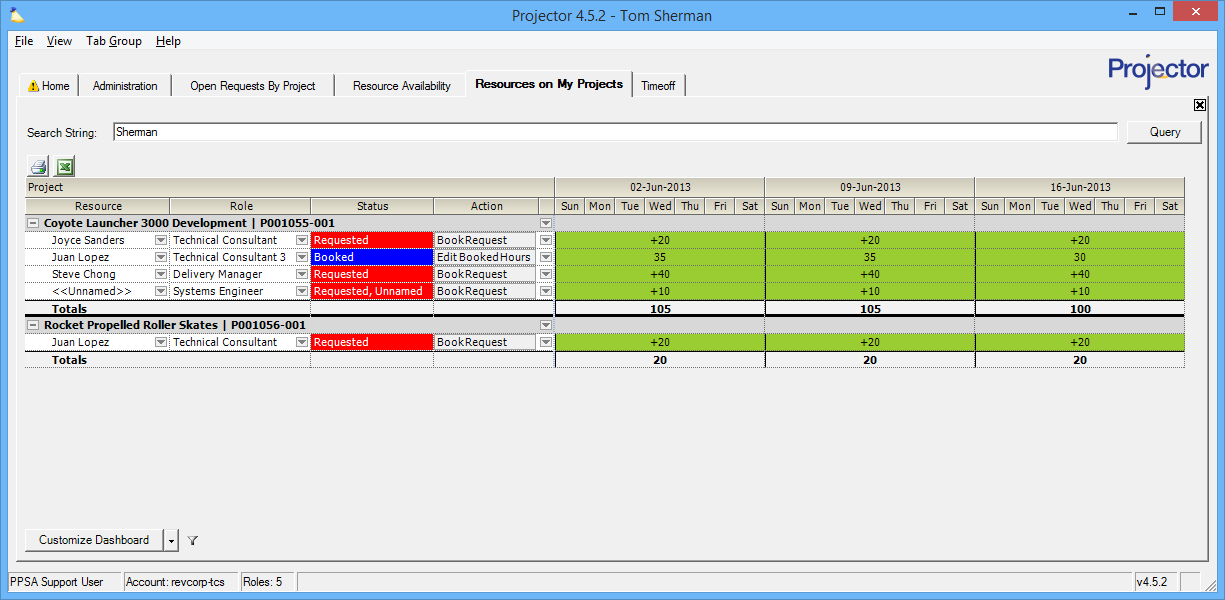
Before we get into configuring the dashboard, let's take a look at a simple case of reading the information in the dash. In the screenshot below you can see three resources. Under each resource are the roles they are currently assigned to. Let's look at the second resource, Joyce Sanders. She is on three roles. The first role is a request for her time. Over to the right you can see then number of hours requested for each week. She already has booked time on two other roles. If you fulfilled her request she would be working 60 hours next week. That seems like too much! Now you've reached a decision making point. Here are some likely options to help Joyce out:
- Assign someone else to the request
- Move some of Joyce's other work to someone else
- Push some of Joyce's work off into the future
- Book the hours anyways and tell Joyce she'll have to work extra hard this week
One other thing you've probably noticed are the colors. Blue, green, and orange. What do these mean anyways? The colors indicate the type of engagement the role is on. Orange indicates a G&A engagement in my installation. So I know it is safe to transfer Joyce from this non-billable work to billable work. Your installation's colors are defined on the Scheduled Hours Color Map Editor.
You can also see that I have columns for Project code and role. Projector offers dozens of customized columns so that you can see just the information you need. Want to see who Barry's project manager is? No problem! How about the client's name or Barry's department. All of this is configured from the Customize Dashboard screen. See the next section to learn how.
Customize the Dashboard
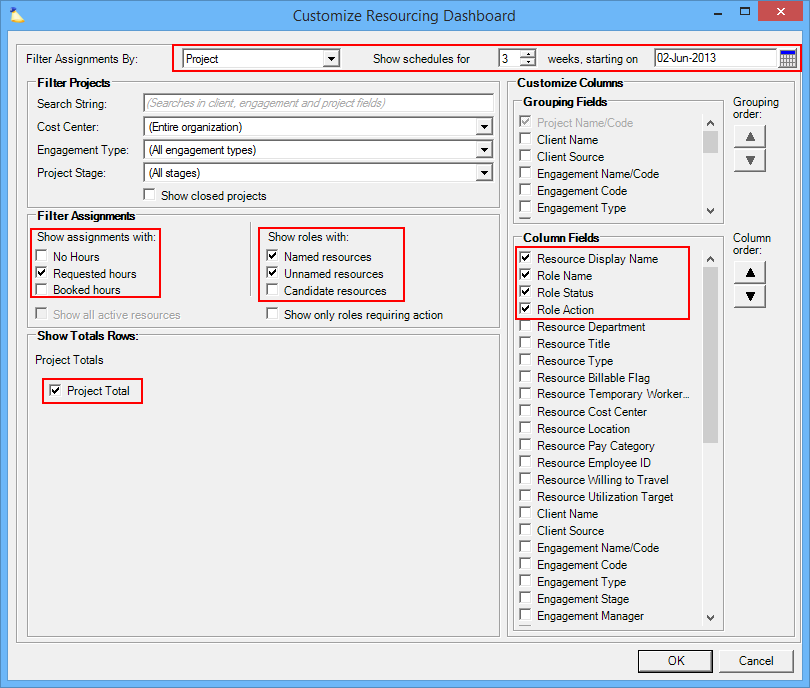
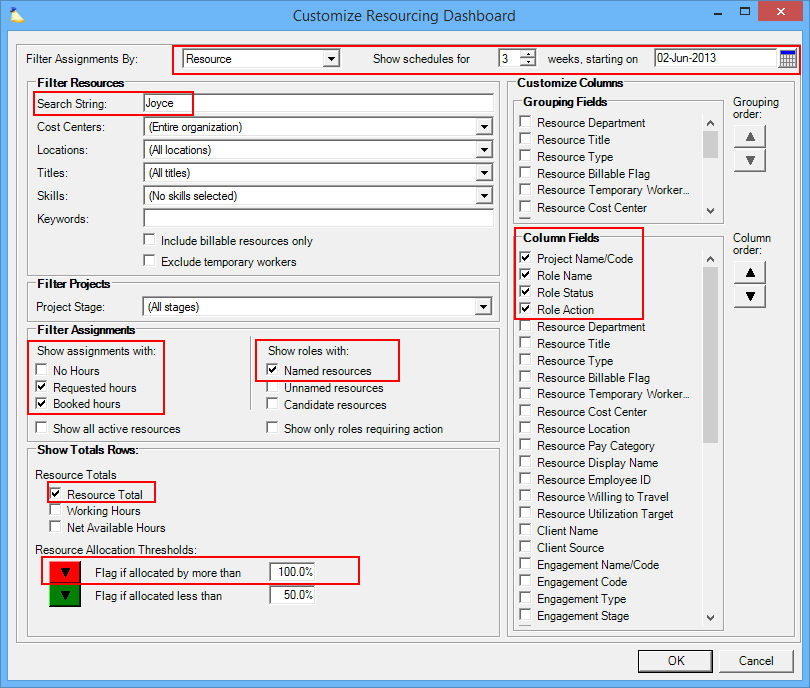
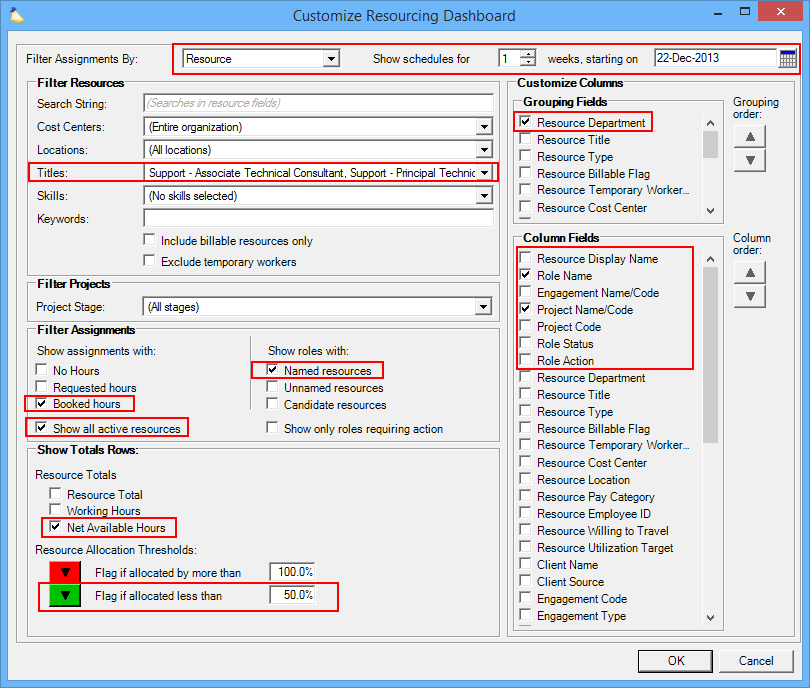
So you've read through a short introduction on how to view the dashboard, but now we are going to get into the core of the dashboard. Learning how to customize it to show the information you want. When you visit the dashboard for the first time, probably the first thing you want to do is jump into the customization area and tweak it to show the data you want. Start by clicking Customize Dashboard in the lower left. This brings up the customization screen. You'll one of two layouts, both pictured below (click to enlarge).
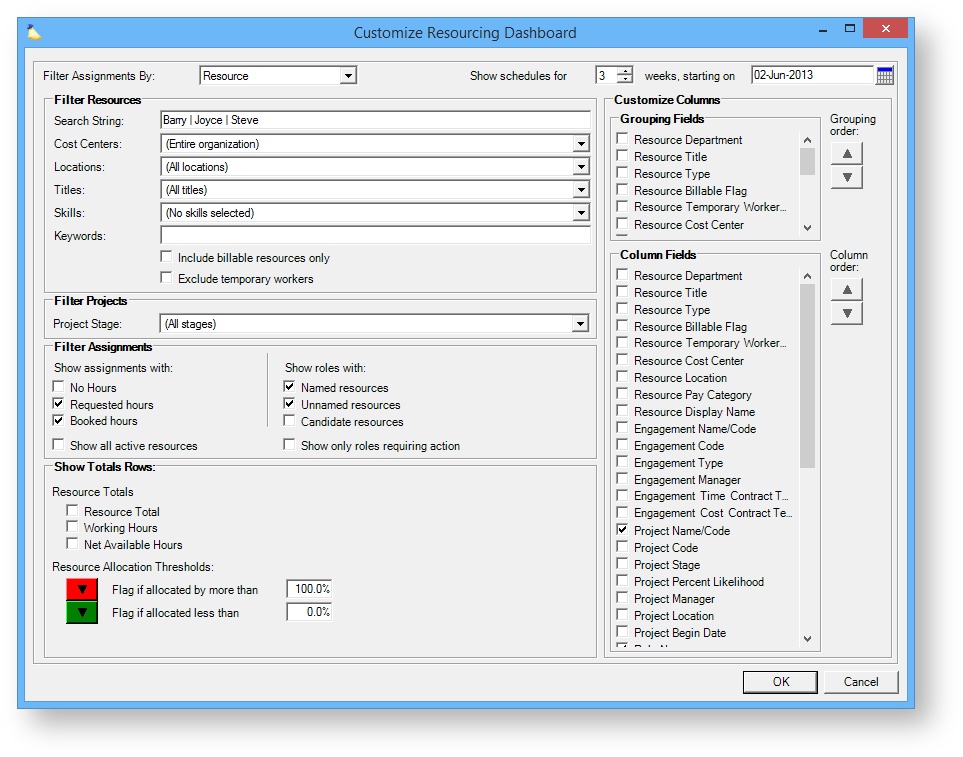
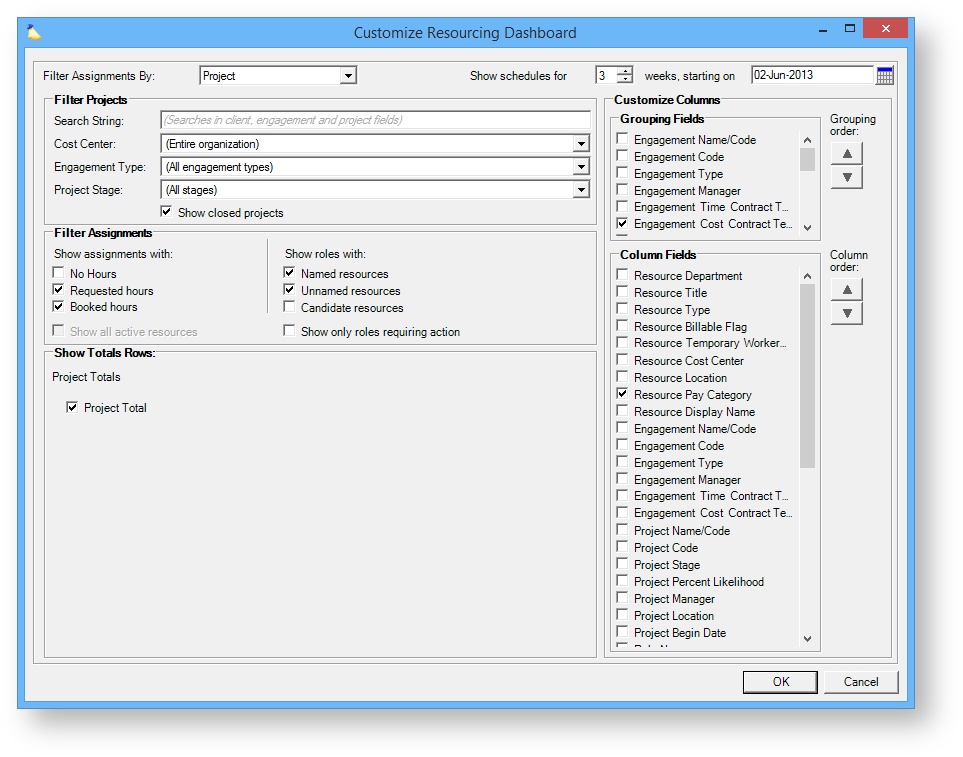
Your view is determined by the Filter Assignments By dropdown in the upper left. One view shows information related to resources, the other is information related to projects. Choose the view that matches how you want to group your roles at the highest level. As a resource manager I probably want to use the Resource setting. This shows me Joyce and all the roles she currently has. I get a whole picture of just Joyce. If I am a project manager then I probably want the Project view. This shows me my projects and all the roles on them.
Also in this upper area is where you specify the time span you are interested in. Pick a date, and then the number of weeks of information you want to see. You can display up to ninety-nine weeks of data.
The remaining fields let you filter and organize your data. We'll explain the following subsections what each filter/organization area does and how you would use it.
General Settings
Group your roles by resource or by project? What time interval are you interested in?

| Field | Description |
|---|---|
| Filter Assignments By | Group roles by resource or project? |
| Show schedules for | How many weeks of data do you want to see? |
| Starting on | What is the first week you want to start seeing data for? Projector will roll back the current selected date to your first day of week. For weeks in the past, we don't show requests. This is because it is too late to do anything about a request in the past. |
Filter Project / Resource
The filters presented here depend on whether you are viewing your dashboard by Resource or by Project. The filters themselves are pretty self explanatory and explained in the tables below. There is one trick with the dropdown lists though. When you expand a dropdown list, you tick the checkboxes for each item you are interested in. The dropdowns only include active items. So inactive cost centers, titles, etc will be excluded. If anyone you are searching on is still part of an inactive group, they will always be excluded. To always include everyone then you need all checkboxes ticked or all checkboxes unticked. Both configurations tell Projector to 'just get everything.'
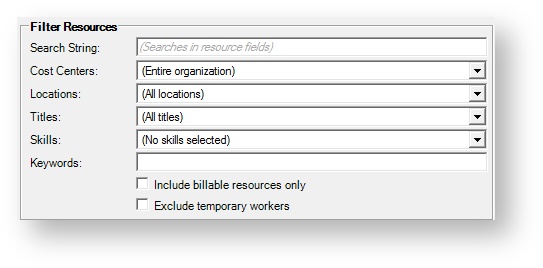

| Filter Resource Fields | Description |
|---|---|
| Search String | Projector searches against the resource's display name. You can enter multiple search terms and use our smart searching tools to narrow your results. |
| Cost Centers | Return resources that are currently in the selected cost centers |
| Locations | Return resources that are currently in the selected locations |
| Titles | Return resources that have one of the selected titles |
| Skills | Return resources that have any proficiency in any of the selected skills. Searching on a skill will exclude all unnamed roles from the results. This is because an unnamed resource does not have any skills. |
| Keywords | Enter keywords to search resource resumes. Keyword search involves doing an additional lookup on documents stored in Projector. Queries won't run as fast because of this. You can enter multiple keywords and use our smart searching tools to narrow your results. |
| Include billable resources only | Only show resources who have the Billable checkbox ticked on their resource profile. This flag does not return resources who worked on billable projects only, it returns resources that you consider billable. |
| Exclude temporary workers | Exclude resources who have the Temporary checkbox ticked on their resource profile. Temporary resources are typically contractors. This flag is being phased out in favor of resource types. |
| Filter Project Fields | Description |
|---|---|
| Search String | Projector searches against the following fields:
You can enter multiple search terms and use our smart searching tools to narrow your results. |
| Cost Center | Return projects whose engagement is in the selected cost centers |
| Engagement Type | Return projects whose engagement is in the selected engagement types |
| Project Stage | Return projects that are in the selected project stage |
| Show closed projects | Show projects that are in a closed stage |
Filter Assignments
The filter assignments area is identical for both Resource and Project filtering. From here you figure out what kinds of roles you are interested in. You might say to yourself, "I want to see all unnamed bookings." This becomes a todo list for filling slots. Or you might say, "I want all roles with no hours." Now you can nag project managers to get their requests in.
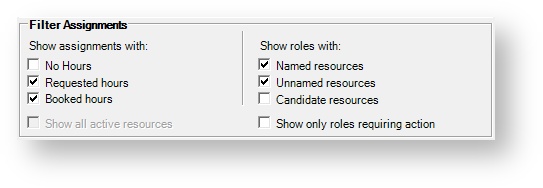
| Assignment Filter | Description |
|---|---|
| Show assignments with | Tick the checkboxes for the types of hours you are interested in
|
| Show Roles with | Tick the checkboxes for the roles you are interested in:
|
| Show all active resources | Just show every active resource in your installation regardless of whether they have any roles. Useful for finding people that aren't doing anything. |
| Show only roles requiring action | Only show roles that have open requests or are unnamed. Roles in the past are not considered actionable, and are excluded. |
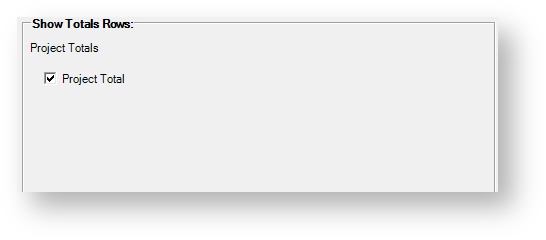
Show Totals Rows
Totals are useful for exactly what you would imagine. See how many hours a resource is allocated on any given week or day. This lets you see how busy they are as an individual. Or, total up hours by project to see how many man-hours a project is consuming on any given week or day. If you are displaying candidate roles, then totals will be off. This is because candidate roles will cause double, triple, etc counting.
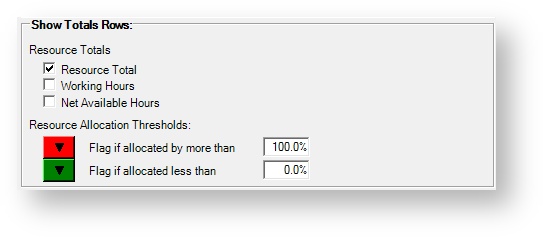
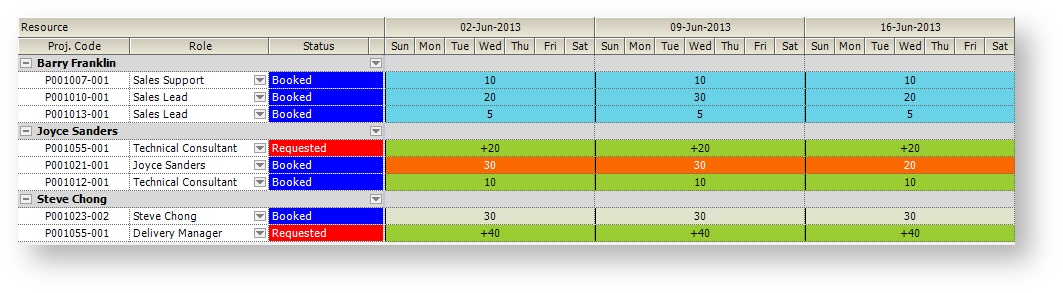
When looking at resources, totals are useful for analyzing an individuals availability, quickly spotting over allocated resources, or quickly spotting available resources. In the screenshot below you can see that Barry is overbooked the second week of June (red cells).
When looking at projects you can see the number of person hours it is consuming in a given week.
| Resource Totals Fields | Description |
|---|---|
| Resource Total | Sum all the hours for a given week or day on all roles returned, and group by resource |
| Working Hours | A resource's Normal Working Hours for this day regardless of holidays or time off. A resource's working hours are determined by their location. These can be overridden on a per resource basis on their resource profile. |
| Net Available Hours | The difference between a resource's working hours and booked hours. This can be a negative number if the resource is overbooked. |
| Resource Allocation Thresholds | Visually identify resources that are over or under allocated. You can click on the arrows to A role is flagged when it exceeds the criteria. So a resource 100% allocated won't be flagged, but a resource who is 101% is. Flags are shown in the Resource Total and Net Available Hours rows. So make sure you have at least one of those checkboxes ticked or this won't be a very useful feature! In the screenshot below you can see an example of an underallocated and an overallocated week.
|


| Project Totals Fields | Description |
|---|---|
| Project Total | Sum all the hours for a given week or day on all roles returned, and group by project (see screenshot above) |
Customize Columns
The customize columns area is where you add additional data points to the dashboard. These are divided into two areas, Grouping Fields and Column Fields. Grouping fields are for pulling like items together. Column fields add additional data points to the grid. The two areas contain a number of duplicate entries, like both contain resource department. If you add one as a grouping field, it's probably unnecessary to also add it as a column field.
Grouping Fields
Tick off grouping fields when you want to group like roles together. This can be hard to explain through words, so take a look at the screenshot below. I've added the grouping field Resource Location. Now I can collapse sections, unclutter my dashboard, and focus on resource's in specific locations.
Your available options depend on whether you are viewing by resource or project. The tables below contain the information for each. Tick as many checkboxes as you want and then use the up/down arrows to organize them in whatever order you want.
| Resource Grouping Fields | Description |
|---|---|
| Resource Department | |
| Resource Title | |
| Resource Type | |
| Resource Billable Flag | |
| Resource Temporary Worker | The temporary worker flag is being phased out for the more powerful Resource Type field |
| Resource Cost Center | |
| Resource Location | |
| Resource Display Name | Always included by default |
| Resource Employee ID | |
| UDFs | Each resource and role UDF defined in your installation will be in the list |
| Project Grouping Fields | |
|---|---|
| Client Name | |
| Engagement Name/Code | |
| Engagement Code | |
| Engagement Type | |
| Engagement Stage | |
| Engagement Manager | |
| Engagement Time Contract Terms | |
| Engagement Cost Contract Terms | |
| Project Name/Code | Always included by default |
| Project Code | |
| Project Stage | |
| Project Percent Likelihood | |
| Project Manager | |
| Project Location | |
| Project Begin Date | |
| Project End Date | |
| UDFs | Each client, engagement, project, and role UDF defined in your installation will be in the list |
Column Fields
Column fields are for displaying additional data in the dashboard. Most of these columns are informational only. For example, what is the role start and end date. However, a few are special. These columns allow you to perform additional steps, like opening a project or editing a role. Each is detailed in the Actions on the Dashboard section found further down this page. You probably want to include these most of the time. The special columns are:
- Role Name
- Project Name/Code
- Resource Display Name
- Role Status
- Role Action
Once you've added all the columns of information you are interested in, you can order them using the up/down arrow buttons. Each column is described in the table below. There is one special column, only available for resource views, called Utilization Targets.
| Column | Description |
|---|---|
| Resource Department | |
| Resource Title | |
| Resource Type | |
| Resource Billable Flag | |
| Resource Temporary Worker | |
| Resource Cost Center | |
| Resource Location | |
| Resource Pay Category | |
| Resource Display Name | * |
| Resource Employee ID | |
| Utilization Targets | Only available when viewing the dashboard by resource. Only displays data for resources whose resource type has utilization targets enabled. The utilization shown is based on the number of weeks you are viewing in the dashboard. For more about how utilization is calculated see Measuring Utilization. |
| Client Name | |
| Engagement Name/Code | |
| Engagement Code | |
| Engagement Type | |
| Engagement Stage | |
| Engagement Manager | |
| Engagement Time Contract Terms | |
| Engagement Cost Contract Terms | |
| Project Name/Code | * |
| Project Code | |
| Project Description | |
| Project Stage | |
| Project Percent Likelihood | |
| Project Manager | |
| Project Location | |
| Project Begin Date | |
| Project End Date | |
| Role Name | * |
| Role Start Date | |
| Role End Date | |
| Projected Hours Start Date | |
| Projected Hours End Date | |
| Role Status | * |
| Role Action | * |
Actions on the Dashboard
There are some actions that can take place directly on the dashboard, like confirming a booking request. Others require that you leave the dashboard and make your changes on the role editor or the project editor. Some actions are available by default. Others require that you add a special column. The special columns are:
- Resource Display Name
- Project Name/Code
- Role Name
- Role Status
- Role Action
The subsections below explain when you can access a set of action items and what they do.
Resource Display Name
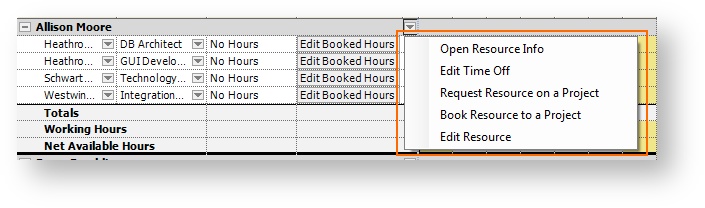
When you search for roles by resource there is a dropdown arrow giving you five available actions. These are also available if you add the column Resource Display Name. Each is explained in the table below
Resource Action | Description | Screenshot |
|---|---|---|
Open Resource Info | Opens a dialog with detailed information about this user as well as working, available, and requested hours. | 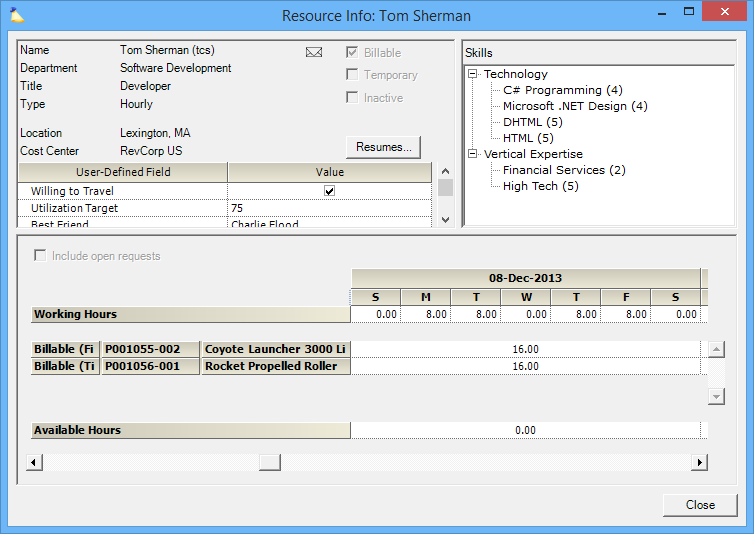 |
Edit Time Off | Opens the Scheduled Time Off tab of the Resource Editor. Add, edit, and delete time off. | 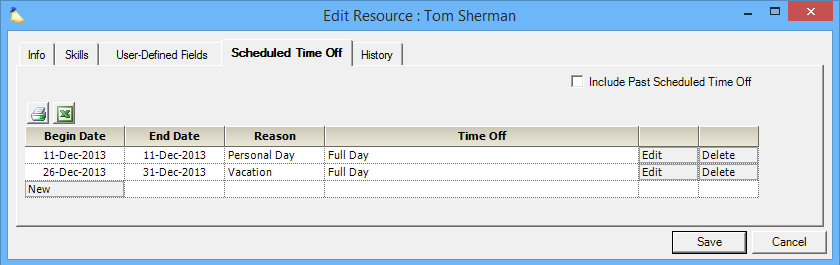 |
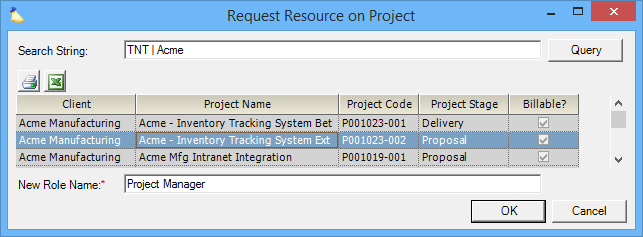
Request Resource on a Project | Request this resource on a project. From the popup dialog:
|  |
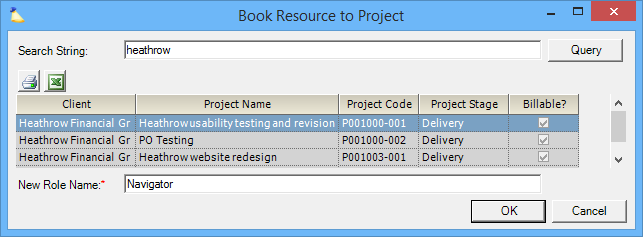
Book Resource to a Project | Request this resource on a project. From the popup dialog:
|
|
Edit Resource | Opens the Resource Editor. The resource editor covers a lot of functionality so you should read the overview page to get an idea of what you can accomplish with this shortcut. |
Project Name/Code
When you search for roles by project there is a dropdown arrow giving you five available actions. These are also available if you add the column Project Name/Code. Each action is explained in the table below
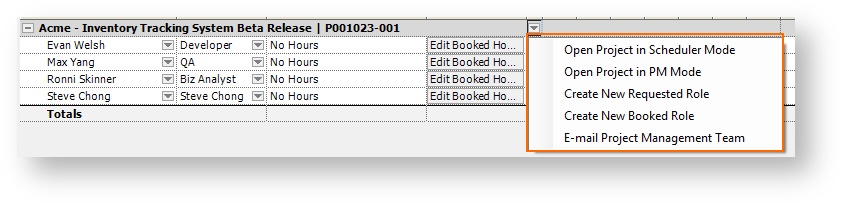
| Project Action | Description |
|---|---|
Open Project in Scheduler Mode | Opens up the Project Info Tab in scheduler mode so that you can edit booked hours. You'll only see this option if you have permission to view the project in scheduler mode. See the Permissions and Settings section of this page to learn more about what this means. |
Open Project in PM Mode | Opens up the Project Info Tab in scheduler mode so that you can edit booked hours. You'll only see this option if you have permission to view the project in scheduler mode. See the Permissions and Settings section of this page to learn more about what this means. |
Create New Requested Role | Create a new requested role on this project. You can't request hours at this time, only create the role. |
Create New Booked Role | Create a new booked role on this project. You can't book hours at this time, only create the role. After the role is created you can use the |
E-mail Project Management Team | Starts a new email message in your default mail client. Everyone on the project info tab marked Include on email list. |
Role Name
If you add the Role Name column you'll see the following two options.
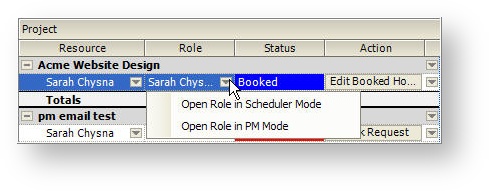
| Role Action | Description |
|---|---|
Open Role in Scheduler Mode | Opens the Role Editor in scheduler mode. You need to have scheduling permissions for the project to see this option. |
Open Role in PM Mode | Opens the Role Editor in project manager mode. You need to have project manager permissions for the project to see this option. |
Role Action
The action column is one of the most important in the resourcing dashboard. It is the one place where you can book and reject hours directly from the dashboard as opposed to opening the project editor or role editor. There are eight available options, each described in the table below.
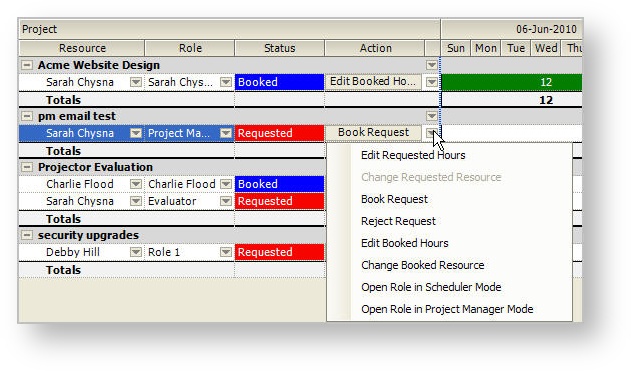
| Action | Description | Screenshot |
|---|---|---|
Edit Requested Hours | Opens to the hours tab of the Role Editor in project manager mode. | |
Change Requested Resource | Opens the resource criteria dialog where you can specify a specific resource or the attributes of the resource you want (location, department, skills and more) | |
Book Request | Confirm this entire request. If you only want to confirm part of the request, you'll need to edit the role. | |
Reject Request | Reject all the requested hours. If you only want to reject part of the request, you'll need to edit the role. | |
Edit Booked Hours | Opens to the hours tab of the Role Editor in scheduler mode | |
Change Booked Resource | Opens the resource criteria dialog where can search for a specific resource to book | |
Open Role in Scheduler Mode | Open the Role Editor in scheduler mode | |
Open Role in Project Manager Mode | Open the Role Editor in project manager mode |
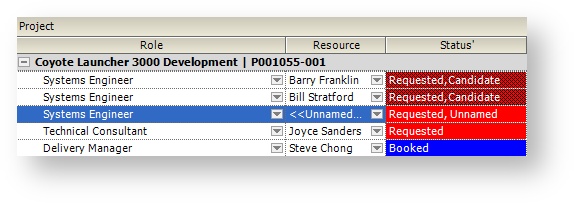
Role Status
This column actually has no actions, but it is a useful column and typically you will want to have it enabled. It's a great companion to the Role Action column just discussed. It displays in bright blue or bright red whether you are looking at booked hours or requested hours. Candidate hours will have a hashed grid over it.
In Practice
If you jumped straight to this section, I don't blame you. The preceding sections contain a lot of dense information, but a few real world examples do a lot to give you an idea of what the dashboard is capable of. I would encourage you to learn how to setup multiple tabs in Projector. This will allow you to have a set of predetermined dashboards that show scenarios most important to you.
Each section will contain a short introduction of what I was trying to accomplish as well as a screenshot of the dashboard. Below, I'll have a screenshot of my customized dashboard so that you can see the choices I made and why.
Open Requests
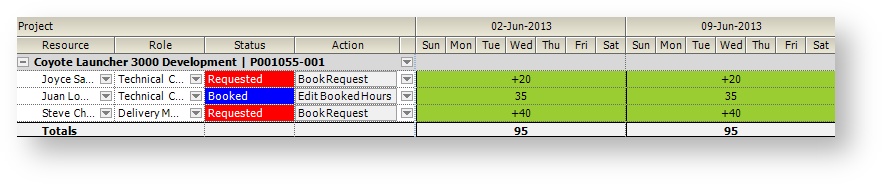
Here I've organized all open requests for the next three weeks. They are grouped by project so that I can see how many hours any individual deliverable is consuming in a week. This view isn't particularly useful for actually fulfilling the request though. I don't have insight into whether booking the request would overburden the resource. That is why I have another tab which we will discuss in the next section. I'm going to start with the first request in the list, Joyce Sanders.
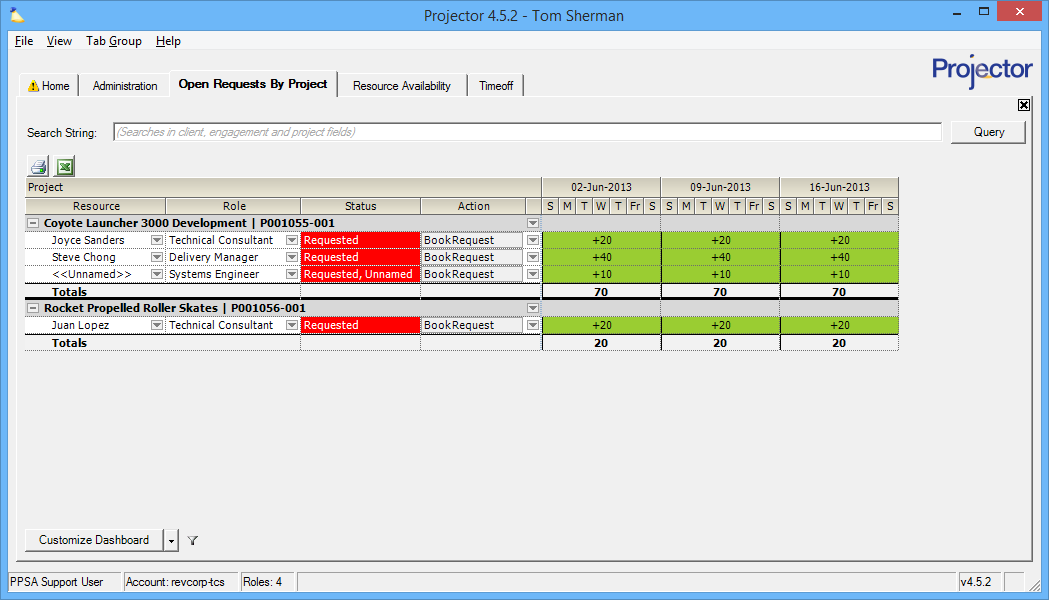
I've configured my dashboard to show me only requests for named and unnamed resources.
Resource Details
Following on from the previous example I've configured a special tab where I only need to punch in someone's name and I receive only information relevant to them. In this case I've looked up Joyce Sanders to see about booking an open request for her. But looking at the results, I see that she is flagged in red and would be working sixty hours weeks. Woops, I better reject this request or book it using someone else.

When configuring my search parameters I made sure to include both Booked and Requested hours. This gives me a 'whole view' of Joyce and all her hours. I also turned on totals and flagged overallocations in red so they stand out. By showing the Action column I am able to quickly jump in and make the requisite choices to make this request work. I'll select Change Booked Resource from the action column, search for someone with similar credentials as Joyce, and book them instead.
My Projects
In this case I want to see all the projects that I am managing and all the people and hours associated with them.
Here I've brought in both booked and requested hours. I've searched on my own last name to limit results to only my projects.

Timeoff
On this dashboard I'm interested in seeing how empty the office will be around Christmas. I know a lot of people take time off around the holidays, but I need at least three support people in the office to handle customer queries. I've constructed a dashboard that only shows the support department, and to flag days when resources are available in green. Dolly has asked for a couple days off around Christmas. By jumping into my timeoff dashboard I can see that just before Christmas, the MT columns, that I have four people available. In the days after Christmas I only have two though. I can give her Mon/Tue.
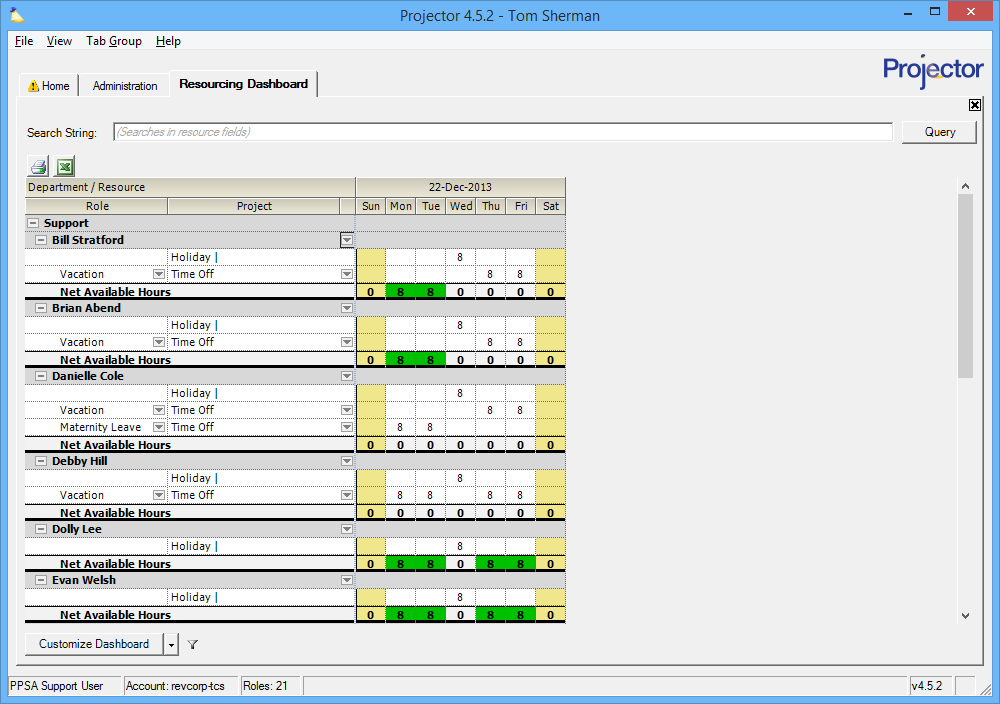
So what choices did I make in the customize screen?
- Filter by resource because timeoff isn't shown in project view
- Show 1 week for Christmas week
- Only show support titles
- Show booked hours because timeoff is always considered booked
- Show named resources because timeoff is always named
- Show net available hours so that I can flag them in green
- Group by resource department
- Only show Role name and Project Name to keep the interface as uncluttered as possible
| Excerpt | ||
|---|---|---|
| ||
check resource availability, book resource requests, and assign users to unnamed roles |
...
To reach the resourcing dashboard choose View | Scheduling | Resourcing Dashboard.
Permissions and Settings
The resourcing dashboard does not require any special privileges. It merely provides easy access to actions you can already perform. Because you can perform many different actions from here, we won't get into every individual permission. The resourcing dashboard is all about roles. So if you can't view a role, you can't see anything on the dashboard. Instead, we'll give you a brief overview. To review all permissions possible, please visit the relevant help pages for the actions you are performing. For example, visit the timeoff help if you are booking timeoff. Here are the most basic permissions you need to view roles:
...
The resourcing dashboard gives you quick access to the Project Editor and Role Editor.
Read the Dashboard
Before we get into configuring the dashboard, let's take a look at a simple case of reading the information in the dash. In the screenshot below you can see three resources. Under each resource are the roles they are currently assigned to. Let's look at the second resource, Joyce Sanders. She is on three roles. The first role is a request for her time. Over to the right you can see then number of hours requested for each week. She already has booked time on two other roles. If you fulfilled her request she would be working 60 hours next week. That seems like too much! Now you've reached a decision making point. Here are some likely options to help Joyce out:
...
You can also see that I have columns for Project code and role. Projector offers dozens of customized columns so that you can see just the information you need. Want to see who Barry's project manager is? No problem! How about the client's name or Barry's department. All of this is configured from the Customize Dashboard screen. See the next section to learn how.
Customize the Dashboard
So you've read through a short introduction on how to view the dashboard, but now we are going to get into the core of the dashboard. Learning how to customize it to show the information you want. When you visit the dashboard for the first time, probably the first thing you want to do is jump into the customization area and tweak it to show the data you want. Start by clicking Customize Dashboard in the lower left. This brings up the customization screen. You'll one of two layouts, both pictured below (click to enlarge).
...
The remaining fields let you filter and organize your data. We'll explain the following subsections what each filter/organization area does and how you would use it.
General Settings
Group your roles by resource or by project? What time interval are you interested in?
...
| Field | Description |
|---|---|
| Filter Assignments By | Group roles by resource or project? |
| Show schedules for | How many weeks of data do you want to see? |
| Starting on | What is the first week you want to start seeing data for? Projector will roll back the current selected date to your first day of week. For weeks in the past, we don't show requests. This is because it is too late to do anything about a request in the past. |
Filter Project / Resource
The filters presented here depend on whether you are viewing your dashboard by Resource or by Project. The filters themselves are pretty self explanatory and explained in the tables below. There is one trick with the dropdown lists though. When you expand a dropdown list, you tick the checkboxes for each item you are interested in. The dropdowns only include active items. So inactive cost centers, titles, etc will be excluded. If anyone you are searching on is still part of an inactive group, they will always be excluded. To always include everyone then you need all checkboxes ticked or all checkboxes unticked. Both configurations tell Projector to 'just get everything.'
...
| Filter Project Fields | Description |
|---|---|
| Search String | Projector searches against the following fields:
You can enter multiple search terms and use our smart searching tools to narrow your results. |
| Cost Center | Return projects whose engagement is in the selected cost centers |
| Engagement Type | Return projects whose engagement is in the selected engagement types |
| Project Stage | Return projects that are in the selected project stage |
| Show closed projects | Show projects that are in a closed stage |
Filter Assignments
The filter assignments area is identical for both Resource and Project filtering. From here you figure out what kinds of roles you are interested in. You might say to yourself, "I want to see all unnamed bookings." This becomes a todo list for filling slots. Or you might say, "I want all roles with no hours." Now you can nag project managers to get their requests in.
...
| Assignment Filter | Description |
|---|---|
| Show assignments with | Tick the checkboxes for the types of hours you are interested in
|
| Show Roles with | Tick the checkboxes for the roles you are interested in:
|
| Show all active resources | Just show every active resource in your installation regardless of whether they have any roles. Useful for finding people that aren't doing anything. |
| Show only roles requiring action | Only show roles that have open requests or are unnamed. Roles in the past are not considered actionable, and are excluded. |
Show Totals Rows
Totals are useful for exactly what you would imagine. See how many hours a resource is allocated on any given week or day. This lets you see how busy they are as an individual. Or, total up hours by project to see how many man-hours a project is consuming on any given week or day. If you are displaying candidate roles, then totals will be off. This is because candidate roles will cause double, triple, etc counting.
...
| Project Totals Fields | Description |
|---|---|
| Project Total | Sum all the hours for a given week or day on all roles returned, and group by project (see screenshot above) |
Customize Columns
The customize columns area is where you add additional data points to the dashboard. These are divided into two areas, Grouping Fields and Column Fields. Grouping fields are for pulling like items together. Column fields add additional data points to the grid. The two areas contain a number of duplicate entries, like both contain resource department. If you add one as a grouping field, it's probably unnecessary to also add it as a column field.
Grouping Fields
Tick off grouping fields when you want to group like roles together. This can be hard to explain through words, so take a look at the screenshot below. I've added the grouping field Resource Location. Now I can collapse sections, unclutter my dashboard, and focus on resource's in specific locations.
...
| Project Grouping Fields | |
|---|---|
| Client Name | |
| Engagement Name/Code | |
| Engagement Code | |
| Engagement Type | |
| Engagement Stage | |
| Engagement Manager | |
| Engagement Time Contract Terms | |
| Engagement Cost Contract Terms | |
| Project Name/Code | Always included by default |
| Project Code | |
| Project Stage | |
| Project Percent Likelihood | |
| Project Manager | |
| Project Location | |
| Project Begin Date | |
| Project End Date | |
| UDFs | Each client, engagement, project, and role UDF defined in your installation will be in the list |
Column Fields
Column fields are for displaying additional data in the dashboard. Most of these columns are informational only. For example, what is the role start and end date. However, a few are special. These columns allow you to perform additional steps, like opening a project or editing a role. Each is detailed in the Actions on the Dashboard section found further down this page. You probably want to include these most of the time. The special columns are:
...
| Column | Description |
|---|---|
| Resource Department | |
| Resource Title | |
| Resource Type | |
| Resource Billable Flag | |
| Resource Temporary Worker | |
| Resource Cost Center | |
| Resource Location | |
| Resource Pay Category | |
| Resource Display Name | * |
| Resource Employee ID | |
| Utilization Targets | Only available when viewing the dashboard by resource. Only displays data for resources whose resource type has utilization targets enabled. The utilization shown is based on the number of weeks you are viewing in the dashboard. For more about how utilization is calculated see Measuring Utilization. |
| Client Name | |
| Engagement Name/Code | |
| Engagement Code | |
| Engagement Type | |
| Engagement Stage | |
| Engagement Manager | |
| Engagement Time Contract Terms | |
| Engagement Cost Contract Terms | |
| Project Name/Code | * |
| Project Code | |
| Project Description | |
| Project Stage | |
| Project Percent Likelihood | |
| Project Manager | |
| Project Location | |
| Project Begin Date | |
| Project End Date | |
| Role Name | * |
| Role Start Date | |
| Role End Date | |
| Projected Hours Start Date | |
| Projected Hours End Date | |
| Role Status | * |
| Role Action | * |
Actions on the Dashboard
There are some actions that can take place directly on the dashboard, like confirming a booking request. Others require that you leave the dashboard and make your changes on the role editor or the project editor. Some actions are available by default. Others require that you add a special column. The special columns are:
...
The subsections below explain when you can access a set of action items and what they do.
Resource Display Name
When you search for roles by resource there is a dropdown arrow giving you five available actions. These are also available if you add the column Resource Display Name. Each is explained in the table below
...
Resource Action | Description | Screenshot |
|---|---|---|
Open Resource Info | Opens a dialog with detailed information about this user as well as working, available, and requested hours. | |
Edit Time Off | Opens the Scheduled Time Off tab of the Resource Editor. Add, edit, and delete time off. | |
Request Resource on a Project | Request this resource on a project. From the popup dialog:
| |
Book Resource to a Project | Request this resource on a project. From the popup dialog:
|
|
Edit Resource | Opens the Resource Editor. The resource editor covers a lot of functionality so you should read the overview page to get an idea of what you can accomplish with this shortcut. |
Project Name/Code
When you search for roles by project there is a dropdown arrow giving you five available actions. These are also available if you add the column Project Name/Code. Each action is explained in the table below
...
| Project Action | Description |
|---|---|
Open Project in Scheduler Mode | Opens up the Project Info Tab in scheduler mode so that you can edit booked hours. You'll only see this option if you have permission to view the project in scheduler mode. See the Permissions and Settings section of this page to learn more about what this means. |
Open Project in PM Mode | Opens up the Project Info Tab in scheduler mode so that you can edit booked hours. You'll only see this option if you have permission to view the project in scheduler mode. See the Permissions and Settings section of this page to learn more about what this means. |
Create New Requested Role | Create a new requested role on this project. You can't request hours at this time, only create the role. |
Create New Booked Role | Create a new booked role on this project. You can't book hours at this time, only create the role. After the role is created you can use the |
E-mail Project Management Team | Starts a new email message in your default mail client. Everyone on the project info tab marked Include on email list. |
Role Name
If you add the Role Name column you'll see the following two options.
| Role Action | Description |
|---|---|
Open Role in Scheduler Mode | Opens the Role Editor in scheduler mode. You need to have scheduling permissions for the project to see this option. |
Open Role in PM Mode | Opens the Role Editor in project manager mode. You need to have project manager permissions for the project to see this option. |
Role Action
The action column is one of the most important in the resourcing dashboard. It is the one place where you can book and reject hours directly from the dashboard as opposed to opening the project editor or role editor. There are eight available options, each described in the table below.
| Action | Description | Screenshot |
|---|---|---|
Edit Requested Hours | Opens to the hours tab of the Role Editor in project manager mode. | |
Change Requested Resource | Opens the resource criteria dialog where you can specify a specific resource or the attributes of the resource you want (location, department, skills and more) | |
Book Request | Confirm this entire request. If you only want to confirm part of the request, you'll need to edit the role. | |
Reject Request | Reject all the requested hours. If you only want to reject part of the request, you'll need to edit the role. | |
Edit Booked Hours | Opens to the hours tab of the Role Editor in scheduler mode | |
Change Booked Resource | Opens the resource criteria dialog where can search for a specific resource to book | |
Open Role in Scheduler Mode | Open the Role Editor in scheduler mode | |
Open Role in Project Manager Mode | Open the Role Editor in project manager mode |
Role Status
This column actually has no actions, but it is a useful column and typically you will want to have it enabled. It's a great companion to the Role Action column just discussed. It displays in bright blue or bright red whether you are looking at booked hours or requested hours. Candidate hours will have a hashed grid over it.
In Practice
If you jumped straight to this section, I don't blame you. The preceding sections contain a lot of dense information, but a few real world examples do a lot to give you an idea of what the dashboard is capable of. I would encourage you to learn how to setup multiple tabs in Projector. This will allow you to have a set of predetermined dashboards that show scenarios most important to you.
Each section will contain a short introduction of what I was trying to accomplish as well as a screenshot of the dashboard. Below, I'll have a screenshot of my customized dashboard so that you can see the choices I made and why.
Open Requests
Here I've organized all open requests for the next three weeks. They are grouped by project so that I can see how many hours any individual deliverable is consuming in a week. This view isn't particularly useful for actually fulfilling the request though. I don't have insight into whether booking the request would overburden the resource. That is why I have another tab which we will discuss in the next section. I'm going to start with the first request in the list, Joyce Sanders.
...
I've configured my dashboard to show me only requests for named and unnamed resources.
Resource Details
Following on from the previous example I've configured a special tab where I only need to punch in someone's name and I receive only information relevant to them. In this case I've looked up Joyce Sanders to see about booking an open request for her. But looking at the results, I see that she is flagged in red and would be working sixty hours weeks. Woops, I better reject this request or book it using someone else.
...
When configuring my search parameters I made sure to include both Booked and Requested hours. This gives me a 'whole view' of Joyce and all her hours. I also turned on totals and flagged overallocations in red so they stand out. By showing the Action column I am able to quickly jump in and make the requisite choices to make this request work. I'll select Change Booked Resource from the action column, search for someone with similar credentials as Joyce, and book them instead.
My Projects
In this case I want to see all the projects that I am managing and all the people and hours associated with them.
...
Here I've brought in both booked and requested hours. I've searched on my own last name to limit results to only my projects.
Timeoff
On this dashboard I'm interested in seeing how empty the office will be around Christmas. I know a lot of people take time off around the holidays, but I need at least three support people in the office to handle customer queries. I've constructed a dashboard that only shows the support department, and to flag days when resources are available in green. Dolly has asked for a couple days off around Christmas. By jumping into my timeoff dashboard I can see that just before Christmas, the MT columns, that I have four people available. In the days after Christmas I only have two though. I can give her Mon/Tue.
...